ZBrushCentral

gobblin creature

newgobblin3.jpg

Hey, this is a new project I am starting, and practicing with head modeling, or modeling all together.

[color=indigo]For NOOBS: Being a noob myself “somewhat” I put some liittle notes on the picture.

open z-b, go to document, set up size to 2000x2000 or bigger, then go to top right hand corner, and hit the AAhalf button, then draw on your canvas and work in your space.

After getting your shape, and subdividing a bit, you can go to texture, set the resolution to Max amount, and click new. now you can click projection master drop your object to canvas and paint on it or do whatever, then pick up.
For modeling purposes, you can use projection master, zoom in and out (top right hand corner) add lines, or use sub for creases, then use blur brush, to smooth them out, then pick up, and there ya go!

I feel pretty foolish giving advice, by Noooo means do I think I know squat about z-brush to offer advice, but if there is a noob out there as lost as i was for so long, maybe this can help? :confused:

hey spaceghost…

have to say you are improving with each post by 100% over previous…keep going…taint nuttin can stop ya now man!

i tend to struggle with the eyes myself i usually put the spheres and mask them then i model around thanks for the tip;)

gobblinguyy3.jpg

Hey hey about the eyes, that is the worst part for me too, I can’t really do eyes and eye sockets, to find that curve for the eye, and then to sink them for the actual eyeball is tough, but the toughest is getting that crease between the brow and the eyeball, ahhh crap it’s all tough.

A technique you can try, which i’ve only done like once with not much success, is in projection master, draw 3Dspheres over the eye’s area, and size them accordingly, then when you pick up, it will deform your geometry to the spheres, giving you that perfect roundess, you can also resize them and sink them to get the sunken slits for the actually eyeball to go into. I like this creasing method “sofar” and you can adjust the crease level so that it will smooth after your 3rd or 4th subdivision, granted you have to use the move tool to play around with the corners and what not. Don’t forget fine adjustments are tough and wacky so you can slide your subdivision level back down to do “gross” adjustments, then slide it back up and you don’t loose fine details that you made at a higher level.

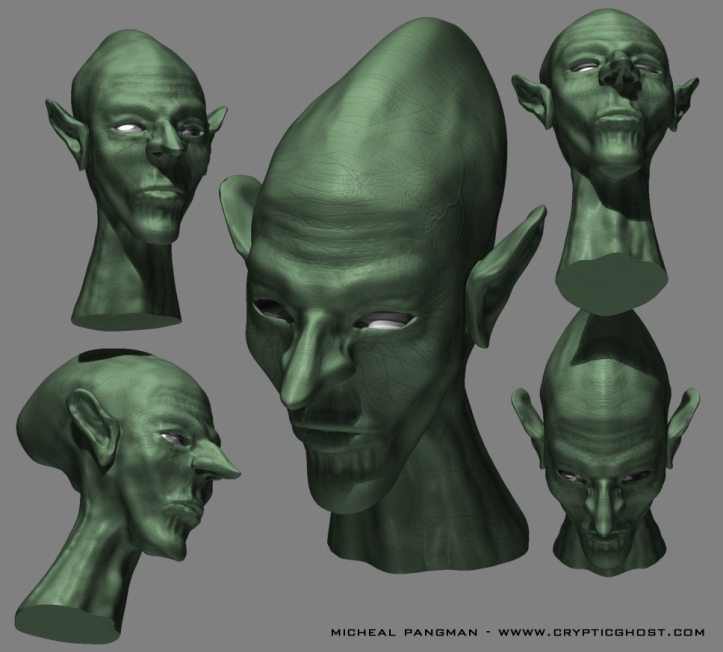
Skin and Material on this guy: I watched a tutorial on Z-MAPPER last night and messed around with it, though it is a little too advanced for me. Anyway, I used Z-Mapper to make a map of the head which acts like a texture map, and displacement map, any hoot, I used this map for my bump map (which I just figured out how to do). O.K i modified the texture a bit with basic material 1, copied the shader, then selected the Double Shaded material, then copied my shader into that, and messed around with settings in both shader buttons S1 & S2, to get a sub-scattering / multi bumpy skin. O.K I’ve blabbed long enough, especially when i am just mashing buttons, and sounding like i might know what I am talking about… :lol:

Thanks for the comments Aminuts, the positive feedback is always encouraging to push the envelope. If your a “wicked noob” and think I can help you, always feel free to message or e-mail, I am always willing to help, if it wasn’t for Aminuts here, I would still be making aliased cubes…

gobblinlayout2thumb.jpg

I modeled the cloak, exported as wavefront.obj, ran a dynamic cloth simulation in poser, imported it back into zbrush, subdivided, and smoothed. Modeled the sicle in two seperate parts, staff and blade, then later merged to form one model. I modeled the hand out of z-spheres, then made it a unified skin, since I couldn’t get the geometry right by doing addaptive. although I might have to redue it, since I deleted it’s lower levels by accident, and I need those for z-mapper to make a bump map :cry:

this is kinda where this picture is going, I might change the sicle to something else, and add a little environment, and render in color. Modeling takes so much time as apposed to poser where you just load and compose, but it is much better feeling to show something that is completely original. o.k, until the next render!

Oh i forgot to add, the dynamic simulation had the left arm going behind the back, as to stand somewhat formal, or at attention, thus you don’t see it hanging, but I might throw it in, just a nudge… o.k thanks!

Attachments

gobblinlayout2.jpg

i am diggin watchin your progress. Am loving how you are using a prog that you know and using it to help you with one you are learning. Keep going! Am having fun watching the light bulbs click on and enjoying the results…the talent is obviously there…just keep at it!!

Am pretty sure with your persistance you for sure will have a top row pic much sooner than you think!

gobbycolor2thumb.jpg

o.k here is what the colors are probably going to be, I don’t have any feet, hence the crop, don’t know if I am gonna put them in, does it make a difference? because i could finish out a scene “i think” without them? Also I don’t know if i should stick with this weapon or the sicle? I like this one. O.K i am open to suggestions for what scene to place him in, or anything for that matter (blackish eyes, color eyes/pupils iris etc.) Thanks. and thanks again aminuts, I am glad I can find a fan in you. :slight_smile:

Attachments

gobbycolor2.jpg

hi

here is my mini crit so far…the cav shader or shadows in the robes completely hides the rolling folds. too much contrast there. when i add a cav i try to take the diff color and select one only slightly darker…this way you can play with intensity or curve or cav diffuse settings to get it just right. the idea being to enhance your work not detract from it. and besides…it just made me go grab a bowl of vanilla fudge ice cream and after finally losing 20lbs…i probably will have to hunt you down now!:wink: Just kidding, I am the master of my own demise thank you.

also am curious about how he fits into the scene you have in mind cuz the scythe faced toward him yet the new weapon faces away so the eyes are taken out of the “scene” at the moment.

Keep going!!!

headingtowardfinalgobblin22thumb.jpg

this is pretty much towards the end, I might add some more detail, add rag to weapon, maybe make a clothing shoulder bag prop, or something? I don’t know?
I did take your advice Aminuts, and do some color matching on that cavity shading. I also reworked the ear, to connect to the head in a more linear fashion instead of looking like a seperate model. I did the weapon without the tribal design in the blade (i don’t know) o.k feedback, ideas, advice, certainly welcome, darn z-brush is cool :stuck_out_tongue:

wooosh I always forget to add something. I modeled and added feet, they are detailed, even though I knew they wouldn’t really get in the scene to much… lobbidy daa… peace~

Attachments

headingtowardfinalgobblin22.jpg

Diggin the latest render! Has a nice feel to it. :smiley:
Something about the blade on the weapon just doesn’t feel totally metallic to me. Not sure what it is… maybe go in projection master and add some minor scratches or unpolished bits.

thanks for the feedback tidalias, I do agree with you, and will attempt to do what you suggested, and even mess with the material it’self. I also want to do a larger render, or get in closer to the character, i don’t want to redraw everything and set in place, but Oh well… i would say the next one will pretty much be the last. :rolleyes:

final gobblin thumb.jpg

o.k here it is, i am done. the background I made in Terragen.

I learned all i wanted to from this piece, onto the next~ thanks for the feedback, and suggestions, it did affect the picture.

fellow z-brusher,
m.e.pangman

Attachments

final gobblin 4.jpg

Great final render! Looking forward to your next project. Looks like you’re learning a lot along the way. :smiley: