ZBrushCentral

First attempts

Hey Man that’s some major progress. Looks awesome!! Yeah it still find that traditionally starting from low res yields better results going back to that process myself.

Thanks, Crevasse! This is by far the biggest project I’ve undertaken and I have no idea how some of you guys do it. 26 subtools (so far), 14 million pollys and growing. But with everything I add I learn a little bit more.

Today’s update…

Kane.jpg

The pose looks stiff. Yes, I know, mine poses doesnt really work that well either. What you can do is, make someone take a picture of you in the position you want your sculpt to be in, use that as reference. Or you could go on the internet, but you could spend hours without actually finding a good photo of the pose you want.

You’ve improved alot since your first post :slight_smile:

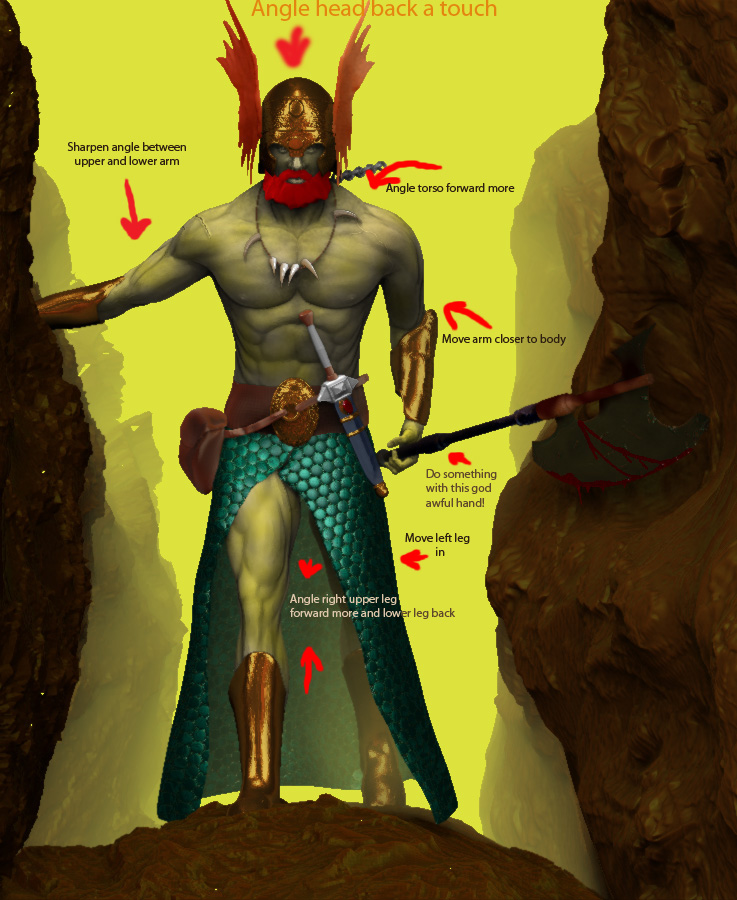
Thanks Victor! I noticed the stiffness too, and I’ve already got some ideas about how to fix it but I figured I would wait until I’ve merged some of the subtools to the body so I don’t have to go through the pain of repositioning every little thing again. I’ve probably gone through that process 20 times already while tweaking what I have already, sooo… :smiley:

If you or anybody else knows of a way to speed that process up, I’d dearly appreciate the help!

Edit’; I’ve thought about transpose master, but I can’t seem to figure out how to use it correctly, so tips in that direction would be a good thing too.

I couldn’t resist…

Kane_color.jpg

Hi VoodooDad :slight_smile:

http://www.zbrushcentral.com/showthread.php?&p=894137&viewfull=1#post894137

Gesture Sculpt Dynamesh Technique…bottom of the page in the link posted above.

Above is a link to a really great technique for getting the gesture of the figure in place first, before you go into detail and accessories…If you get that gesture correct to start with, then you won’t have to use transpose and the resculpting of the parts that you move using transpose that much…The technique in the link above will cut the work and the high subdivision count that you are having issues with now down to a minimum…which is GREAT :slight_smile:
If you do alot of little stick figures/gesture sketches using the Dynamesh technique that’s in that link above, you are bound to end up with the correct body gesture,…which you can then build upon…You can always add on your subtools and accessories that you’ve made already,…and even use the slice brush to capture the head you already made and add it onto the new Dynameshed figure…The move topology brush works great for shifting things around once they are in place on the underlying foundation.
Anyway,…I just thought that I would throw those thoughts and the link to that great tutorial into the mix, as you progress with this piece…That new Dynamesh feature in ZBRUSH, is a fantastic one, and the possibilities it provides are just as fantastic…might be just the thing that you are in need of to make this journy that you’ve entered into that much more easier…:slight_smile:
Keep up the Great progress man…Looking forward to seeing it progress…:+1:small_orange_diamond:)
Glenn

Tip: What might help the look of the leg is to give it a kneecap rather than that cease down the center of the leg. I might be wrong, but the muscles don’t seem right on the upper leg either.

Glenn; Thanks once again my friend. (Note to self, check ZbrushCentral for tutorials BEFORE google!)

LD; Thanks man! Now that you mention it, you’re right. I’m going to bulk out his major muscles a little more anyway to give him a more knotted look (if that makes sense) and that will go to the top of the list.

Here are some plans for tweaking the overall pose. If you guys spot anything I missed, please let me know.

Kane_color.jpg

Had to step back from Kane today and work on something a little more fun.
Marvin1.jpg
I’ve been wanting to do some hard surface work and finally just buckled down and did it. What was I afraid of? It was a blast!
Comments? Crits? Marvin hate???

Ha, so simple yet so effective! Love it, very clean and smooth.

Thanks Dragon! I decided to try shadowbox (finally!) and just got inspired! I can’t see beginning hard surfaces any other way now. I think Kane is gonna have a bit of a vacation while I unlock the hidden gems I can find with shadowbox!

Going with some hard surface sculpting again, I decided to make my first mech. Right now I’m roughing out a shoulder mounted gun for the big guy.

Ya, shadowbox is cool (I am working on a hotrod right now and it’s how I started the body, in shadowbox). Liking the gun, again, so clean. Hope to see more. Best.

Thanks again Dragon! I was looking at some of your hard surface stuff the other night and that’s part of what yanked my own hard surface trigger (so to speak):D! Really like the hot rod you’re working on.

And of course I can’t resist posting one more update for the night… or morning… or whatever it is right now…

For now my working title for this is “And the Shoulder you rode in on!”:cool:

gun_shoulder.jpg

haha I recognized that depressed little robot from the movie, but it should have a bigger head imo! nice progress on the gun, but try to add more sharp edges.

You’re right about Marvin’s head. I meant to correct that when I was working on it, but forgot. I’ll fix it when I have the chance. As for the gun, I’m just roughing out the major masses right now, with some concepting of the smaller details. I’ll have to go back and sharpen everything up when I’m close to finished.

Thanks for the comments, Uber!

Some more progress.
mech.jpg

Voodoodad, I am glad I was able to put a ‘little spark’ into you to do some hard surface sculpting. I hope to finish the HotRod this week (we’ll see-;)).
You know, ‘IF’ you need some more guidance on making weapons in ZBrush (or simply inspiration), I think there is no body better at doing so than Etcher (Geert Melis). You have to view his amazing work here (when you get there, start scrolling down):
http://www.zbrushcentral.com/showthread.php?78703&p=897257&viewfull=1

Or his amazing website:

About your weapon, I am digging the CONCEPT, very cool looking. Very futuristic like. Can’t wait till you start giving it that ‘sharp’ look (as uber points out). Keep going my friend, keep going.:+1:

Oh, my frikkin’ GAWD! Etcher is amazing! That tutorial is gonna save me no end of heartache. Don’t know how I missed it, but I am eternally grateful to you Dragon for pointing it out. Saying you’re gonna clean things up in the end and actually knowing how to do it are two way different things.

Thanks again, Dragon!

Ha, ha, ha… your funny. But, I know you WILL get ‘there’. Just to let you into a little secret, I have been working on my HotRod image for over a year now. But, it has not been so much about MAKING the thing, but learning ZBrush to get the results I want, in between helping my wife raise our children, my 8-10 hr a day job, vacations, running kids to the hospital when they get sick, fixing the car, writting people, talking to family on the phone/skype, studying anatomy (drawing with a pencil and paper-:D), etc. But, one thing is for sure, I am a very patient man and I HOPE by the end of THIS MONTH that I finally finish THIS FIRST FULL 3D image I am working on (as I have so many others I am looking forward to do, only I know it’s not going to take me as long on the next ones).

So, what I am trying to say is… YOUR DOING FANTASTIC-:wink:

Yes, Geert is something else with ZBrush.