[attach=10265]TinyToolsLogo.jpg[/attach]
Tiny Tools consists of 5 small zplugins, each one expanding upon an existing Zbrush function.
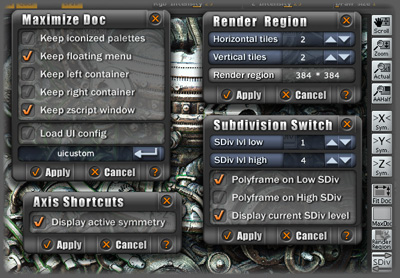
[attach=10270]InterfacePreview.jpg[/attach] [color=orange]Render Region
What: Renders multiple 192*192 render tiles.
Why: The default Cursor Selective Render ( CTRL/CMD + R ) does not always render a large enough area, therefore requiring repeated Cursor Selective Renders. Render Region is useful when test rendering small to medium sized areas of a document.
How: Press the Render Region button to access the interface. Press  for more help. Use the shortcut, Shift + R, to render the area under the cursor.
[color=orange]Max Doc
What: Maximizes the Document Window or switches between the current and a user defined User Interface.
Why: The default Maximize Document View button removes any undocked palettes and interface items. Loading a UI configuration is then needed to return to the previous UI.
How: Press the Max Doc button to maximize the document view, press again to restore the user interface. Shift + press the Max Doc button to access the settings. Press for more help.
[color=orange]Fit Doc
What: Adjusts the zoom factor to fit the current document in the Document Window.
Why: For viewing the entire document on screen. Handy when working with large documents.
How: Press Fit Doc once to fit both document axes into the Document Window. Press again to fit the smallest document axis into the Document Window. Shift + Press for help.
[color=orange]Subdivision Switch
What: Quick access to 2 subdivision levels.
Why: When making global changes to a model it is good practice to edit at a low subdivision level and view the results at a higher subdivision level. A single button to change the subdivision levels makes it easier.
How: With a subdivided PolyMesh tool simply press the Subdivision Switch button to switch between subdivision levels. Shift + press the Subdivision Switch button to change settings. Press for more help.
[color=orange]Axis Shortcuts
What: Symmetry axis and Deformation axis shortcuts.
Why: At high monitor resolutions the deformation axis switches can be difficult to press, especially when Zbrushing long into the night.
How: Hover the cursor over a deformation slider and press the X, Y and Z shortcut keys to toggle a deformation axis. When the cursor is not over a deformation slider the shortcuts act as normal and toggle the symmetry axes. Shift + press one of the 3 Axis Shortcut buttons to open the interface. Press for more help.
How to install:
Download the compressed TinyTools.zip file from below and unzip into the Zstartup/Zplugs folder. If you do not have a Zplugs folder then create one. Make sure you unzip the file with its folders intact.
Next time you start Zbrush you will find 7 buttons in the Zplugin > TV tools > Tiny Tools subpalette. These can moved around the Zbrush interface like other buttons and their positions stored in the User Interface Configuration (CTRL/CMD + SHIFT + I).
Hope you enjoy.
I would like thank Marcus_Civis for helping me with the Shift + press functionality, it is a great way to cut down on interface clutter. Thanks, I would never have figured it out without you. Also a special thanks to Chadtheartist for catching a few features (bugs) and Mac testing the zplugins.
Attachments

 Not only are they very handy and speed the workflow but the design is beautiful. Those buttons fit snugly on the right shelf.