Woah, hey Nick! It’s been…geez, a while. Nice to see you again!
Bought a dvd on z4. The presentation was excellent and the intro music was badass! Great to see this.
Eat3d 
Thank you so much for putting these together. VERY informative and your explanation and walkthrough are easy to follow along to.
Pav’s videos are magic over on Eat3D, great move Pixo!
Great Tutorials, they are a big help, Thanks
Fantastic tutorials, thank you. Looking forward to more.
Ok. That’s it. Just watched Part-3… I’m getting Michael’s Eat3d “character production” dvd. Soon to be followed by the “new features” one i’m sure 
Thanks for these vids, Pixologic and Michael!!
Thanks you Pix and Michael! Very to the point intuitive videos these… Keep them coming….
Thank you very much! Great help really!
Could you please clarify a bit more, how with the mesh insert brush you can snap the newly inserted mesh straigth-upright to the center of the “mother”-mesh.
I’m not sure how to determine the center of an arbitrary mesh and have your insert brushes snap to that point (if someone out there knows, please post!), but here’s a few things that might help with the “straight upright” part:
To draw out an insert mesh straight out from your camera view (have it ignore the surface normals of the underlying mesh), go to the Picker menu, and click on the thing that looks like a circle (it’s actually an arrow if you click and drag on it, but since we just want to draw our insert meshes straight toward the camera, just clicking it will give us what we want)
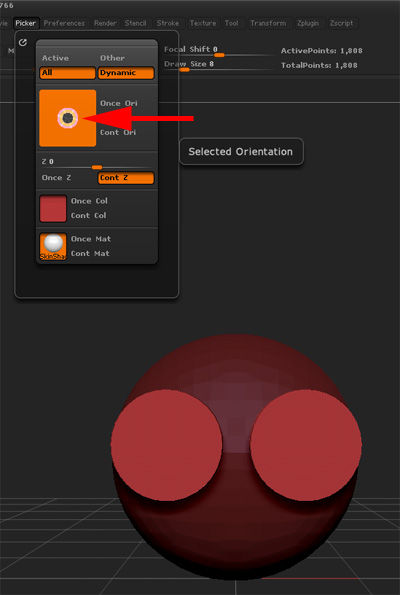
Now when you draw out your insert meshes, they’ll come straight out; from there, it’s just a matter of using transpose to position them (if you want to rotate and snap to an angle, just hold down shift while you transpose-rotate, for example if you want to rotate them perfectly vertical)
Turning on transparency (with ghost selected) will sometimes give you a good idea of how far into the mesh your insert brush is while you’re drawing it.
Another thing I forgot to mention is, under the Brush > AutoMasking menu is where you’ll find the Auto Mask Mesh Insert toggle (this tells ZBrush whether or not to apply a mask to your base mesh / previously drawn insert meshes). It’s on by default.
Hope that helps!
Wow, where have you been hidden? What an AMAZING educator! There are a few good ZBrush instructors out there and you sir are right there with them. You give the feeling of an artist talking with other artists i.e. not those few folks that come from rocket engineering- backgrounds that see the oportunity to make money in the 3D realm and learn art afterward or from ARTIST’S at the company they work… but someone that was first an artist then learned the technical (computer) stuff to bring the rest of us (artist’s) up to speed. And if you are one of those folks, then, you did a great job getting up to speed with your artistic side-
ArtBot mentions some videos you have made, I am going over to eat3D and purchase them!
Look forward to the rest of these videos.
Awesome stuff mate, Thanks for the tutorials,
I was wondering if you could shed some light on your rendering techniques used to create the image?
Also on your website, in the misc section, it looks like you’ve used the defualt zbrush skin shade, could you share how to got these nice renders both with polypaint and without?
I appreciate your help
Thanks
For sure! I’ll make a quick post about the guys in the misc section of my website, and when I get home from work tonight I’ll make a similar post for the Dynamesh character (same basic principles, but a little more involved, the “misc heads” are fairly simple)
First, the misc heads were rendered quite a bit ago, but you should be able to get similar (actually, better!) results using the render passes in the newest version of ZBrush.
Here’s the layer palette of my setup before I start, so you can get an overhead view of how my file is set up. I wanted to keep everything separate and non-destructive, so I could make changes on the fly to any aspect of my image (ao, shadow, lights), and also have the ability to swap different diffuse bases and keep my lights and shadows nice:
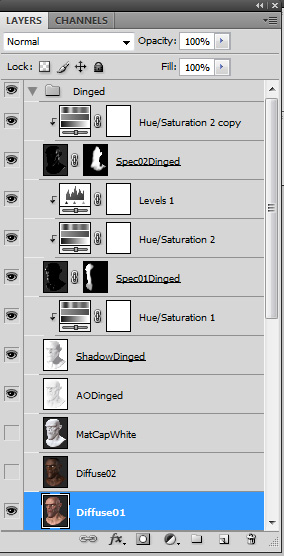
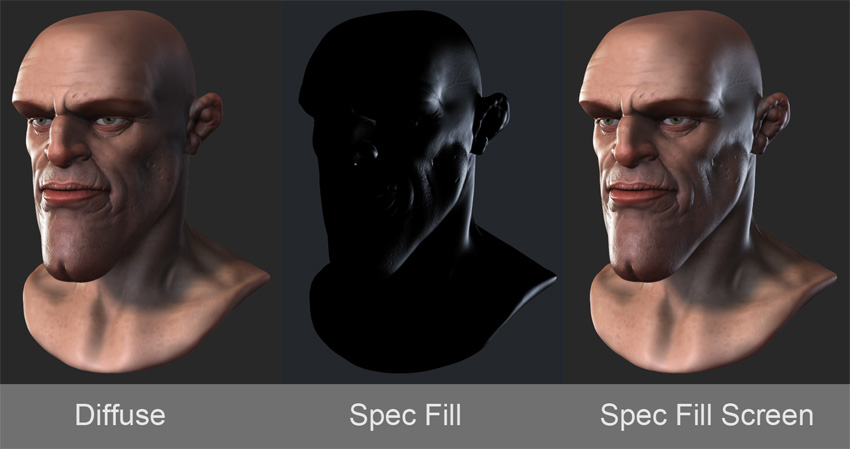
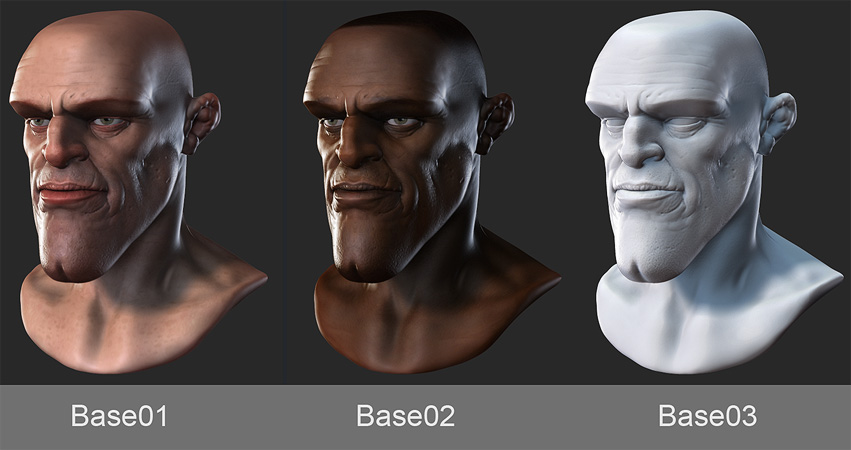
The bottom 3 layers are my diffuse renders:
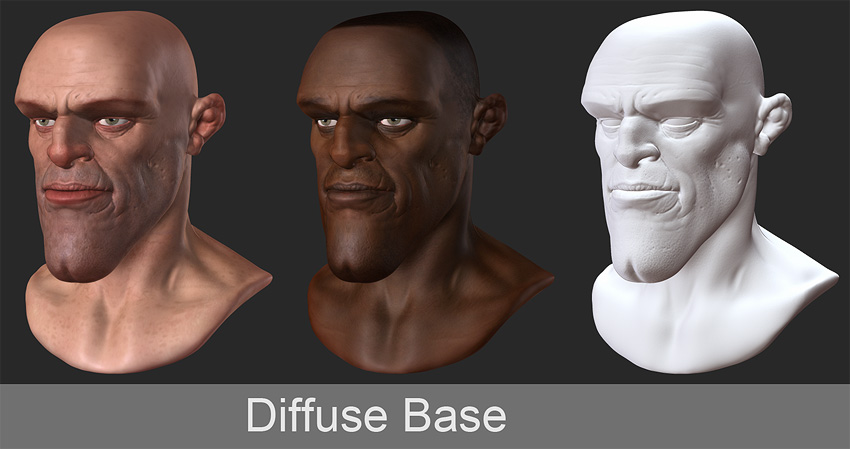
Like you said, this was just the default skin mat…not even sure if I tweaked any settings (sorry it’s been a while). The one on the far right I believe is a render of the MatCapWhite01.
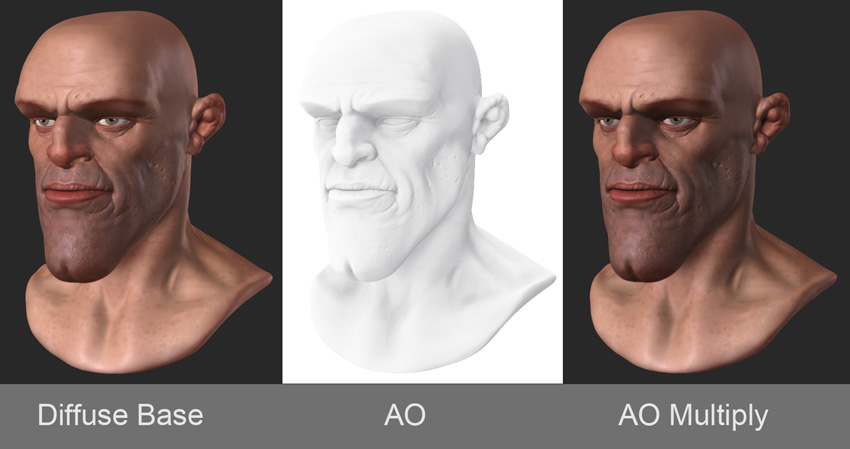
So when you do your renders, you’ll be able to have Shadow and AO (and SSS, which I’ll use in the pirate example) show up in your Render > BPR Render Pass menu, as long as those are turned on in your Render > Render Properties.
I’ll multiply my shadow pass and AO pass over the diffuse base:

You’ll notice in my layer palette image that I have a Hue/Saturation adjustment layer for my shadow. You might also notice it’s “connected” to my shadow layer by a bent down arrow–this is a quick way to have any layers (adjustment or otherwise) above your base layer to be only applied to one layer (in this case, the Shadow layer).
How you get that is to have your shadow layer, create an adjustment layer above the shadow layer (bottom of the layer menu, the black/white circle), then hold your cursor in between your adjustment layer and shadow layer and hold down the “alt” key. You’ll get an icon that looks like an arrow with a circle above and below it–left mouse click when this icon appears, and it will link the adjustment layer to ONLY the shadow layer. This way it only turns my shadow blue, and not everything below it!
For my rim and fill lights, I’ll turn off colorize (the paintbrush icon in your subtool palette) for all of my subtools, choose black as my color, select a basic material, and just move my light around until I get the spec that I want. To get a nice rim light, I’ll click the red dot that indicates the light position, which sends the light around the back of my object. I’ll also play with the spec on my material to get a tighter falloff for my rim, then loosen the spec back up for a broader falloff on my fill. When I do a bpr render for my rim and fill lights, I turn off AO and shadows, and export just the light information over black.

Again in my layer palette image, you’ll see I have Hue/Saturation adjustment layers. You also might notice I have layer masks linked to my light pass layers–because I didn’t render with shadows or AO, I’m getting light where I don’t want it and it looks unnatural; to combat this, I’ll apply a layer mask to my light layers (select a light layer, then click the layer mask button at the bottom of the layer palette). I’ve found that it’s faster to invert my layer mask (select the layer mask and go to Image > adjustment > invert, or Ctl + i ), then paint in with a white brush where I want my light to fall.
Having my file set up this way allows me to swap out my render bases, and keep all of my adjustments:
I also have a thread here on ZBrush central dealing with similar information (it’s really old, way before render passes, but has some good info in there), but I can’t seem to find it through the search. I’ll try and track it down later today.
Thanks for the question, hope this helps! It would be a lot easier just to make a quick video of this, it’s really not as complicated as it looks in text. Maybe when I get home tonight I’ll throw together a quick video if you think that would be better.
Thanks for these, really helpful!
And thanks for the rendering breakdown!
Found it!
http://www.zbrushcentral.com/showthread.php?79772-ZBrush-Character-Production-DVD-info-and-Artwork
Like I said, this is pretty old, but there might be something in there that’s useful. Scroll down about 3 or 4 posts.
Michael, a video showing your render process (ABOVE) would be awsome!! I have tried so many times to get that ‘rim’ light and am unable to do so (unless I go into PS and do it manually, which is not the same). I am going to attempt it in a bit from your ‘writtings’. But, ‘IF’ you have the time, a video would be just dandy-
I own one of your DVDs and learnt a lot from it. Awesome stuff here also. By the way what did you design your site in? Really like it.
Sorry about the late reply guys! Had some sod delivered a day early, so I got to spend 7pm - 10:30pm throwing my back out. Looking forward to a sweet lawn though!
I’ll try and get that video up this week!
As for my website, I asked my buds on facebook for some suggestions; after looking them over, I ended up giving Imagevue a try (www.imagevuex.com). It’s a one time fee, and all you basically do is download their files, FTP them to your domain (make sure it supports php), then just follow their directions. I had the entire thing up and running as you see it now in about 40 minutes after downloading it (definitely needs some tweaking and right now it’s basically just a garbage dump of old renders, which I’ll comb through probably this weekend). But it’s super easy to upload, organize, it creates thumbnails automatically, and you can even generate them manually, crop them and whatnot, all on the fly and have it do all the hard work for you.
Anyway, it was Eugene Fokin who suggested Imagevue, and it does just about everything I needed it for–simple and easy upload, organization, and maintenance of my stuff. Good enough
Here are the other suggestions I got:
www.Imagevuex.com
Cargocollective.com
Krop.com
Virb.com
squarespace
Hey Michael,
Thanks for the breakdown, that was awesome and was a great help!
I appreciate you taking the time to do this kinda stuff!
A video would be great too! If you could touch on your render settings a little possibly for shadows and AO passes in the latest zbrush render passes
I always fail to get a good AO and shadow pass/layer
Thanks again
Thanks Mike. Appreciate the info.