ZBrushCentral

Did You Know That (ZBrush 3.5)

Hi Paul, thanks as this would be great as they are really good tutorials and it would be a waste not to be able to follow them.

I find these particulary user friendly as in may of the other good tutorials, I find the guys getting carried away in their skills and not really showing what ZBrush can do. They have there place to, but one has to develop your own style based on what ZBrush can do, I think there is still a lot to come…

Thanks again.

Ziggy

look forward to the maya vid :slight_smile:

hey gabo, many thanks for these great tutorials, helped me a lot…! just one more thing, can you please put them to download…? or give us a download links…?, cause not every one has good net speed…it will be really helpful…!

thanks in advance…! :wink:

Paul as per your request in your first post. :slight_smile:

I want to make a diorama (scene) - lets say I have some rocks ztools, some trees ztools, a bridge ztool, etc. I want all the ztools to be combined into one ztool but space between them. What I have read is that this could be done with Multimarkers and/or the Subtools (OTHER). And when doing this is it better to paint/texture each ztool first or after combined into one ztool. How to do this?
TIA
John
SpaceMan

Hello SpaceMan

You can use subtools for this. Here is a link on the Wiki that will help you with this. http://www.zbrush.info/docs/index.php/Subtools

As far as texturing the ztools. You can of course do it all individually and then append each tool to the main tool. Or you can append each tool and then texture each. Just keep in mind that ZBrush can not have multiple textures, so click the TXR>COL in the texture palette of the tools before appending. This will make any texture you have be poly painted onto the tool. If you have never used subtools before I would recommend doing everything individually.

This is how subtools works.

Load all of your tools
What ever tool you want to be the main (maybe the ground)
Under subtools click append
Select the tool you want to add
Use transpose to move your tools around
http://www.zbrush.info/docs/index.php/Transpose

Is this what you were looking for? If you need more info I can put together a quick tut a this.

Paul

Thanks Paul I think the wiki answered most of my ouestions to start.

Ok Team

As asked for here are the links to download all the high resolution videos. I am working on some videos to put up this week. Sorry I’ve been at SIGGRAPH:D

Enjoy

Cavity Map Video

http://www.pixologic01.com/zbc/didYouKnowThat/Cavity_Map.mov.zip

Displacement Map Video

http://www.pixologic01.com/zbc/didYouKnowThat/displacement.mov.zip

Merge Multiple Subtools Video

http://www.pixologic01.com/zbc/didYouKnowThat/Merge%20Mutliple%20Subtools.mov.zip

Transpose Master Video

http://www.pixologic01.com/zbc/didYouKnowThat/Transpose.mov.zip

Normal Map Video

http://www.pixologic01.com/zbc/didYouKnowThat/Normal_Map.mov.zip

From here on out I will have links to high resolution for all videos. Thank you for the feedback.

Paul

[DidYouKnowThat.jpg]

Great and keep them coming… for Artsake…

Ziggy

Paul,

Nice job on presenting these concepts in a clear and concise manner.

Regards, James.:+1:

Hello Everyone

As promised here is the video showing how I took the Displacement, Normal, and Cavity Maps into Maya to render out with Mental Ray. Keep in mind all of the settings I go through may vary from Mesh to Mesh.

[veoh]v15625038hw3JnSJ3[/veoh]

This is the link to the download the HighRes video

[font=Calibri]http://www.pixologic01.com/zbc/didYouKnowThat/HighRes_MayaRender.mov.zip

Sorry to those who use YouTube to watch. The video is too long to put on YouTube. Thank you for taking a look at all the videos and as long as they continue to help I will keep making them.

Paul

small_icon.jpg

Thank you for the tutorail, this couldn’t of come at a better time one question about pluggin the normal map in maya I usually use tangent space normal could you explain the difference.

You dont happen to be able to do one of those only for 3dsmax? Even if you dont, great thread. :smiley:

I subscribe to that…what about 3DSMax ?
thx

Hello aesis412

The difference between a Object Space and Tangent Space map is this. An Object Space map is the local 3D space of an object. Up is always up and right is always right. What I mean by that is it is an uniform space is what the world is really like. If you had a normal map of a spike and put it on the bottom of an object. The spike would look like it’s going into the object.

Tangent Space is away from the surface. It follows the normals. So for the above example because the normal of the cup would be facing out not in the spike would look like it is coming out of the bottom.

In most cases it is best to use tangent space, in fact that is usually what I use. It is more accurate. For this demo the cliff I was using was for the most part a plane so I wanted to show what object space would look like. I have included a render of the same cliff with a tangent space setting.

Remember, for every mesh you have to play with all the settings to find which one works the best. The settings for each mesh may vary a little but usually you will find settings that will work for most of your meshes with little adjustments.

[[attach=104642]Tangent.jpg[/attach]]Tangent.jpg

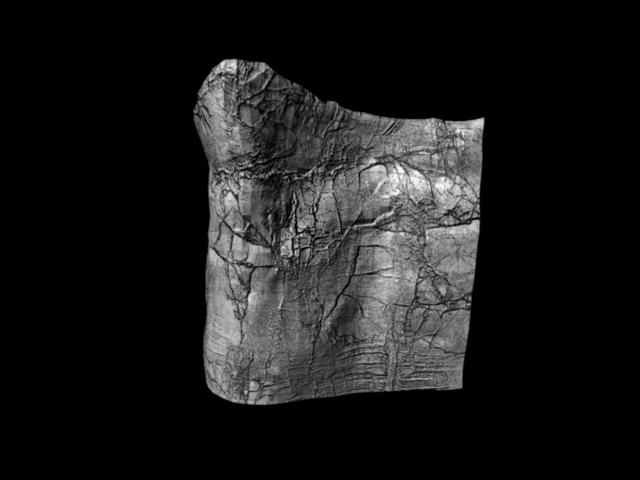
Thank you for the question and please keep them coming.

As far as the workflow using 3DSMAX. I don’t use that application but I have some friends that may be able to help on that.

Cheers

Paul

[small_icon.jpg]

Thanks gabo1991, that would be great. :+1:

A sea of thumbs to you sir
:+1: :+1: :+1:

Now hopefully it’ll work for me too when i do it.

Great tutorials, thanks for sharing!

One other thing regarding tangent space vs world/object space, only tangent space supports deforming the surface. So if you’re doing a rigged animated character, you can only use tangent space.

Hello

Here is this weeks video. This is a feature in ZBrush that I think many people do not know about or how it works but it could save some headaches for some of you. When you are using the pinch brush have you ever wanted to add more detail but you couldn't because all of your polys have been pinched together? Well duh thats what the brush is suppose to do. However, this video will show you how to reconstruct your polys quickly so you can add more detail around the pinch. The tool is found in the Tool Palette under Geometry and is called

Reproject Higher Subdiv

Enjoy [veoh]v15797072dBmcMTsN[/veoh] This is the YouTube link [http://www.youtube.com/watch?v=EOp1523Ky9w](http://www.youtube.com/watch?v=EOp1523Ky9w) Here is the link to download the high res version

http://www.pixologic01.com/zbc/didYouKnowThat/reproject.mov.zip

Thank you everyone for taking a look at the thread.

Paul

[![small_icon.jpg|100x76](upload://BquI10tcEK3LvoSRALWAMg2H19.jpeg)]

“did you know that” it is a good idea to store a morph target before dropping down, guess why. also that if you go all the way down and move your verts/polys manually to where you want them you get better results.

thanx alot for sharing videos !