Heads coming on great, Brian… small_orange_diamond
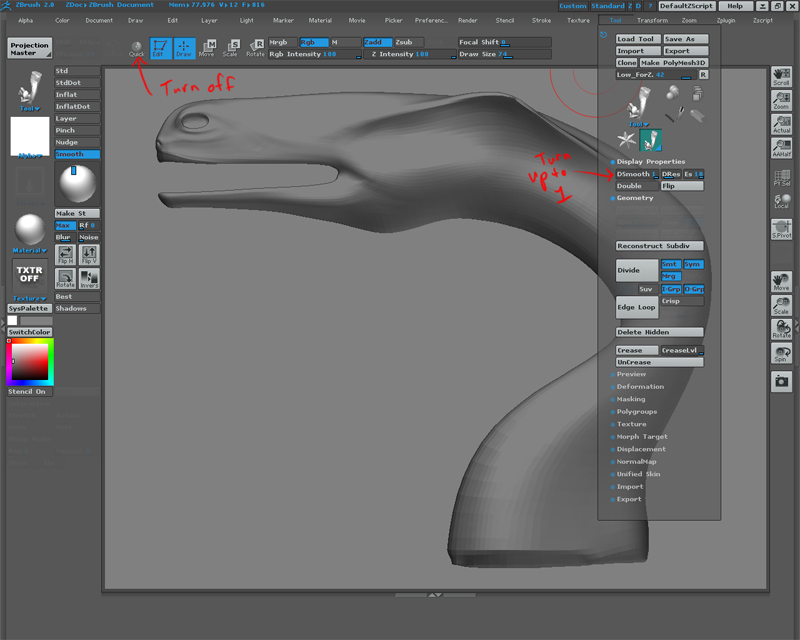
To get your plugis loaded, create a ZPlugs folder: */ZBrush2\ZStartup<b>ZPlugs
and put your .zsc & *data folders in there…
Here are some skin type mats / lights for you to check out (zip):CB
Heads coming on great, Brian…small_orange_diamond
To get your plugis loaded, create a ZPlugs folder: */ZBrush2\ZStartup<b>ZPlugs
and put your .zsc & *data folders in there…
Here are some skin type mats / lights for you to check out (zip):CB
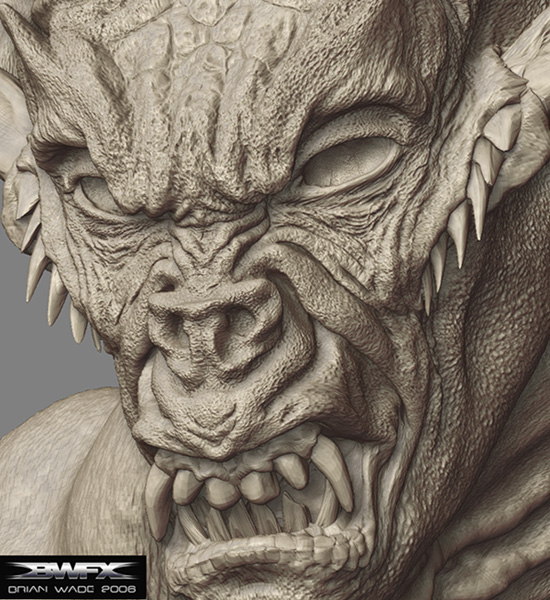
Here is another view. This time with with LittleDedders’ interisting shader. (Thanks for sharing this!)
Atwooki, Thanks for the nice selection of shaders. I am checking them out at the moment.(They are great! Your always so very helpful!)
Cheers mates,
~BW
That’s great Brian - really like the treatment of the nose you’ve given him; very dog-like in style 
Chris
Brian your too popular -
Please clear you PM inbox (or outbox!) trying to get something important thru
Chris
Very nice last update! I like how you got all those pores into the skin.
I was wondering… How much Ram Mem you have on your computer?
Ok have a good one!
Javier Loredo.
Atwooki, Hmm, glad you like it. He has to sniff out his next victim with something doesn’t he… Yea, it is kinda dog-batty, isnt it?
Cleared some PM room out just for you 
javierloredo,
I only have one gig of RAM. But,…tomarrow I will get another gig*. I am so curious what difference it will make, I can hardly wait! *(Please don’t tell my girlfriend) You can keep a secret? Can’t you?
You like pores!?!.. I like pores too!!!. (Insert moc giddy little girl squealing voice), I used to hand texture every sculpture one poor at a time, making sure they had the the right direction to them, the little bit of streach to them when they change direction or compress, the larger and smaler ones, the different depths to them, freezing the clay and then applying the micro-small-skin-texture to the skin on a separate pass, acne scars, moles, the bumps on the neck, the stretchy wrinkles, crows feet, and the Holy Grail, an “old drunks nose”!..
Oh, oh, sorry…I did it again. (I love textures of any kind, maybe too much;)
To answer your question, I used my own alphas. Sometimes I just make them ahead of time in Photoshop and try them out and see how they look.
Here are a few techniques:
(Please forgive the corny names, but I have to call them something;) )
Mr.Monsters’
WadePores
Tips:
Alphas from real skin texture, human or animal: (The real deal)
The first method I havnt heard anyone else doing, (to my knowledge yet), is I take detail photos sections of my face in close up, bring them into Photoshop, Select: Image>Mode>Greyscale to loose the color, and then adjust the brightness/contrast to a suitabe effect, and retouch that usually by hand where necessary, and Viola! I have an WadePores Alpha from real skin!
*(It works best with big poors like mine, old people too.) Give it a try and let me know what you think! (Ryan Kingslien does something simular with reference photos, and it is amazing, better actually!) *For all I know a thousand people may have tried this allready, but I just tried it out on a whim.(**Any body know a thread where somebody did this? Just curious.)
I have tried this technique with all kinds of stuff, even reptiles at the pet shop, making WadeScales, and sometimes the results are really amazing! (It helps alot to have a good digital camera!)
Mr.Monsters’
WadeWrinkles
Tips:
Custom Wrinkle Shapes to Suit Specific Shapes and Forms, On The Fly in Projection Master:
(Takes a tiny bit of prep but offers much, much, more creative control than Deco Brush)
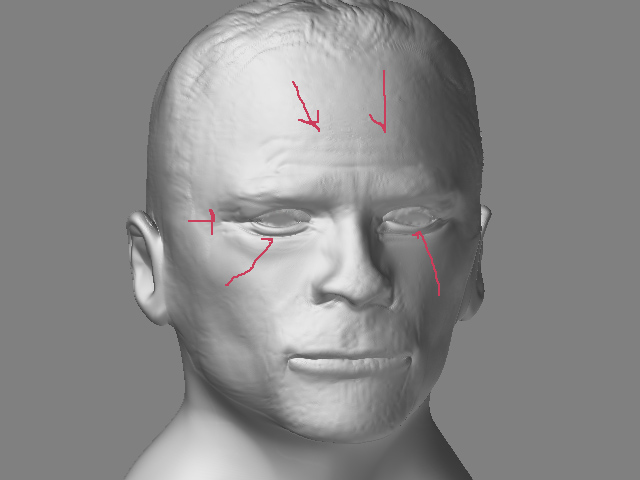
Another technique I tried out sheerly by thinking, “What if”… is to position your model where you want to put the wrinkles in a close up, drop your model to canvas and ZAppLlink it to Photoshop. Then add two layers on top of the image.
Layer one: Select an appropriate brush that suits your tastes. I use the airbrush, and make sure the pressure sensitive option is turned on. Draw your wrinkles where you want them to go, and always aspire for realism when doing so. You can vary the line thickness as you go when using a tablet. I usually do this with a black color to make it easy to see. When I am satisfied I Select: Image>adjustments>Inverse and the line is now white.
NOTE:* Then duplicate this layer and flatten the two together to make it bolder. (Were back to two layers again)
Layer two: Delightfully simple. Select the PAINT BUCKET from the tools palate and…Fill with black! Easy.
Cntrl+E flattens the two layers.
Crop to suit the shape.
Save as: Name it specific to the area you are working on.
Go back to ZBrush and load your brand new custom WadeWrinkle Alpha.
NOTE: You still have to rotate, scale, and move it back to the position you desire it to be, but experienced ZBrushers should have little problem. It can take getting used to.
Note: WadeWrinkle Alphas are best used on the specific instance of “Drop” in Projection Master that they were created in. Some WadeWrinkles are more flexable than others. Don’t try to do too big an area at a time, otherwise lining it back up will make you nuts!
It’s a few extra steps, but will go quickly one you do it a few times.
I REALLY PREFER THE FREEDOM OF WadeWrinkles AS OPPOSED TO THE LACK OF TOTAL CONTROL IN DECO BRUSH.
PLEASE LET ME KNOW WHAT YOU THINK OF EITHER OF THESE.
Hope you find it usefull:)
Here are two WadeWrinkle samples and two corresponding example .jpgs to get you started.
~BW
You may already be doing this but it dosn’t look like it for the way your teeth look in the render.
very cool tips on wrinkles and pores
thanks a lot for the effort!!!
cool model
i love the details
Mr.Monster.
Thanks for taking your time to share all this techniques and tips. Very helpful!
I’ll be downloading your 2 samples and try to make my own in photoshop. Using the Zaplink tip for wrinkles was very helpful!
Hopefuly soon I get the chance of getting 1 more gig this next week!
Thanks again and have a good one!
Javier Loredo
Have been using the idea of photos for awhile.
Can also be used for hair.
The suggestion for wrinkles is fantastic.
Only had a few minutes,but it worked great.
( attempt at new “bond”, Mr Daniel Craig)
Many, many thanks ( shame you cannot patent it;) )
Seems like you’re having alot of fun!
It’s great to check in and see people pushing Zbrush to it’s
breaking point.
Keep going brother!
It’s fun to folow your gallery.
Later
Cesar Dacol Jr.
Aka, The Voodoo Monkey
LittleDedder, Thanks, I had it set quite a bit lower. Very cool of you to enlighten me, and include the photo to help.
wammerl, Glad to give something back. Thanks for the support.
javierloredo, MY pleasure. Enjoy the samples. More to come. Keep checking back. Didn’t get the 2nd gig yet. Maybe tomarrow. I’ll let you know how it turns out;)
bicc39, Cool. Glad you enjoy the WadeWrinkles, technique:D Looking forward to seeing your finished model.
voodoomonkey, (You’re a machine. ) Really? That explains a lot! Don’t tell my girlfriend. (She’ll set me to “vibrate”)
Good to see another Makeup effects-jockey around here.
NOTE to my ZAmigos: (Bought my girlfriend an engagement ring today, while she was out of town visiting her parents. Will pop the question on Friday. Let you all know what she says.)
LOVE TO HEAR FROM ANYONE ELSE TRYING THE WadeWrinkles TECHNIQUE.
AND…IF ANYONE HAS AN INTERISTING PAINTING TECHNIQUE, LOVE TO HEAR ABOUT IT.
Cheers,
~BW
Woooohoooo! Make sure you get a picture of her reaction for us!!! I know she will go for it - or else I know people who know people!!! :lol: From what you said, she sounds like the gal, so I wish you both all the best.
Nothing like a good woman to keep you in-line, submissive and to teach you how to do laundry, clean up and cook, prevent your drinking binges, save you from various social diseases and to imprint upon you the virtues of not owning anything in your name, aaahhhh the life…
Jason,
Thanks! I will keep you posted. Loved your take on marriage. Too true!
Just got my PC back from the shop. Finally have 2 GIGs of RAM. Anxious to see what this baby can do:) Here goes!
Yipee!
~BW
Brian, nice to see you finally post something. You should paint it as you would a rubber head, with your background I think you would find it easy. Then you don’t have to worry as much about what material to use.
Rick,
Hey… Yea, well, I’ve been holding out for a while. (Something like how long I waited before I ever showed you my book, way back in the day.) Akin to the ol’ I’ll never be good enough syndrome. (I guess some things never change) But Zbrush made it feel fun and exciting.
Thanks for taking a moment to touch base. Been a long time, since we had a chat.
I appreciate the direction. Especially as this is a new venue for me, with seemingly infinite possibilities.
What you suggest seems pretty straight forward, and sensible. (And grasp-able
I"ll just give it a shot then. What have I got to loose? Certainly can’t run out of colors, or air, or…?
What an amazingly, great community here. I am very greatfull to my friends here, new, and old… An extraordinary amount of talent here, coupled with especially sharing and supportive people. It is very, very, refreshing for me personally. It’s really, really, nice, for me to have a new challenge, and outlet for all the…(what ever you can call it), inside.
Thank you kindly for the visit, and suggestion. I’ll try it with that mind set.
See you around here then.
Again, thanks. Truely…
Peace,
~Brian
Mazel Tov on the marriage! Just stay unpredicatable with her every now and than, so she doesn’t get bored and into routine. You might need a gorilla suit for this. And don’t give into all of her arguements keep up the backbone! Again the gorilla suit could be useful for this since it might scare her.
Before you start painting though your going to need to establish UV’s and a texture map size. GUV tiles work nicely, if its not going to be animated.
UV mapping is kind of like painting on pieces of paper that are bound together with glue. This is magical paper that doesn’t crinkle though, I need some of that myself. However where the paper is fused together the paint doesn’t like to flow cleanly from the two sheets of paper. These seams are best hidden in hard to see areas, and under limbs. The sheets of paper are called UV islands.
However its rather a pain to set up properly and to avoid stretching the “paint”. Um sorry to sound so condescending, its what happens when I have to do my laundry and dream about world conquest and destruction.
womball, you genuinely make me laugh! What a great sense of humor you have.
I also liked your universal, “gorilla suit”, cure-all.
Sadly…as far as the UV tiles, and other stuff goes…you totally lost me and now I am a little bummed. I never needed UV tiles and the other thingy’s to paint a monster head before*. Be it either latex or silicone…Or did I*? (Insert Twilight Zone music here)
No worries. If what you suggest is truly the way to go, which I have no reason to doubt, I will definitely end up obsessing on it at that point in time.
Why does it have to be so complicated sometimes to have fun? I guess it makes it more fun and rewarding in the end…eh?
Thanks for the informative and detailed advice womball.
I will just have to try something, and see how it goes.
What’s the consensus on this?
~Brian
UV is basically texture cordinates of the model, and since their are 2 letters than means there are only 2 axis. So UV’s are 2d and the model itself is 3d. So to translate a 2d image (your texture, or the painted surface) to a 3d object, your going to have to be prepared to counter stretching and warping of the texture.
GUV tiles will not warp which is nice about them and reduce a lot of the technical aspects of UV mapping (which may be an art itself). However they have tons of seams and if you animated this, I’m sure those seams would make your texture become really ugly. Also any adjustments in say photoshop would be a pain to do because the uv islands, or pieces of magical paper, are arranged in some weird computer randomness. When I uv map I try to form the body like composition that is easily readable for the texture artist. I try to make the body clearly look like a body and the head to clearly look like a head, just cut open in certain areas. An example of a good real life UV map would be say a bear hide rug. The cuts are under the belly which you generally don’t see in animation.
Stick with GUV tiles for now (found under TOOL> texture>GUV tiles) than go under texture and where you see number enter say 3072 for both values (width and height).Than create new texture. Than you can start painting. Where zadd is turn that off, and make sure RGB is on. This way you can rough out your colors quickly. You will have to become familar with projection master for coloring, it has some interesting quirks if you paint on the edges of the dropped object. But you do have a lot of access to great tools with it. “C” picks up previously used colors.
Btw thanks for the compliment. I wish I had a gorilla suit yesterday at a Halloween party. Its kind of awkward when your wearing a long sleeve shirt and having to convince people your Tinkerbell or a modern day Jesus.
Great stuff brother! Fantastic start.
Believe me, Its all confusing at first. 10 years ago When I was hired at Janimation I knew less than nothing about computers or CG, I was hired based on my real world skills. They sent me for a week of Softimage 3d training, on SGI computers. I could not even type! Trying to figure out what polygons or nurbs even were was making my head hurt! Ten years later I run the department. Its all about the passion to learn more than the next guy, and from your interest and number of postings you have obviously been bitten by the CG bug!
As for your techniques for making pores and such it is a fairly common technique to extract details as you described in you very well articulated tutorial. Aaron covers this quite a bit in his DVD.
Again great first post!
Greg