Top Row!
This is amazing. Can you give us a render from one side to show the forced perspective?
Top Row!
This is amazing. Can you give us a render from one side to show the forced perspective?
If you dont mind me asking what kind of lighting are you doing on your models? by that I mean are yoou loading it into 3D studio max and doing a 3 point lighting rig or are you lighting it in zbrush?
Wow, thanks again for the nod, everyone. I will put together a walk through over the weekend. It is a pretty simple, old school technique for the very beginning of film. As a kid I pored over every book and magazine article on Willis O’Brien and Ray Harryhausen and spent hours and weeks building miniature sets and puppets. It is like a 3D shadow box setup…Like I said, I will put together something by early next week.
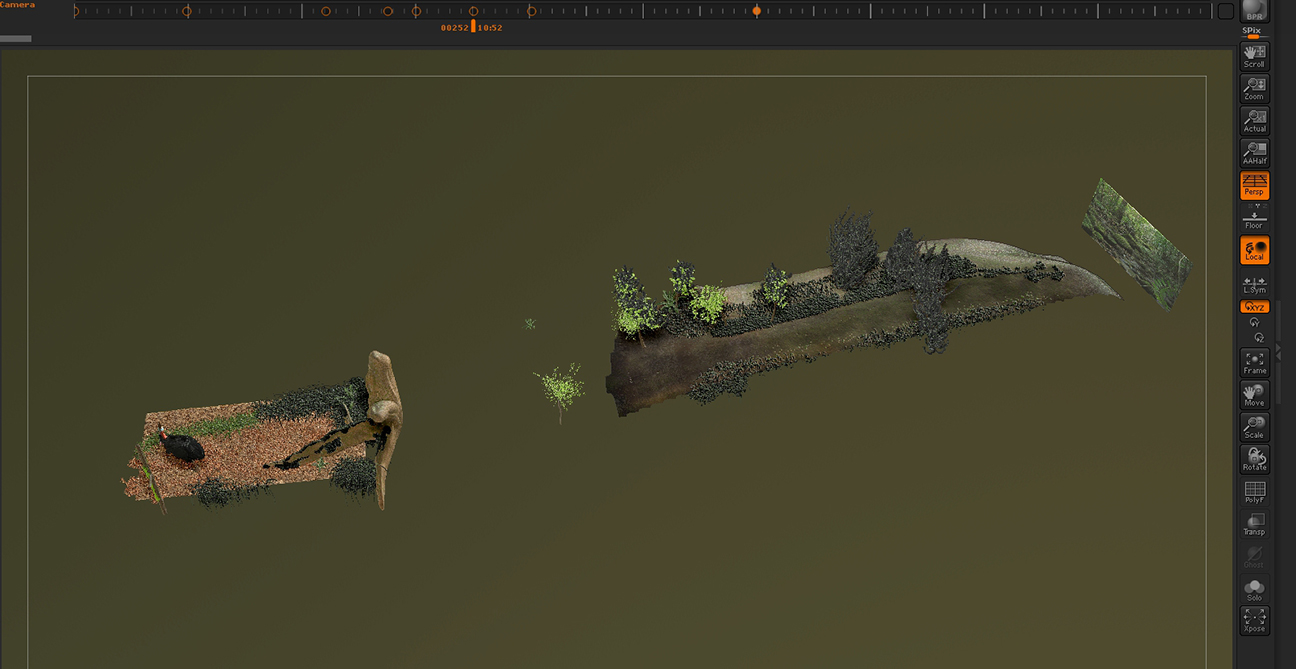
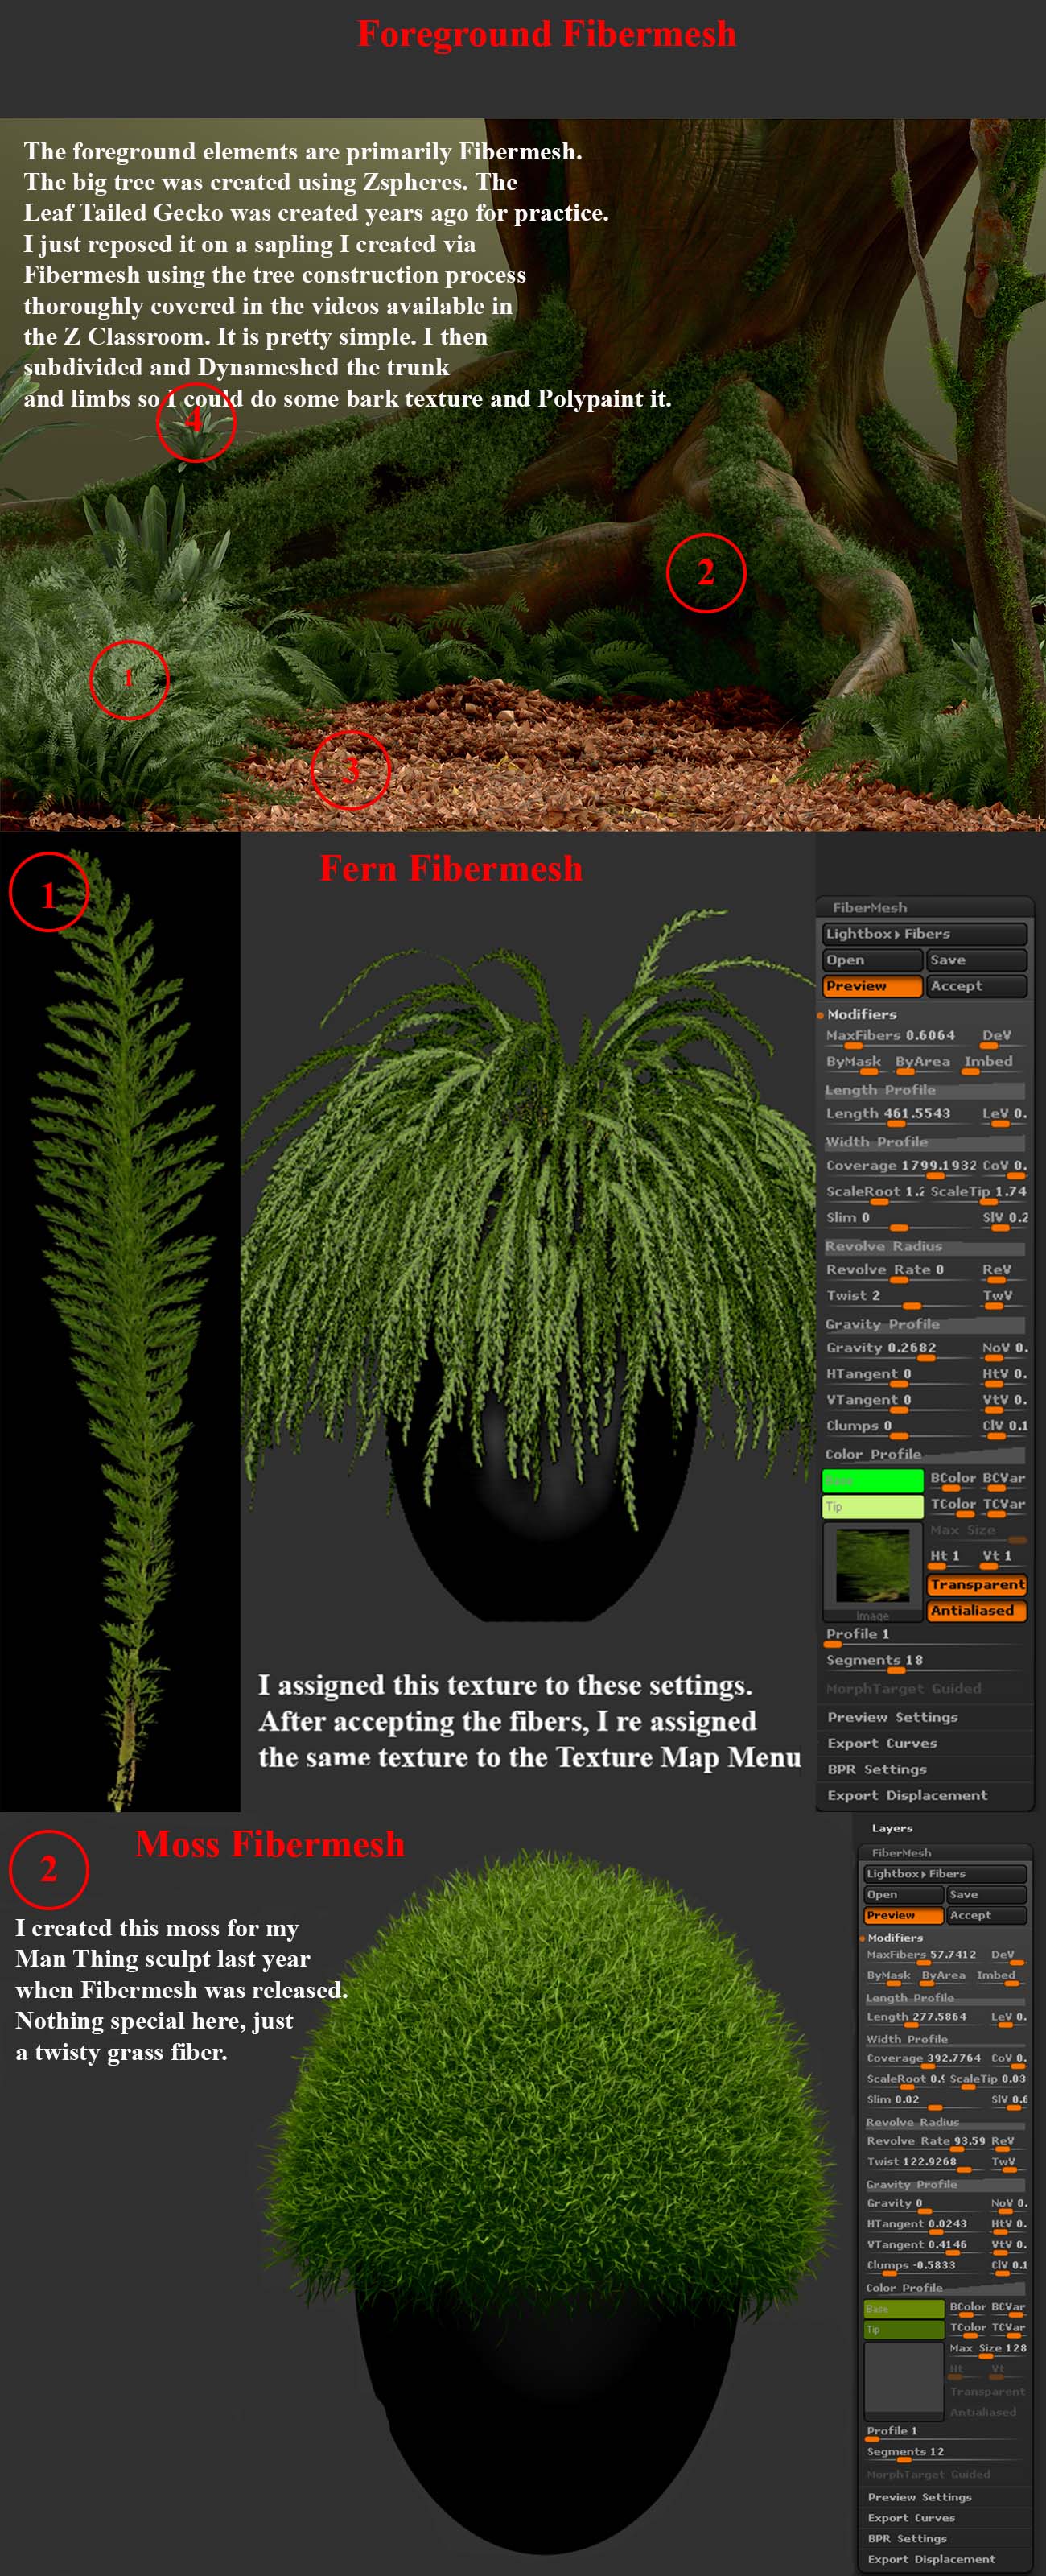
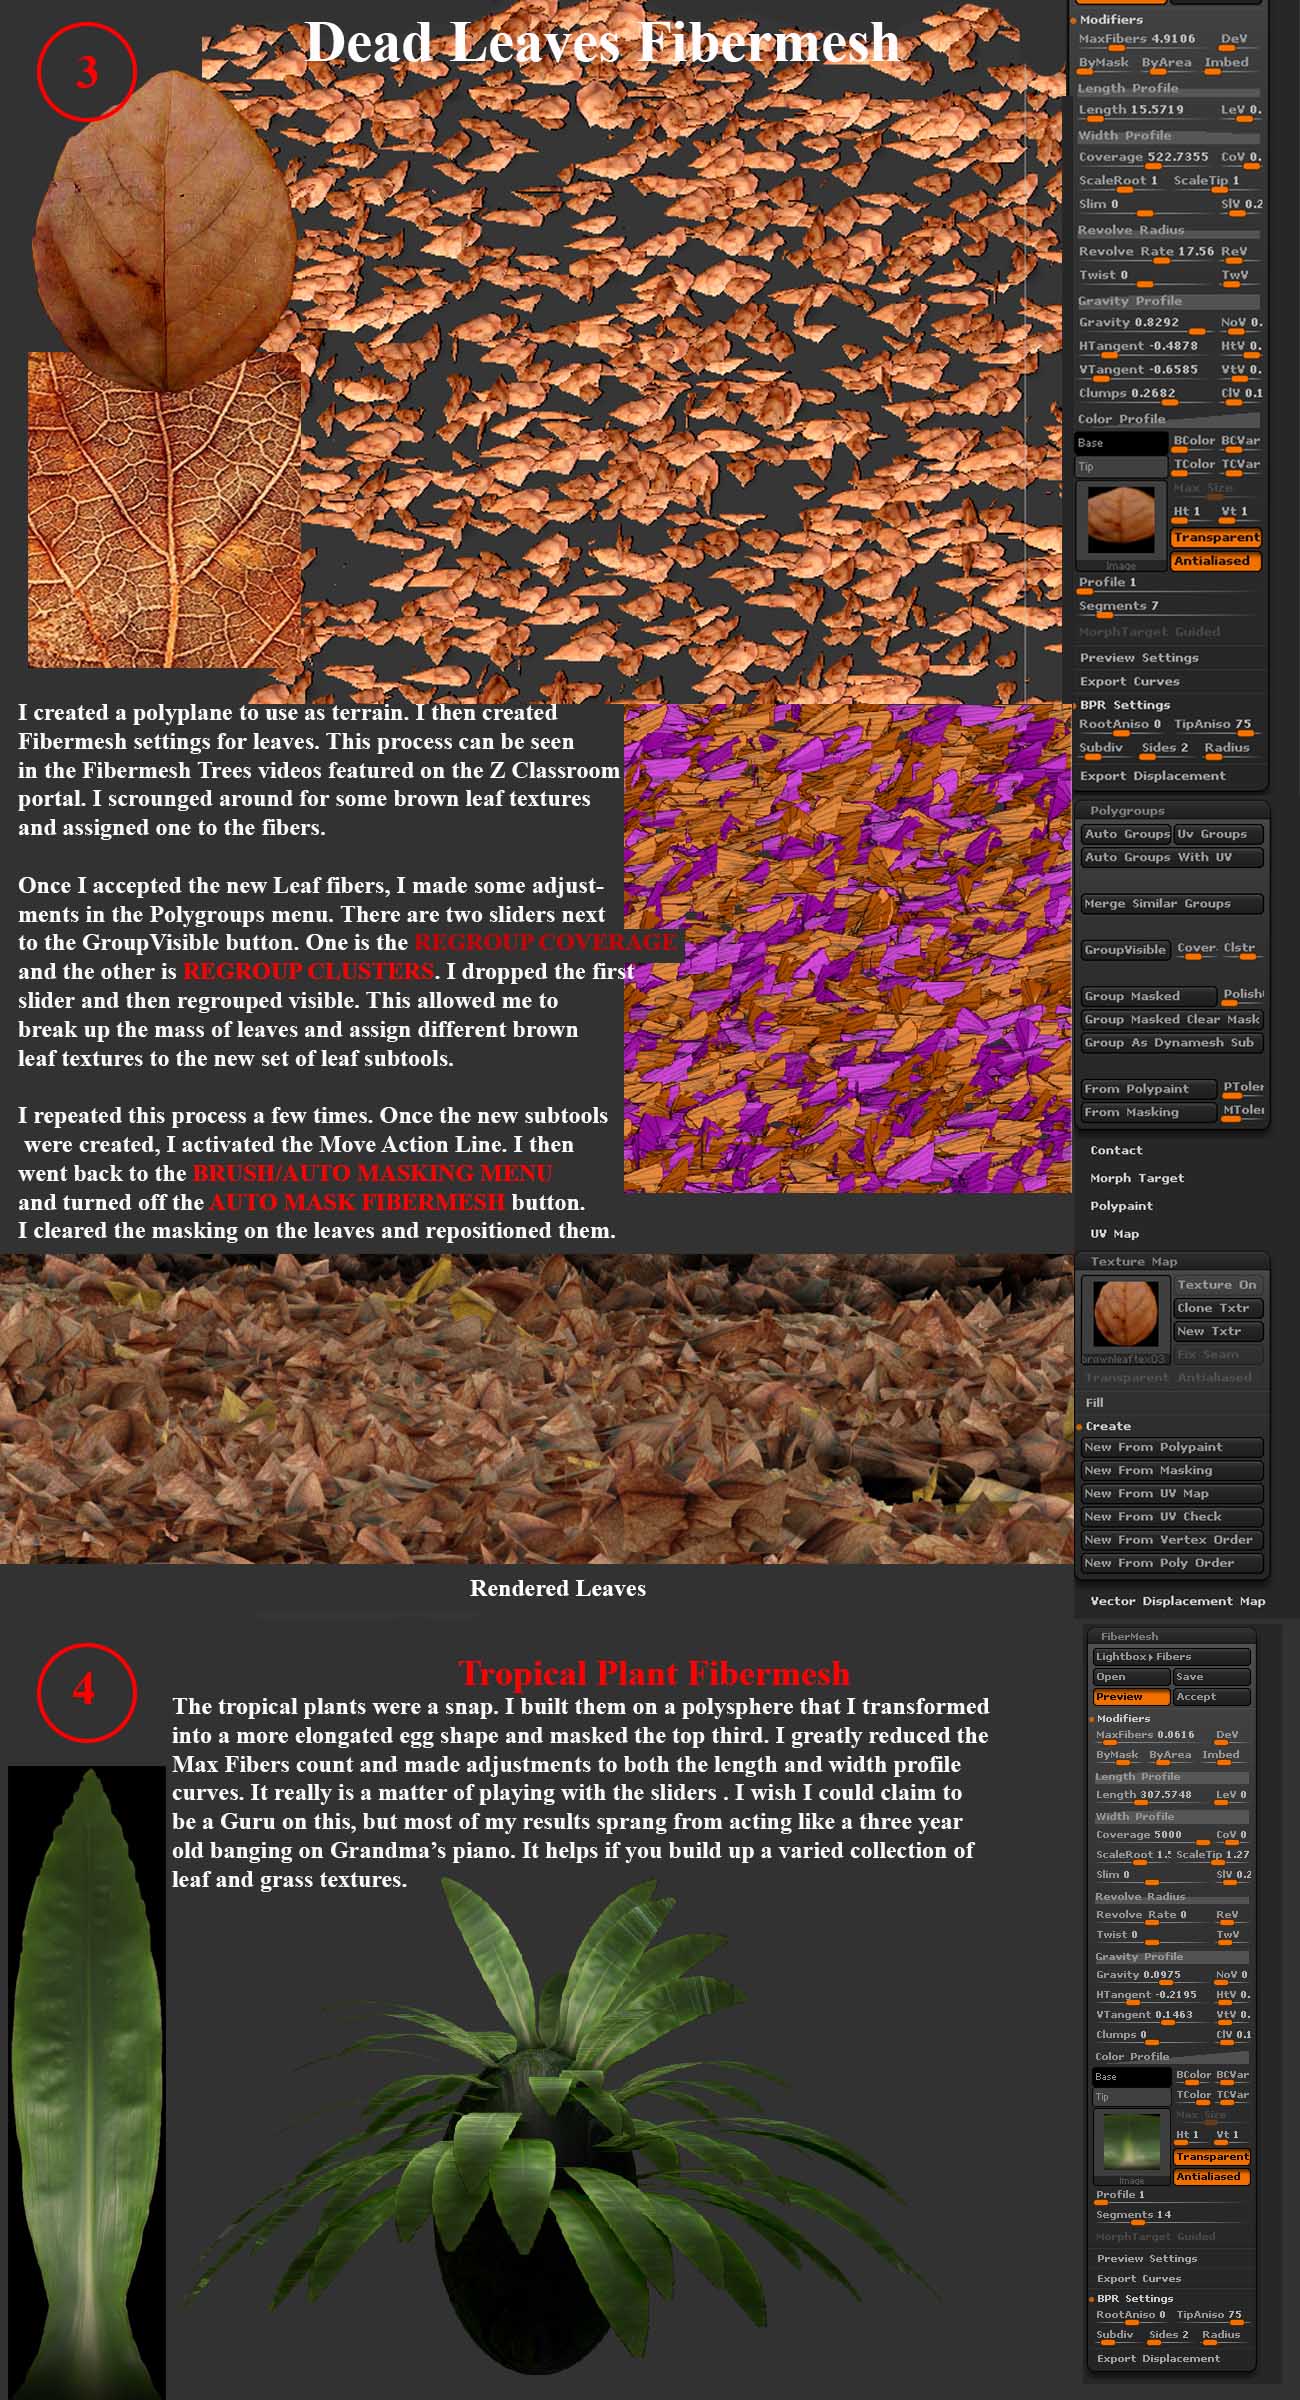
The fact that Zbrush isn’t “3D” 3D, but 2.5D makes it a bit tricky to get real depth. I used the same approach on my Dogthing.
Kecaj - Zbrush is the motherload to me. Thank you.
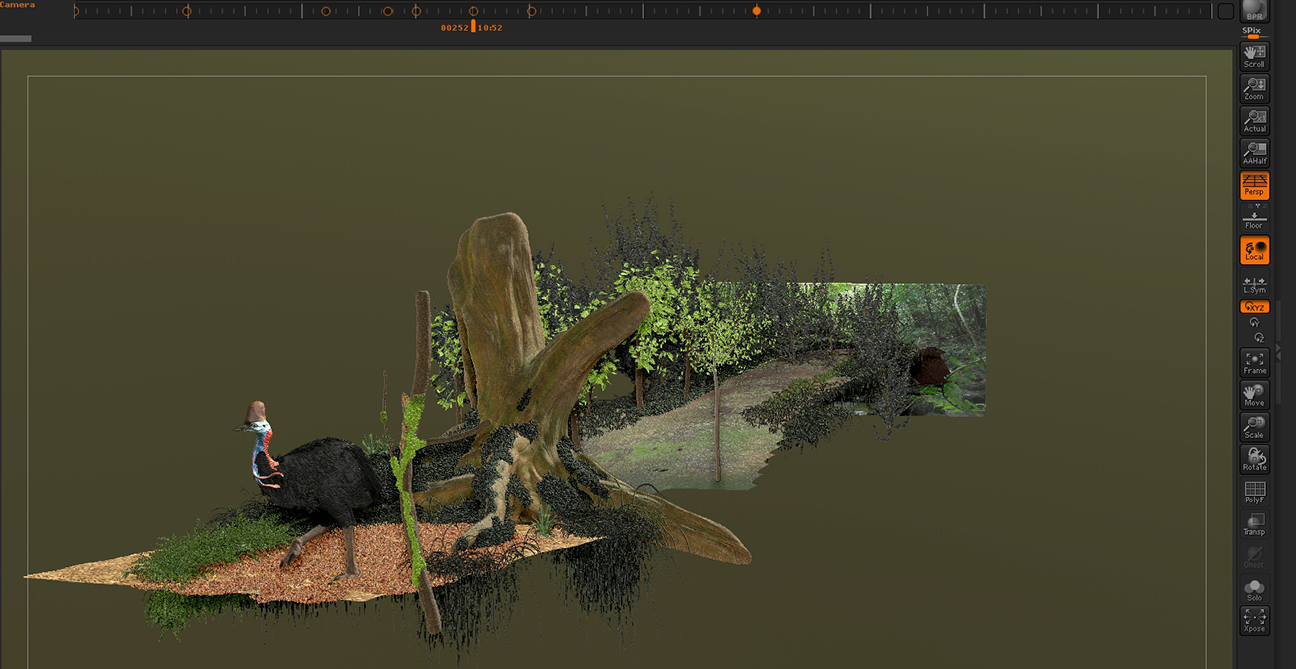
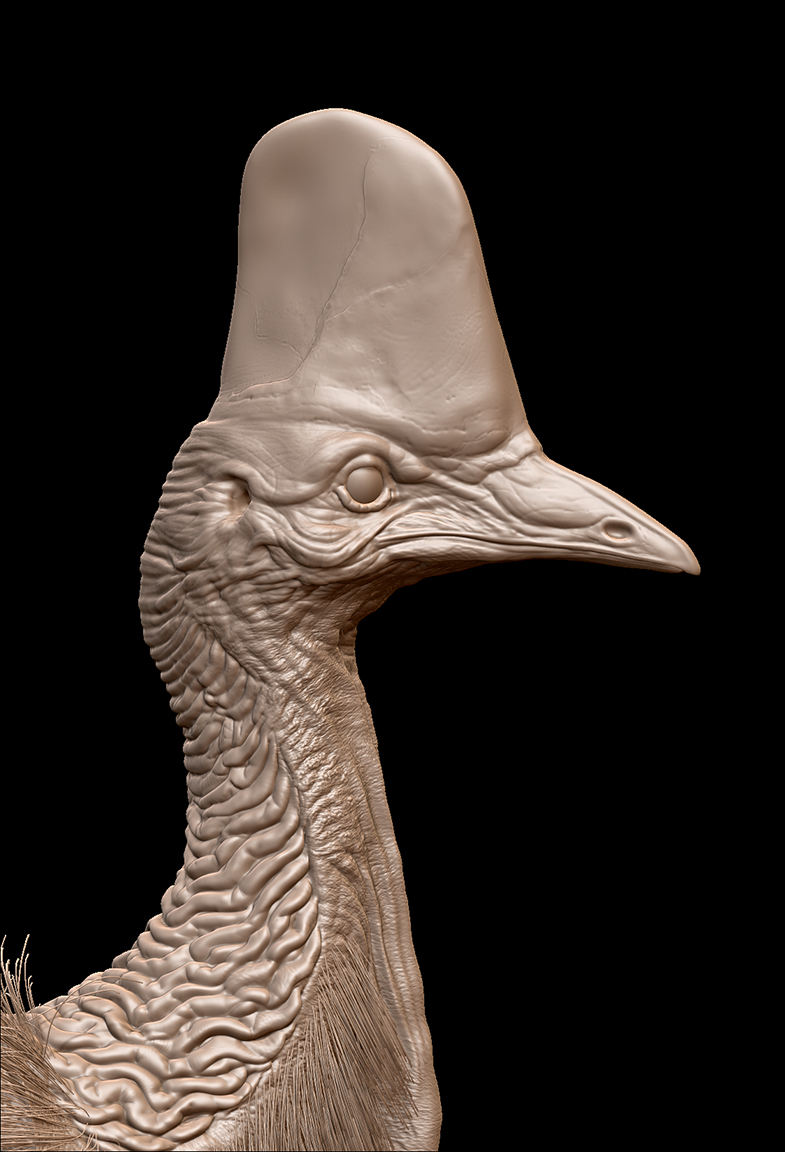
dingle001 - As you requested.
Abraham - Everything was done inside of Zbrush from modeling to rendering. I used all Zbrush lighting.
Well, I gotta get back to work. Thanks again for the top row. It means a lot coming form this community. More later.
incredible…
Hi, Carver. Excellent scene you’ve created here!
I’m pretty familiar with forced perspective, and have created a few mini scenes myself as well as seen large forced perspective sets, so it is fun to see the technique employed here. However, having never put together a large scene in ZBrush before, I don’t fully understand why you can’t use the 3D space to create the depth in your image. Obviously, creating a jungle scene to scale would be a pain to create as well as to work with in the 3D space, but is this just plain not possible with the ‘3D’ space in ZBrush?
Would you mind addressing this a little bit when you get around to posting the explanation you mentioned?
Finally, as a bit of constructive criticism, I think your cassowary image would benefit quite a bit from having some depth of field and atmosphere. You’re probably familiar with how to do this, but just in case you’re not, you can use the ZDepth image created by the BPR in Photoshop using the Lens Blur filter. Alternatively, if you weren’t doing any compositing, you could use the BPR blur filter with the depth parameter. In Photoshop, you can also use that same ZDepth image as a subtle overlay so that the background forest has a kind of foggy atmosphere. It also helps sometimes to desaturate the background elements to further fake an atmosphere. I think these techniques would really push the forced perspective depth.
Thanks for sharing this great image with us. Looking forward to more from you. Cheers!
I second that! The Cassowary model is beautiful, and the fact that the most of the image is straight out of Zbrush is amazing.
Quality art, and yet again we see just how Zbrush renderer is holding its own, thanks for sharing. Would love to know more about your process of compositing in photoshop please?
Very nice.
Dang, this is sooo cool. Zbrush has such amazing capabilities when utilized by Master CG artists like yourself. I never ceased to be amazed by the great work quality that is posted on this forum.
Ezra
Love it! 
A stunning end result with amazing fibermesh finesse.small_orange_diamondsmall_orange_diamondBravo!!
It must take a fairly powerful computer to manipulate , position and fine tune such a rich scene to camera or, did you build to view?
Even with far less dense scenes I have to use markers to upsize on my cranky little pooty.
Wow!! Jaw dropping work Congrats!! 
Fantastic! congrats on top row! and what a magnificent creature the cassowary is! I made sure to see them when I was visiting tropical north Australia! well done!
REALLY great use of the fibermesh here mate. Most impressive!
Hey my friend,
Your work is really good-looking and thank you for sharing your workflow on the basketball, it is very useful to me.
I would really (badly) like to see your workflow on the preparation on 3d printing, so if you could find the time in your busy schedule I would be very grateful!
Cheers
I did A bust version of the Cassowary. This is a straight up BPR render.
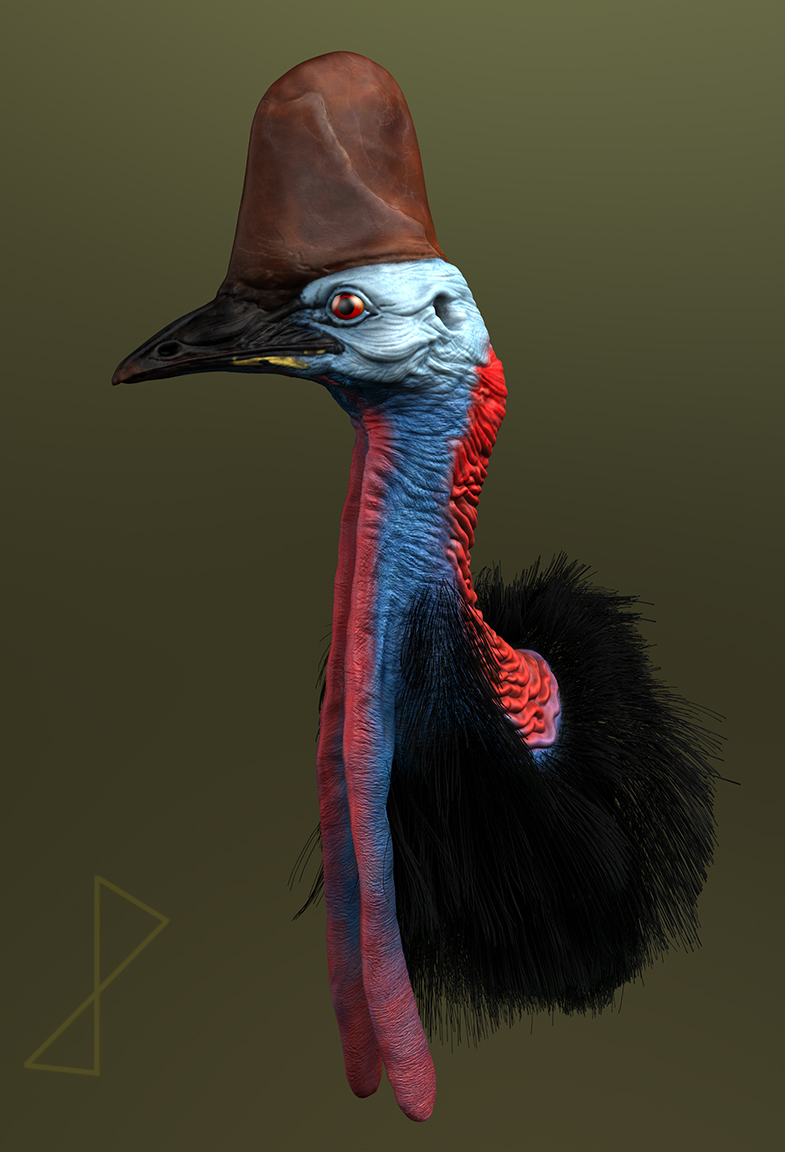
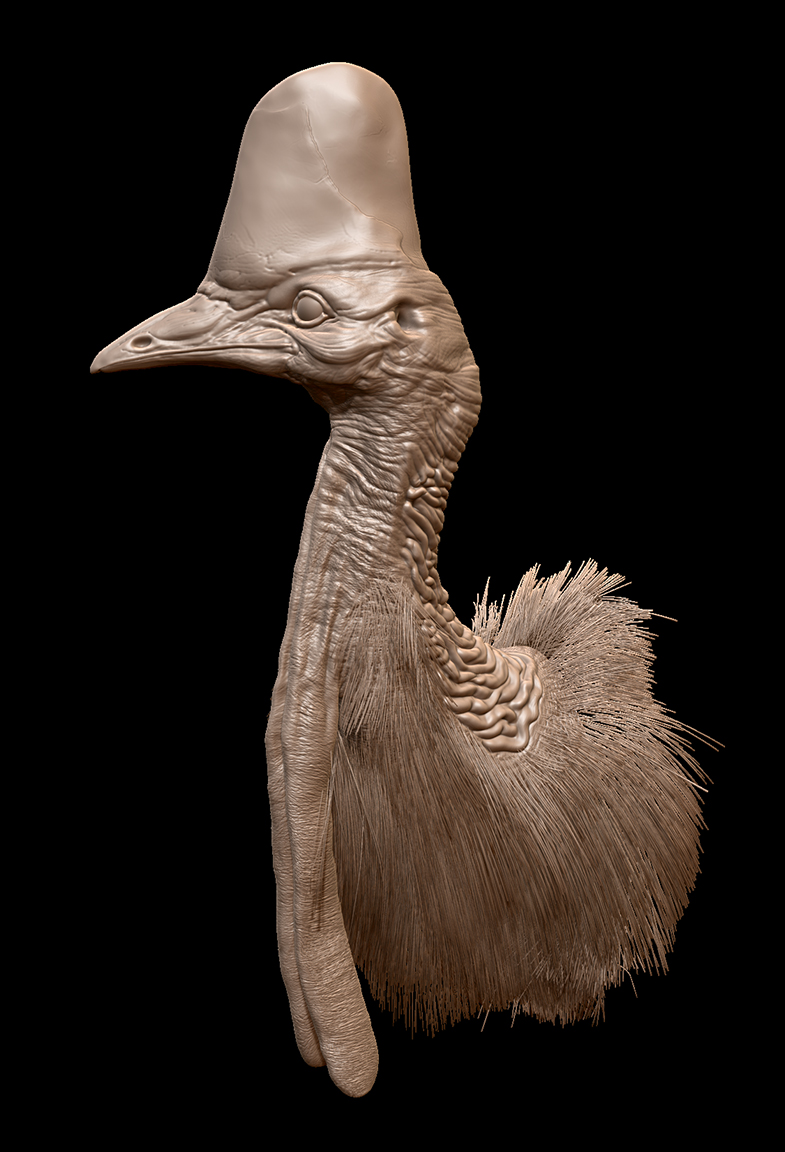
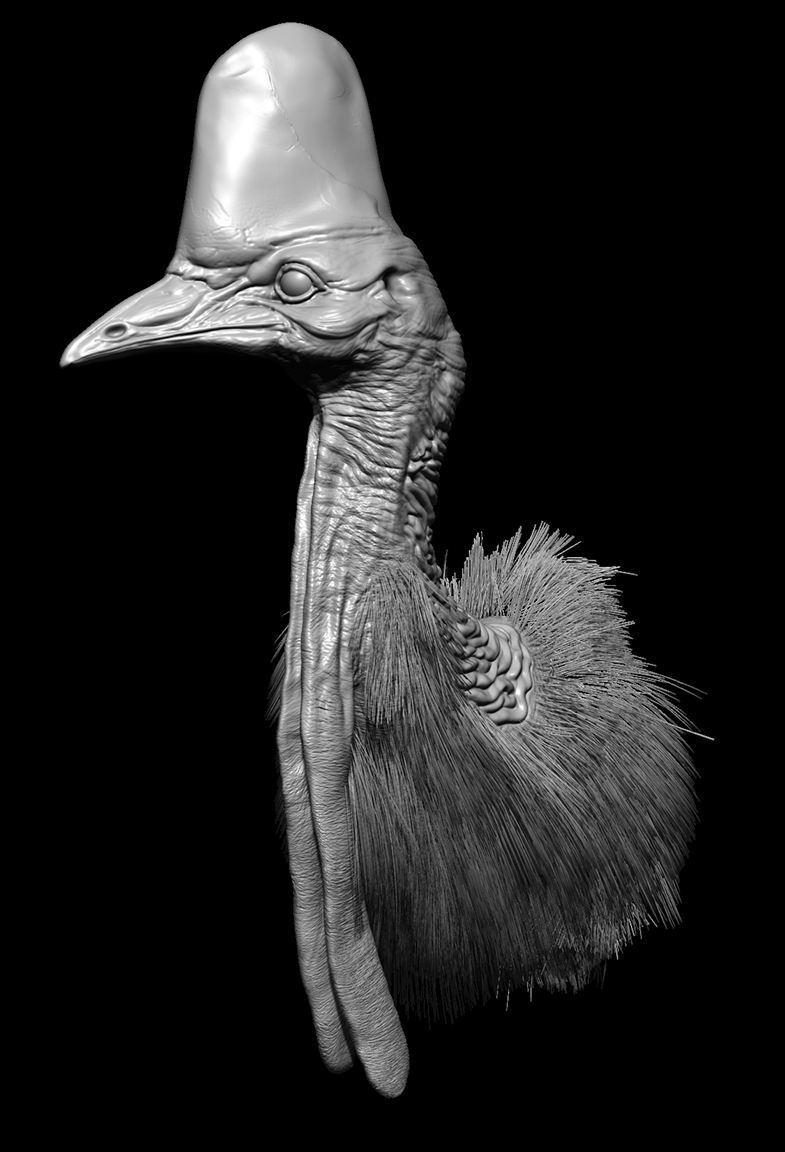
Some “Clay” renders.

LVXIFER - Thanks!
cdizzle - Zbrush is not a true 3D environment, 2.5D, so it is not like doing a Maya layout. I did use depth maps in photoshop, but I guess I need to tweak the background more
a i r - I took a lot of noodling, but Zbrush is just the best.
tez - I will go over my steps in photoshop, please be patient. Gotta do the fibermesh steps first. 
Doug Jones - Thank you, sir!
EZRA52 - You are making me blush…I don’t consider myself a master of anything, I just follow the lead of all the great talents on this forum, but thank you for the praise.
Santis - Right back attcha. Isn’t getting your stuff printed just a hoot?! Great stuff.
boozy floozie - Thank you…Yeah, I pushed my machine to the limit, that is for sure. My final master pass took almost 2 hours to render. I did model to the view. I new I was pushing my machine’s limit so I tried to keep the fibermesh only to what would be in the frame.
sculptor.zb - Thank you very much.
SammehSAMURAI - Thanks! I would love to see one in the wild…as long as I can carry a riot shield and body armor. Very testy critters.
chris-carter - Thank you. Your stuff is awesome. Love the poster update, by the way.
Slice - Thanks. I know I dropped the ball on the printing tutorial (no pun intended). I will try and put it together…finally!
And to all of you have stopped by the thread, but didn’t comment, thank you for taking the time. I am working on the walk through, coming soon!
Carver
Alrighty folks, here is the first part of my walk through covering the foreground fibermesh assets. I will follow up with arranging the background elements and compositing in Photoshop.

I will do my best to post the rest ASAP.
Cheerio
Carver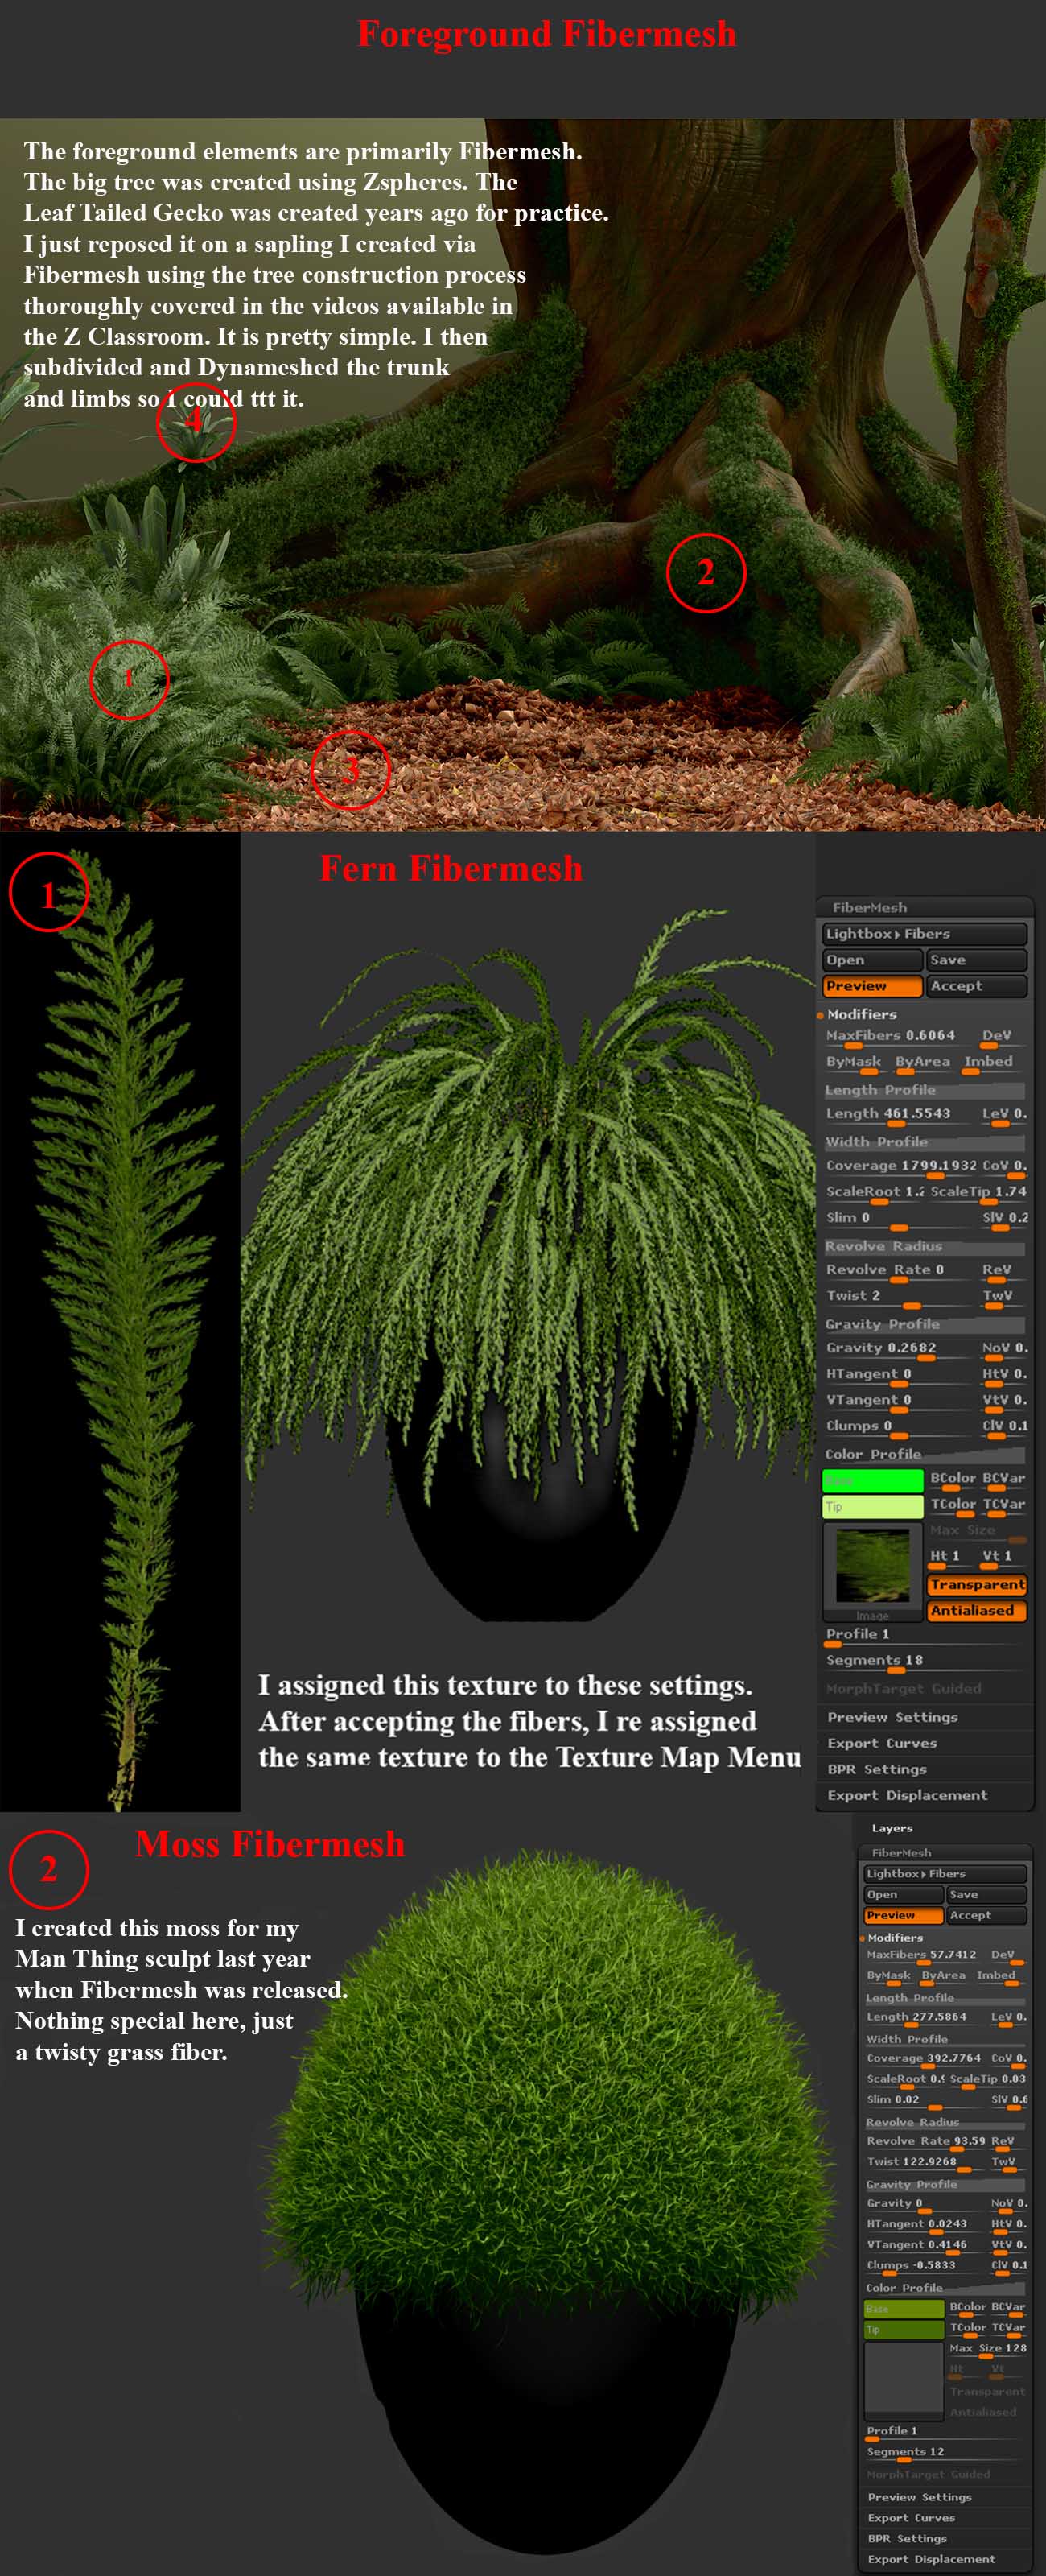
Thank you so much for all the work you’ve done to share this information with us Carver. VERY much appreciated. Your project is just amazing. I hopr I can soon understand all of this well enough to do something cool with these new Zbrush tools. Thanks again.
Ezra
Thank you so much for sharing your beautiful artwork and techniques, man. So awesome!
Wow, Carver. Amazing work! I’ve been meaning to sculpt a Cassowary myself as I grew up around them and have eaten their monster sized green eggs. Now I’m frozen between motivation and despair LOL. Thanks 