ZBrushCentral

Any advice Help to Extrude or Extract even thickness on model with 90 degree corners/edges?

KEY EXTRUDE 1 KEY EXTRUDE 2

Hello, I’ve spent 2 days trying various methods with no luck to resolve this technical issue, I thought it would be a basic problem to solve, but no luck. The photos I’ve shown here are not the actual model I’m working on, but show the exact issue I’m having on one smaller basic model part, therefore easier for me to explain (and show my current resullts.)

*Note: I’m trying to retain the model as a polymesh subD, ( but can delete sub-divisions to gain the results that’s no problem), but (if possible) trying to avoid Dynamesh so I can retain a nice mesh and Clean sharp polygroup elements)

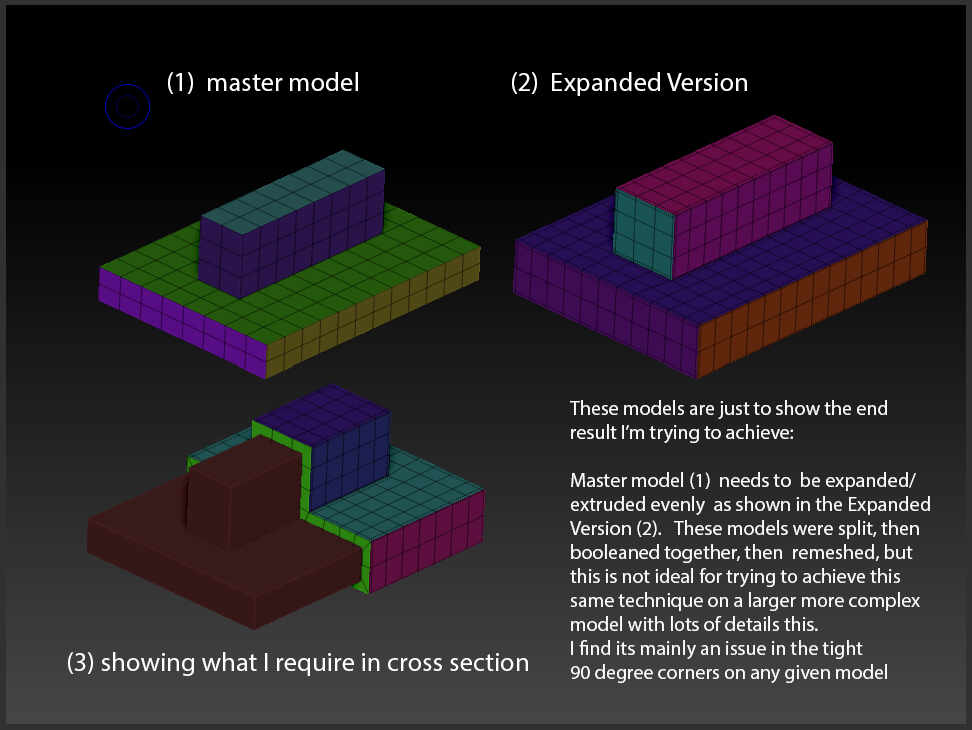
Basically, I’m trying to obtain a scaled (relatively even) thickness around an entire hard edged model, but no matter what technique I use, I always find the mesh collides into a crumpled mess in any of the 90 degree corners, or all the high points are rounded and softened. (A problem that I don’t get on organic shapes, just these kind of 90 degree angle sections.)

I’ve included a couple of photo breakdowns which hopefully show the issues I’m experiencing, and hopefully might lead to one of the kind members here to help me find an answer. I’m sure I’m missing something, but after spending 2 days experimenting and many hours of Youtube guides, I cant find any video or guide with this specific type of problem regarding 90 degree angles, most are showing how to expand organic round shapes like a Vest, or robot/suit panels, and I’ve tried applying them to this issue with no luck.

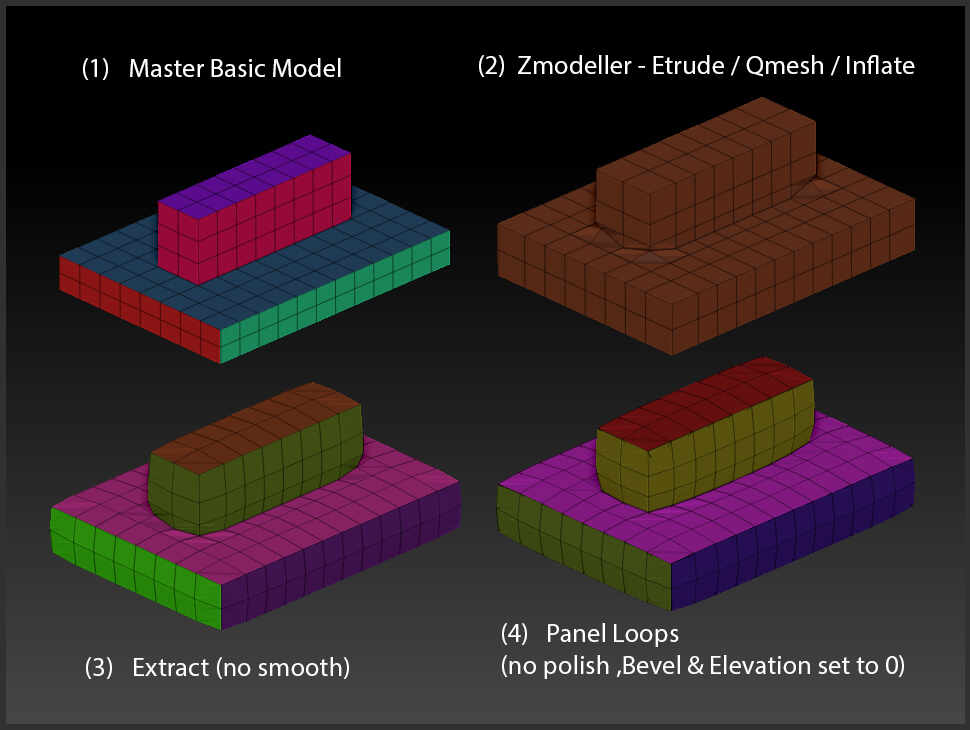
  • So far I’ve tried various Z-modeller techniques (Extrude, Q-mesh, Inflate) which although generally gain sharp results , they make a huge mess in the 90 degree corners, destroying the Geometry.

  • I’ve also tried ‘Extract’, (with smooth set to 0), this seemed to inflate the model and lose all the sharp angles.

-I’ve tried ‘Panel loops’ (no polish & elevation set to 0) , and also Deformation/Inflate which all seem to just inflate the overall model giving uneven rounded shapes similar to extract.

The only workaround way I’ve currently found, is to break down every individual element into many separate subtools, extend them, close holes, then use Z-modeller expand each one, then Boolean them all back together followed by creasing/ Zremeshing (which is what I did in the photo showing what I’m trying to achieve (pic with 3 images).

the only other way I found was very convoluted using Grouploops which made a messy model all clashing together within, then using dynamesh, followed by changing back to a Polymesh/Subdiv mesh, but this took a long time to do, and the end result destroyed all the nice topology and polygroups and wasn’t very good.

any help would be much appreciated,
many thanks, Brian

Hello Brian,

I don’t think you’ll be able to do this in the manner you are attempting, and there is no one solution for every situation. In this scenario you’ll have better options if you work on that shape as two separate intersecting boxes rather than a fused shape. It also appears that scaling operations, as opposed to extrusion operations, may be a better fit for what you are trying to do. Extrusion will displace points in different ways depending on the situation. Scaling operations will preserve the points relationship to each other.


In your scenario it would be easier to work on that shape as two separate intersecting boxes and then fuse them together. That would eliminate the operational conflict where the two boxes share the same points.

Ctrl-drag duplicate one of the boxes with Gizmo so they exist in the same subtool, scale or extrude them as desired to form the desired outer surface. Make sure the boxes cleanly intersect, and avoid polygons that overlap on the same plane. Duplicate the subtool and fuse the duplicate together with the Gizmo “Remesh by Union” function.

Then ZRemesh with “Detect Edges” active to clean the geometry. ZRemesh at a high target polycount first, then reduce with the the “Half” option to reach the desired polycount. Remember to always do a mesh integrity check after a boolean operation to look for problem geometry.


In this specific scenario, you can also do the following:

  1. Set the ZModeler Polygon> Extrude (not QMesh) target to Flat Island.

  2. Click on one plane and drag out the extrusion to establish the depth.

  3. Click on each flat plane in turn which will extrude them by the same degree.

  4. Remesh by Union to clean up the overlapping geometry and proceed as above.


If you are attempting to create a shell, working at higher resolution will give you more options like the Dynamesh Shell function and mesh extracts. In some situations your best option may be to duplicate a subtool inside itself, scale it down to act as the interior surface, and then subtract it from the volume with Live Boolean.

Good luck!

Thank you so much Spyndel for taking the time to write such in-depth breakdowns, and with multiple other techniques. very kind of you.
I tried all of the above, some of which I’d already experimented with prior, but with a mixture of what I’d already tried mixed with your advice I got a very efficient resolve for the process I was trying to achieve on the larger model which I was having these issues with.

One part that was eluding me was the ‘Remesh by Union’ feature. An extremely useful tool that I could have used several times in the past to resolve many issues.

I find it strange that the ‘Remesh by union’ feature isn’t in the Geometry menu, I’m sure there’s a reason for this, but that seems to me a great place for that function.

Thanks again for the help.
Regards, Brian.