ZBrushCentral

Zero Dean - works-in-progress

My copy of zb3 has me pulling hair also.I cant poly paint~well I can but when its time to make a texture I crash.Trying to save some models I crash.My paint stroke thumb dispalys the wrong icon for the current tip ete etc etc.But I can still model and be creative so Im holding tight for 3.1!!

Great work as ever here:D :+1:
cal

calum5ZB: This should not happen, please make sure that…

  1. Your mesh has UVs.
  2. You are not trying to manipulate meshes with polygon count that exceeds your system capabilities (i.e. do not increase the preferences max poly count).
  3. You did not modify the content of the ZData folder.
  4. You did not install ZBrush2 plugins which have not be tested (or updated) for ZBrush 3.

ZD,

I just now had a chance to see your work. Excellent stuff! It’s easy to see you’re very much at home in ZBrush.

Sven

Yeah, great work! I really like the dragon. :+1:

Thanks for the feedback guys! Much appreciated.

I got burnt out on trying various versions of dragon scales for a few days…so I put the dragon on the side to take temporary break while I get creative with some other stuff. But I’ll be revisiting him soon, with “fresh eyes” to push him towards completion.

As I previously mentioned (I think), I’m going to create a whole scene… though I need to put some finishing touches on him first…and get the scales right. :slight_smile:

So I wondered what it would be like if I sat down and started recording a movie of my work (what pressure) this morning. So I hit record and just started modeling. Totally free modeling session…didn’t use any reference because I had no idea what I was going to end up with when I started… :slight_smile:

Anyway, I think I’m going to try to force myself to do more of these…sit and speed model something to completion.

I fully intended to save the recorded movie session, but when I exited ZBrush, I reflexively hit “no” to “save recorded movie?”. But no worries, gives me a good reason to do another.

Anyway, I started from an all-quad sphere and could only go up to 2.5M polys, the way the mesh density worked out. I briefly considered HD. But I don’t need more detail…it’s already waaay too busy as it is. No place for the eye to rest.

Next time I think I’ll start with ZSpheres… that way I can create a full figure.

Image is a combination of 4 real-time ZB renders blended in photoshop.

Here’s the result…

free_model_00x.jpg

nice. How much ram do you have?

2GB… if you’re asking in reference to my 2.5 million polys remark above… the reason I can’t go higher is because 2.5 x 4 = 10 million. I suppose I could raise my poly limit threshhold from 8m, but I didn’t figure it was worth it for the free model.

Is that why you were asking?

Not quite…

I have 1.5 gb, and I can’t get past around 1.5 million “active points”. Does that mean 6 million? If so, then should z3 say 1.5 million “active polys”.

If zbrush is right, since don’t have that much more ram than me, so how can you get to 10 million, and I can only get to 1.5?

If you put your mouse over your current active tool in the tools palette, it will tell you how many polys your tool (model).

I did decide to do one more subD on the above model to see if I could clean it up… so I raised my poly threshhold. I’m currently working with it at 9.8 million polys, but I have UVs disabled… that can make a big difference. Try that. :slight_smile:

And I did just crash “insufficient core memory” error after trying to do a resym on that model (bad bad idea!). :slight_smile:

hey zerodean, its good to take breaks on pieces every once in awhile. that way you can come back refreshed and even stronger than before. you’ve been putting out alot of work lately. you deserve a break. can’t wait to see you come back to the dragon though, its looking really good. definitely working hard.
great models.:+1: :+1: :slight_smile:

Hey Denni5 - Thanks for the feedback! Yeah, I look forward to hitting the dragon again. I guess the thing that’s frustrating is working on something like scales and not having the end result be as good as what you envision… partially due to skill on my end, and partially because I need to find/make the right alphas. :wink:

Anyway, here’s a repost of my “Kwirkz” guy I posted above. All I did was open his mouth and apply a different material, as I think the last material isn’t very complimentary with regards to details… that and I need to remember that posing a model can make a big difference in how it looks. And now that it’s so easy in ZB3, there’s no excuse. :slight_smile:

And yes, nearly all my models to date have almost perfect teeth. They all see the same dentist and good oral hygeine is important. :wink:

kwirkz_05.jpg

I decided I needed another Orc… so re-worked Brutus into another character, which I’ll be developing further. There are certain things about Brutus’ design that have kind of bugged me since the start… one of them being that he seems to share more human qualities than Orc qualities… so I’ve decided he’s actually a “half orc”. :wink:

The other thing is I wanted to experiment with different looks… scar over the eye, broken tooth, different headgear, etc… but it probably wouldn’t be wise to do all these things at once (too distracting). So I’ve created “Krog”.

Krog is a full-blooded orc. Still in early development and I’m still trying to figure out a good hair design. I was thinking dreadlocks, but haven’t worked out how I’d model those just yet. :slight_smile:

Krog and Brutus are going to be in a scene with the dragon I’m also working on. Should be pretty cool once I can pull all these elements together. :slight_smile:

krog_00.jpg

He looks like he’s completely missing any muscles to make use of those nice chompers of his, which is a shame.

Here’s a store that sells human head models, but I think we’ll just look at the pictures :wink:

D’oh! I may have gone too far with the hollow cheek look. I’ll see what I can do. Thanks for the feedback!

very cool indeed!

Gorgeous models, zerodean, love em! My only critique would be with brutus, his hat seems to ride a bit high, like half of it would be empty, and with no strap it would topple right off the first time it got hit with a battle axe. It kind of makes me want to go up to him and just push it down tighter on his head, if that makes any sense. But overall, awesome models!

~Matthew

nugjar: Thanks for the comments and critique!

I can definitely see what you’re saying, but it is somewhat of an illusion. Look again, but this time consider that the eyes are roughly the midline between the top and the bottom of the head. There’s actually a lot less space up there than you might think.

Either way, if it really looks “off” then it’s definitely noteworthy to fix.

Here’s a sideview (and not trying to prove you “wrong” here, I really appreciate the feedback) to demonstrate what I mean… the red line in the pic represents the outline of the leather helmet liner, which conforms to the shape of his head.

I agree from the initial image here in this thread, that the helmet looks like there would be a lot more room than that!

[attach=60775]helmet.jpg[/attach]

Attachments

helmet.jpg

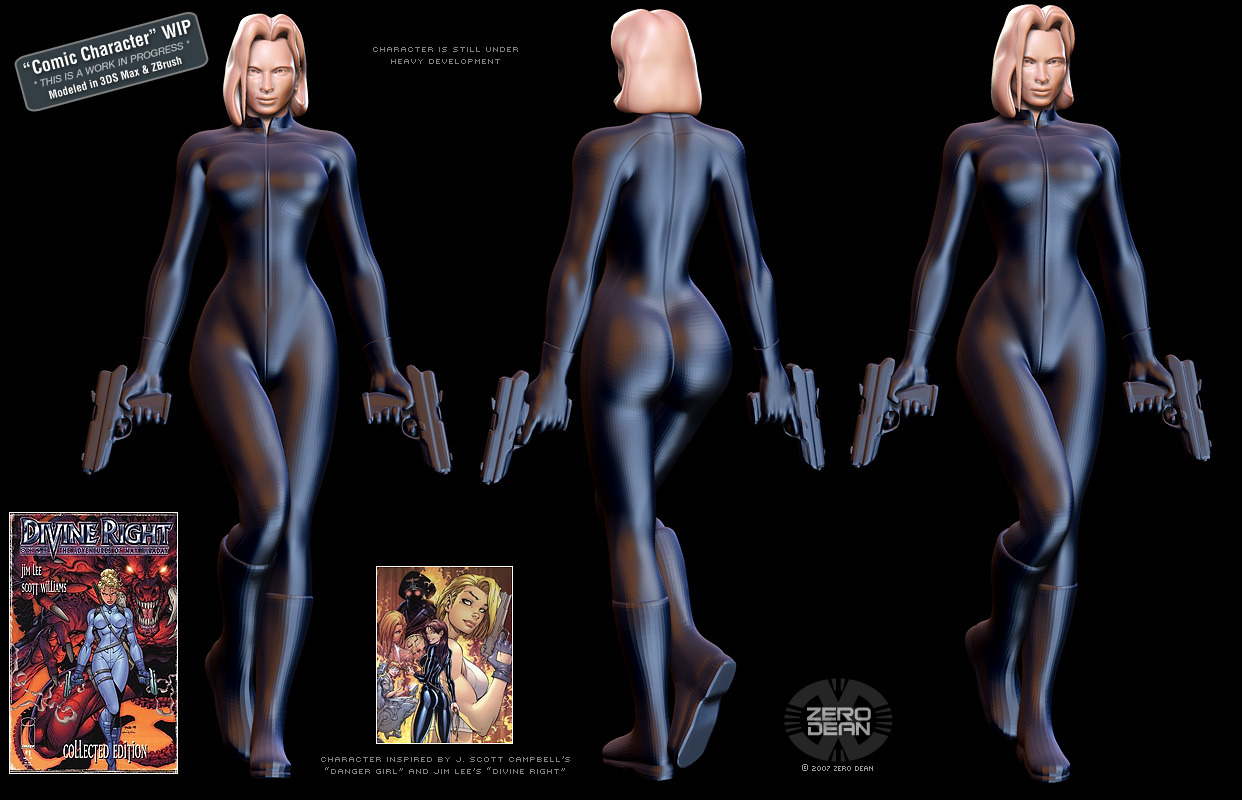
Been working on this for a couple days. A currently unnamed female character inspired by and referenced from Jim Lee’s “Divine Right” comic and J. Scott Campbell’s “Danger Girl”.

Was having a heck of a time trying to create detailed layers of armor for my Orcs, so decided to try working on a character that typically has fewer layers…mainly, a woman. :slight_smile:

Came across an image of a character in a symmetrical pose, so decided it would also be a great reason to try out Image Plane X. Plus it’s just a cool image to re-create/use as inspiration (see bottom left of image for reference).

The body proportions/curves are almost perfectly aligned to the reference image. And as such, I’m surprised they translate so well in 3D. She’s purrty.

The rear end is actually based off a “naughty supergirl” sculpture I ran across…which is also what I was originally going to sculpt, until I came across this symmetrical image and thought it would be fun.

After trying to get the original hairstyle right, decided to draw from the hairstyle of one of the main characters of the Danger Girl and basically make the character my own.

The body is the same base mesh I use for my humanoid characters (or was, before it was extracted as a subtool, then re-modified in max, and so on), which were all male, up to this point, so it was modified for breasts (fun!). The head is the same base mesh as my male human, which is a progression from my Orc mesh (which was a progression from a former human head basemesh). I simply made the features more feminine and used Image Plane X with a nice symmetrical female headshot.

Having lots of fun working on this one and it’s much easier to find reference for modern day women than it is for fantasy orc characters…though, I’m really mainly using the comics as reference. :slight_smile:

Still lots to do (going to add the accessories in the reference photo as well as refining details), but because she has a body, she looks more finished than much of my stuff…

The head is separate from the body and I’m keeping the body as one mesh until after transposing it. It’s been subdivided a few times for the render only.

Her hands and boots were originally separate meshes, but combined using GameMaster770’s make1mesh plugin.

I rigged her hands in Max using Biped to allow for easier “grasping”, but then tweaked the results in ZB. The body pose was all done in ZB. The pose deviates slightly from the reference in that in the reference, the right foot is in front of the left leg. I mistakenly tucked the right foot behind the left leg…but I think I like it better.

The guns are purely Max at this point, except for 1 subdivision in ZB. They based off the sillouette in the reference and a little Walther P99 influence. Since they’re so mechanical, I probably won’t touch them in ZB… ideally, I’d like to simply detail everything in ZB and export displacements to Max, for texturing, rendering, etc.

[attach=61170]full_body_02x.jpg[/attach]

Attachments

full_body_02x.jpg

The link is broken. Could you please direct me to a link where I can download these wonderfull skins ? Thank you