Well, if you don’t want it. Just send it my way. 
Don’t be too hard on yourself here. It seems to me that there are a lot of others who need help using them as well. So it’s not just you.
Well, if you don’t want it. Just send it my way.
Don’t be too hard on yourself here. It seems to me that there are a lot of others who need help using them as well. So it’s not just you.
BR:
Very very lucky for me, my generous benefactor does not totally
know about the misunderstanding. ( she has little or no interest in this
type of thing, other than listening to me shouting when a render
or something else turns out well)
So for political reasons must keep it.
I try to do some things in the program ( Poser and renders especially)
What I have been doing is basically lying about what program
produced what.
Since I now have a lot of them this is not entirely a lie, I even forget.
Vue and Poser are the easiest to remember:D
According to my count at the present Lemonnado is in the same
boat.
Regarding displacements, it took so long ( weeks) to get any kind of results
in Maya. I now do at least one render a week in Maya with displacements so
I won’t forget how ( seriously).
Message to Scott Spencer: if you buy Carrara, let me know:D

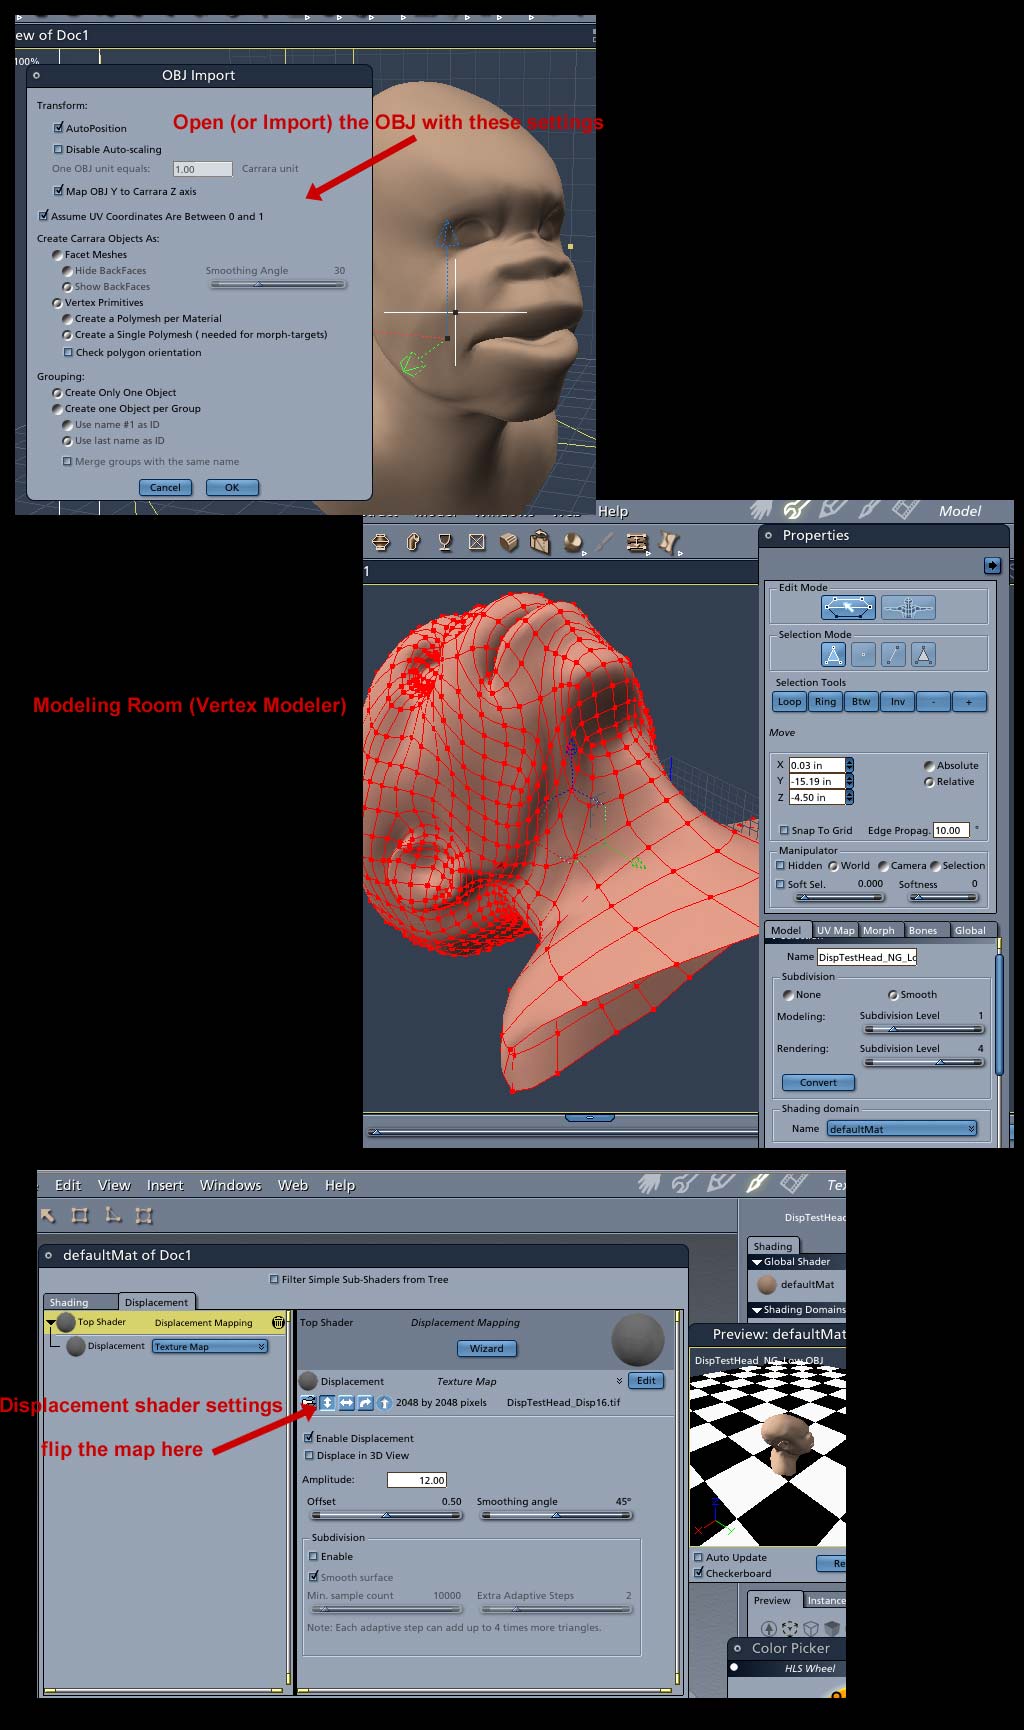
ZBrush displacements in Carrara 5 are easy.
Import model as a vertex object. In the Vertex Modeler select the whole object, click the ‘Model’ tab in the ‘Properties’ on the right and click the ‘Smooth’ radio button. Set Rendering subdivision level to a reasonably high value. This render used a setting of 6.
Switch to the Shader Room and click the Displacement tab in the object’s shader. Select ‘Texture Map’ and choose your ZBrush disp. map; flipping it will probably be necessary. Amplitude setting here was 18 but 12 is generally sufficient. If you use the Disp. Exporter then you can adjust there. For ZBrush disp maps make sure you don’t enable subdivision in the shader.
Render and you’re done.
Any problems, let me know. 
Mr. Civis, will try as soon as possible.
As I mentioned in another thread, there are a few
members here whom if I tried to pay back, I would
never succeed. You are truly in that group.
My gratitude.
…for this ZB sword rendered in Carrara 5?
And for Lemo’s image?
My Images took less than 2-3 minutes each. On a more moderate PC I’d expect less than 10 minutes each. With a good understanding of ZB and the terms, it’s easy to control… I’m having a blast…
Lemo
PS:Yes Bicc39, we are in the same boat 8-). But I think I lead with 1 Modo hahaha.
The ZB sword only took a minute or so, on a pretty low-spec machine.
Mr Civis,questions if you would.
When the displacement map is created for Maya. it is exported
in a tiff format, opened in photoshop and converted to an rgb
format. Note is made of the alpha gain, the image is flipped.
When exporting the map for use in Carrara what procedures, if any.
should be done.
Am exporting and working with a head that is basically 5000 poly.
During experiments with using the map keep hitting memory allocation error.
My machine has 1gb ram and this message is unusual.
To double check the settings with you.
Apologies to Lemonnado for using his thread for this, it does
have a slight relationship.
I think this is a good thread regarding anything in that direction. The inofficial ZB-Carrara 5 thread 8-). I discovered that there is a Vector render module… Needless to say that I had to get it. I was looking at the equivalent as stand alone product from another manufacturer and can happily say that it was a good decision not to procure that. The .SWF output is phenomenal. I made a website last night with some cool 3d speheres rolling around in the header and it took about 10 minutes to make. Only a few KB size as .swf… Alone for that the C5 procurement was justifyable.
I also made a quick and dirty test which ended up better than expectedd.
Poser James generated walk path and walk cycle. All default. Saved as .pz3. Imported into a demo interior scene in C5 and hit the render button… Rsult was surprisingly good but verry ‘grizzzzzly’. I stoped the renderer to recalc the lighting every frame and the grizzly’s went away. There were still a few weird artifacts (shadow fragments left on the floor which looked funny as James would have dirty feet) but I rendered everything in lowest quality. Render time about 5 minutes for 160 frames in 320x2something. GI! but map only calculated on frame one.
If interested I post it on my website so you can look at the results and the differences. I’ll try and make a ZB monster walk through that interior haha.
Lemo
…there surely somebody take you the answer 
Everybodys knows Zb & Carrara& other !
A very cool forum the best place for Carrara Hexagon…
bicc39,
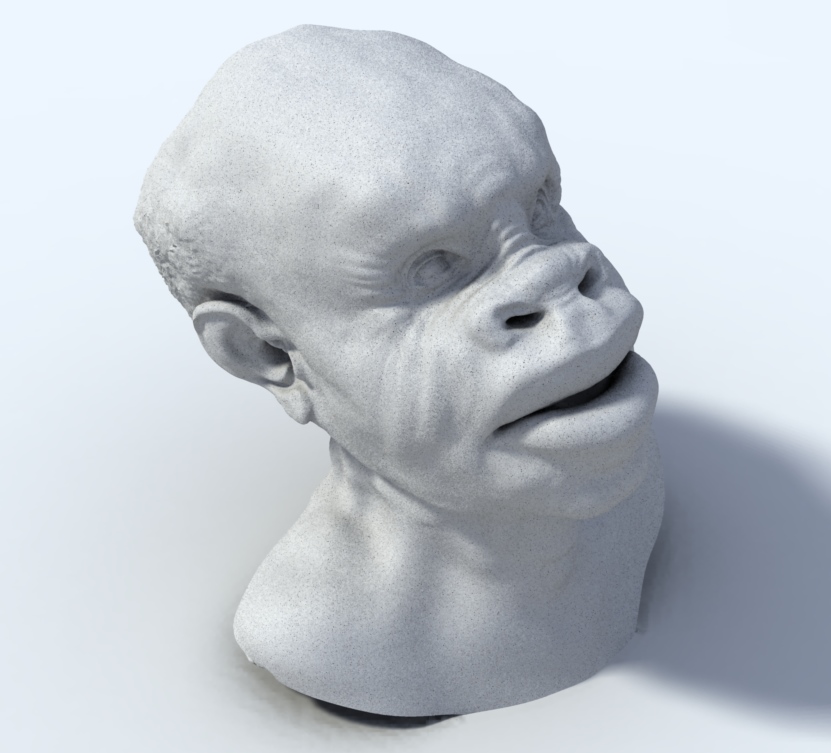
It may be that C5 is choking on the level 6 smoothing - that’s equivalent to over 20 million polys for a 5000 poly mesh - (although that wouldn’t explain why you get nothing when you lower the figure). You should only need a figure that is comparable to the number of levels you had in ZBrush. The slider is effectively multiplying by four each time. (I could use 6 for the sword because it is only 340 polys.)
Carrara 5 can cope with 16 bit grayscale tifs straight out of ZBrush. You can flip them inside Carrara (see my pic).
Here are my settings for Pix’s displacement head test in this thread which you might try to get things working.
HTH,
Many thanks, will try, to be honest I had forgotten about
this thread, saw a lot of it during the Maya period.
note to lemonnado,didn’t know if you know this, update for
Carrara pro 5 available on the Daz site.
Mr.Civis +1:
+1:
Had to lower the Rendering level to 4 error message at 5.
Amplitude 12.
Once again, at the risk of boring anyone who reads this, my
thanks. Maybe I could just send one big thank you each month, instead
of every other day.
Again apologies to Lemonnado.

Looks good!  I only used setting 4 myself for the rendering subdivision - it’s a higher low poly model than the sword - something over 3000 polys.
Glad I could help!
I could not pass up the deal on C5 pro…going to install today.
Wow, actually the first (at least for me) place that REALLY helped. One Question left for the C5 Pros. The Vertex Modeler shows the Model as is (all Quads), while in the 3D View, the Display is different, tesselated somehow. Can i avoid this. I want my clean Quads back …
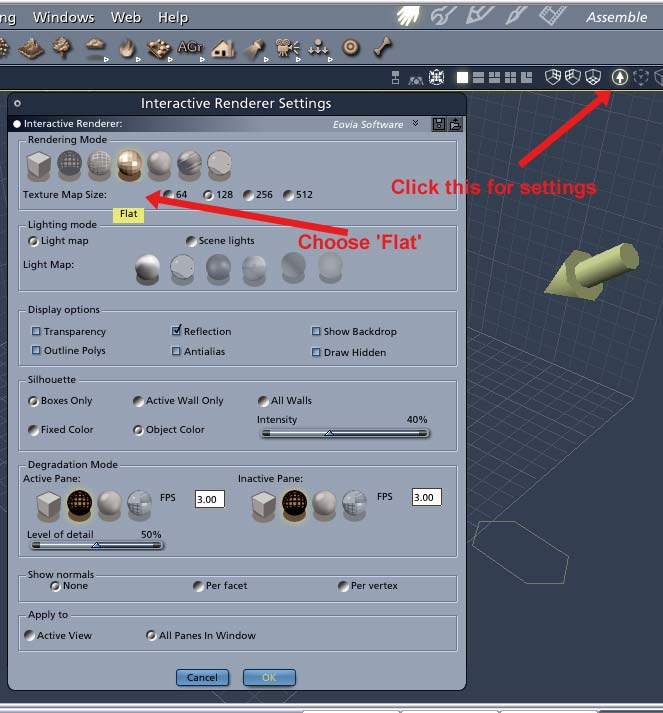
Yes, change the Interactive Render settings in the Assembly Room.
That’s weird, that are my settings, but each and every Quad seems to get two Tris, no matter, what i do. The Display in the VM is always fine.

The Assembly room uses a draft render and so uses triangles for shortcuts. It’s the polygons in the Vertex Model room that you want to be concerned with.
Rendered in Carrara Pro 5.1. An amplitude of 12 was used for the displacement and a smooth rendering of 4 was used on the polygon model.
 ]
]