ZBrushCentral

Warhammer SpaceMarine... help

Hey Zbrush World and fellow artists! im Brian Trochim and i am Trying to in a way Recreate the Spacemarine, now before you go “ha!, good luck”.

i understand that the Warhammer Design is a VERY delicate and flimsy design, and many if not most, and hey… even I have or will fail at making the Design look Awsome, regardless if your a WH40k fanatic, im am going for a more anatomicaly correct spacemarine. but stil keep somewhat close to the overall design.

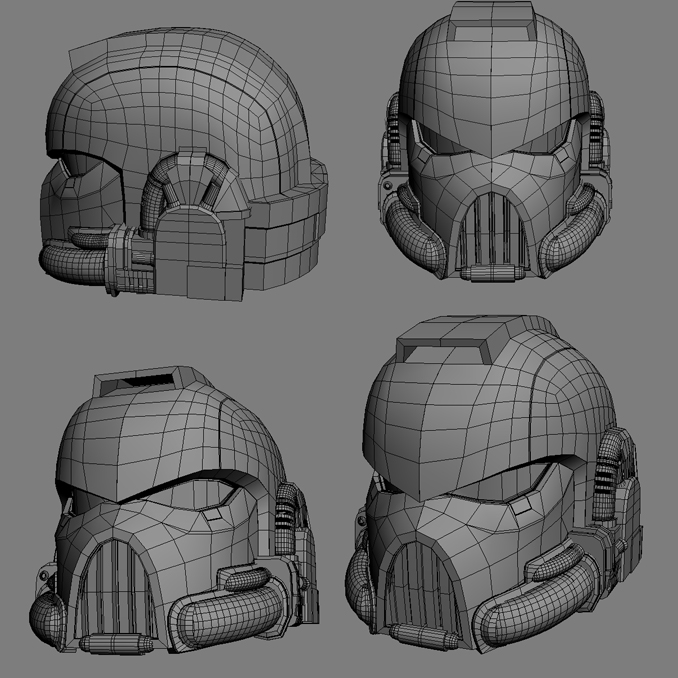
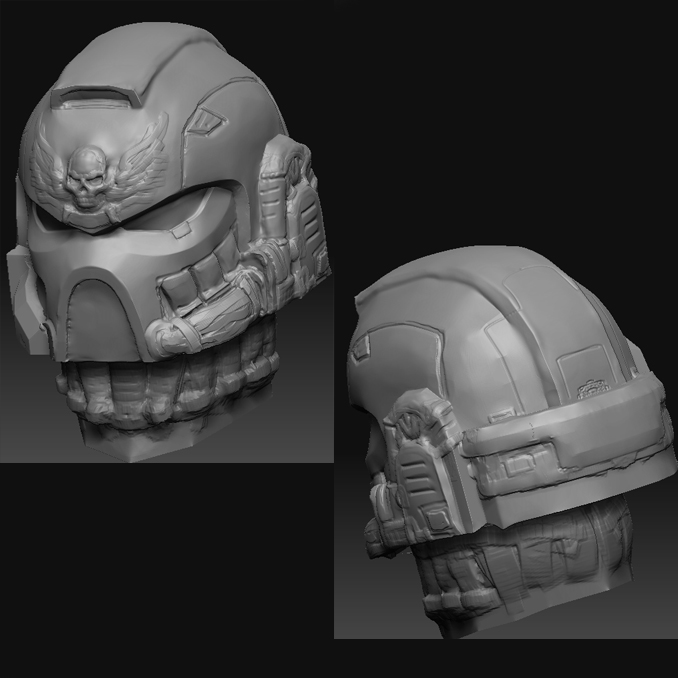
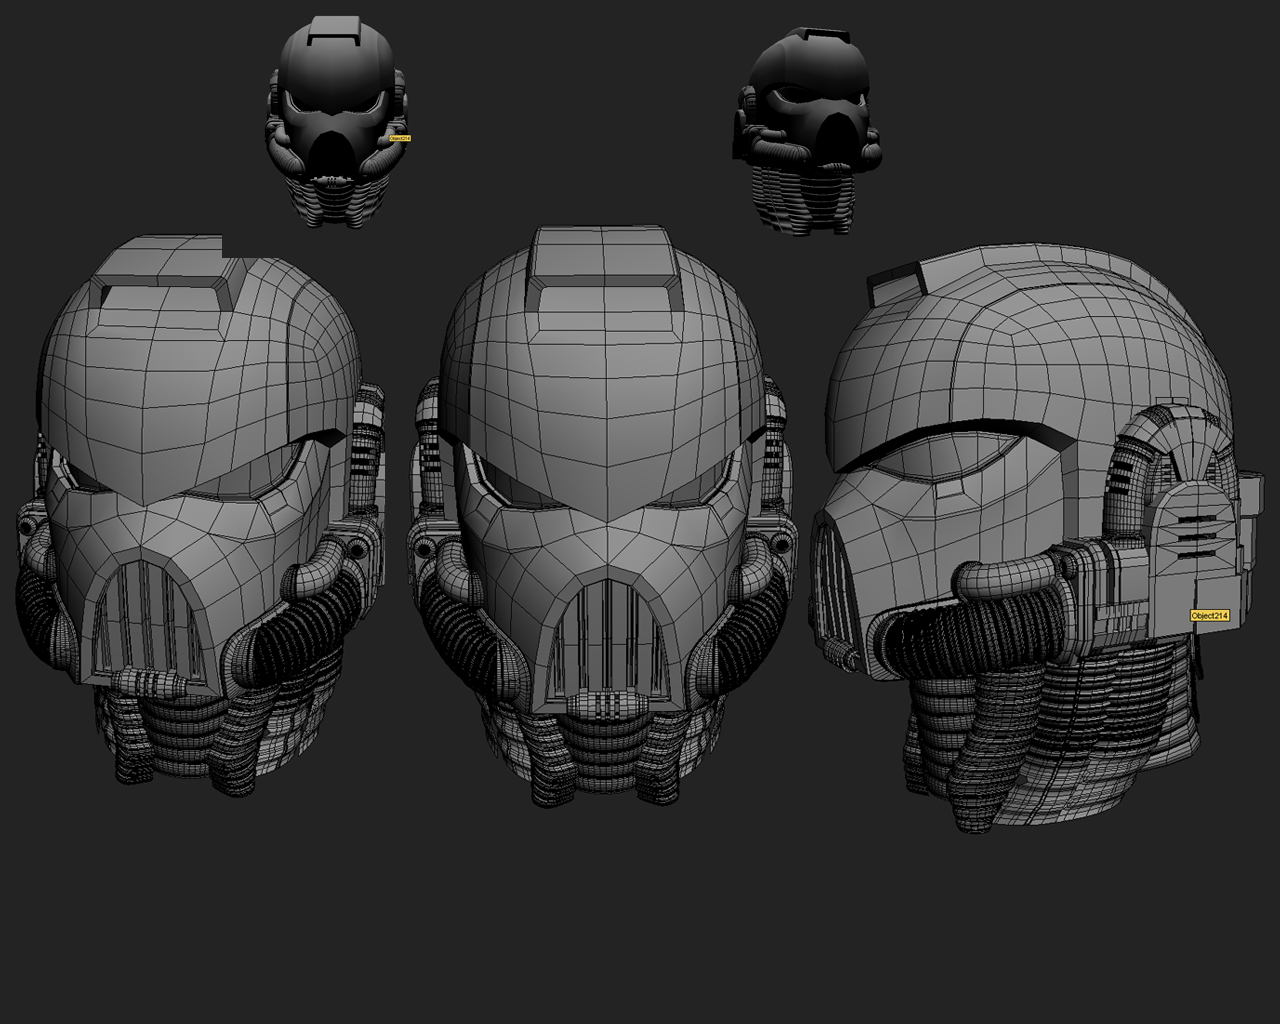
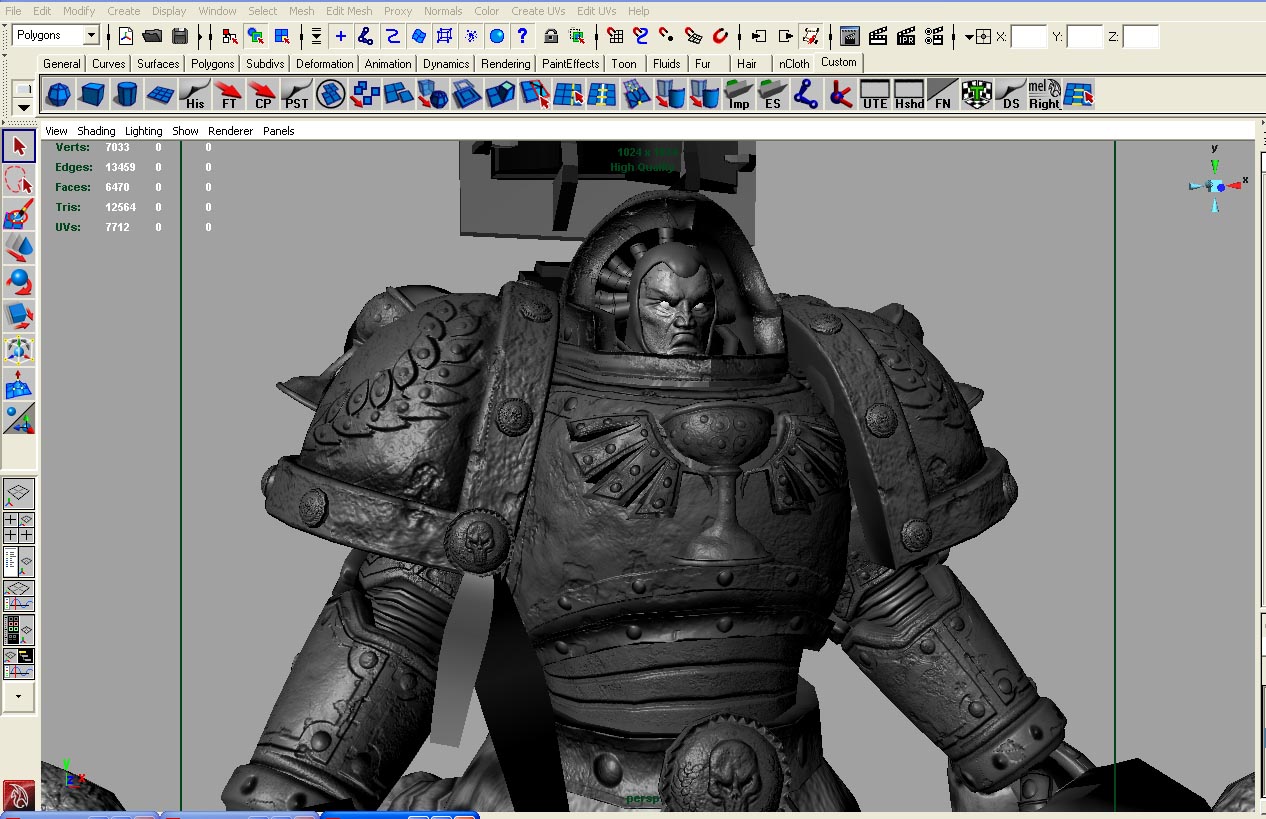
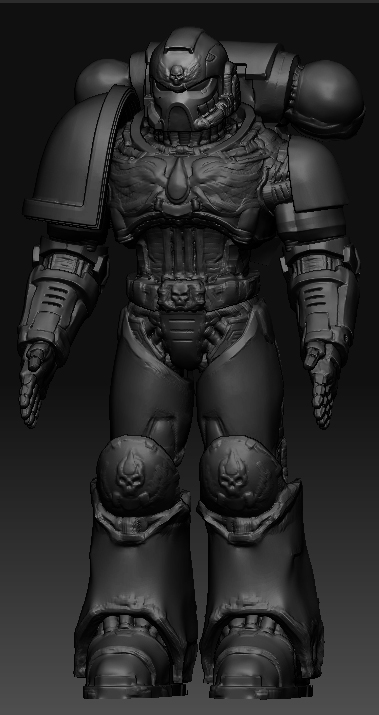
Now so anyways ive got lots of Questions, i am not super pro at Zbrush so im not entirely sure how to go about this. i have made a Base block out of the marine in Zbrush to get a idea how i am going to go about doing this, then threw it back into max to get a more defined sculp. As seen below.

SMpic.jpg

now im not sure if i should Make the skull (on the helmet)or a low poly in max then export into and merg it in zbrush. OR just model it in Zbrush.

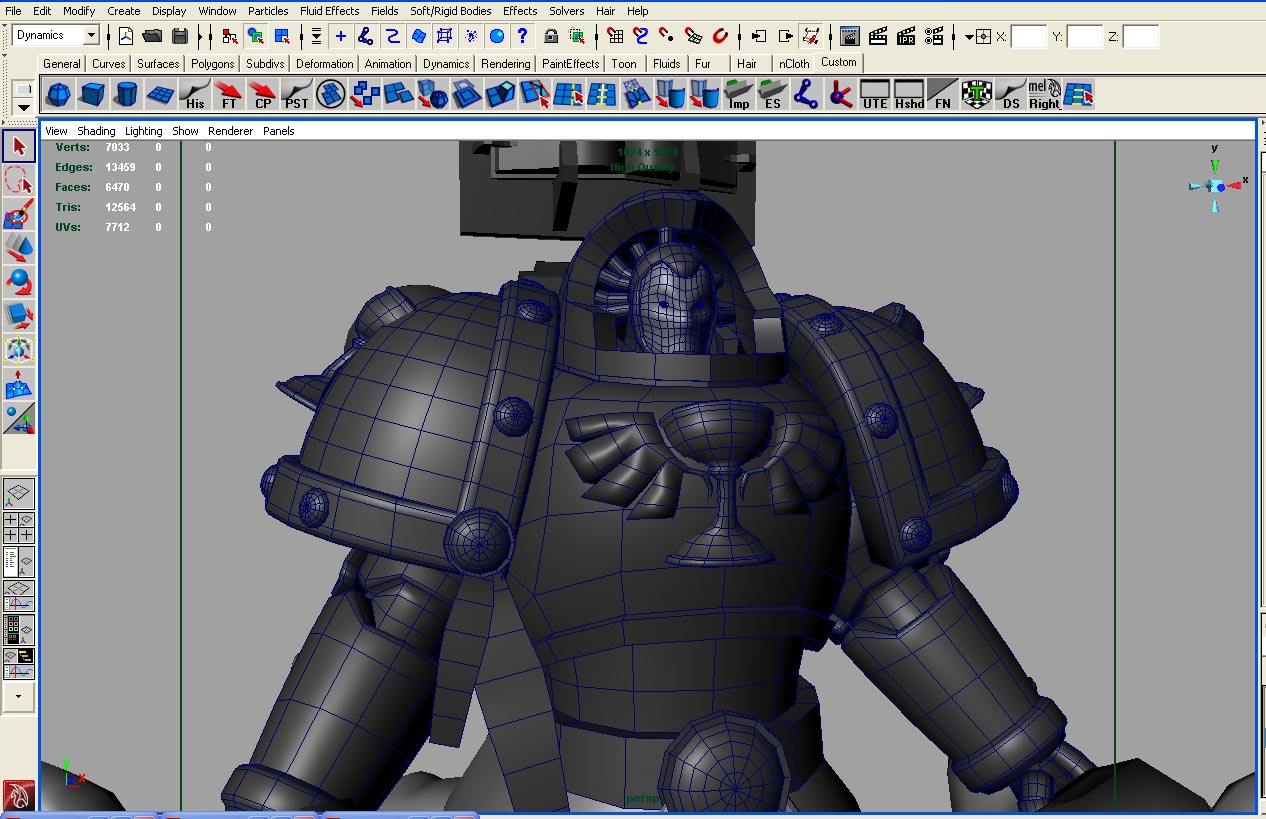
however. my comp sucks so the msot i will ever get is around 1.1 million polys on any one model. so i not sure how much i can just model on top of stuff.

also im not sure which parts are better off just projection mapping in max and zbrushing…

so eya any MORE question u could bring up and Advice you could give me would be nice. Im also on a strict time lime i oly have 6 weeks to make this thing happen. so more like 5weeks to model.

Attachments

Spacemarinehelm.jpg

moreheadstuff.jpg

1,1 mil is not much, but u can do some good detail . have u try to work with sub-tools,each at 1 mil , pice by pice ? then combine them at a friend that has a better pc. my pc is also a B.C. version, but i can go around 8 mil.
i like the max version a lot better , just me, it has more hard surface, u coult try the Smooth Group Import plug-in .

Piece of an advice - you don’t wanna sculpt on imported hard surfaces in zbrush using brushes (save detail such as skull on kis forehead) like clay, standard, flat and such, unless you want that melted kinda look. For hard surface, import them then use move and inflat tool only in zbrush to define them more (sharpen for example). Also check out the propreties for these brushes and check “accucurve” tab to see what it does for you.

Bye,
cr

Trying to make an anatomically correct marine is impossible in the 1st place
THAT’S WHY THEY’RE SPACE MARINE!!!

Have you decided on the Chapter?

Sub tools are want you want to use for the small details like that. Also it looks like a Blood Angel yes?

yes it is a blood Angel. (greatest chapter in thet history of warhammer!!!) just my opinion of course :slight_smile:

yes i am used to subtools, when i said 1.1 mil per model i ment as in ill have 12 modles in the scene to make up the spacemarine but each will be 1.1 mill comeing to 12.12 or what not. errr its early my math is dead.

and dont worry. im making an anatomicaly corret marine (with all the special jubnk in his body. hes still buff dud. i just hate the small head… im ocd to hell so it bothers me. =D

SO im going to want to do a complete different model for the skull on the forhead yes?

thanks for the advice! helps me alot. i wasnt sure if i wanted to just make the skull on top of the mesh. so this helps me alot.

anyone notice how long the replies take? i just posted yet i dont see anything? or is this my enternet sucking??

It’s because you’re not promoted to a regular member. If you continue posting hence convince the staff you’re not a “one time visiter”, you’ll get the benefits of your posts being published immediately, sending pm’s to other members and voting. But beware, don’t cuss and send innapropriate material, such as nudity, unnanounced, for you’ll get banned. But chopped off heads and hearts on a stick are good :+1:

u are a new member. u don`t have a net problem :lol:

Blood Angels? HA! Lol just kidding, I’m a Soul Drinkers fan personally. Nice start bro. Yeah like the other guy said, it’s tricky getting the proportions right as it seems to vary slightly between the actual models and the concept work you see on the net.

If I may, I think his torso needs to be bigger, like a barrel chest. That and the shoulder pouldrons seem to be what give SM’s their bulk. I’m working on one myself and I know how frustrating it can be getting the details right, especially on the areas that are hidden by the armor.

Anyways, good start, and luck with yours.

yea, right now ive got the helm pretty much started in the direction i want, but im really having trouble alineing the arms to rotate and not rotate wrongly im really thinking i might have to give him double joints in the shoulder arm.

also im having hard time making the lower torso area. i dont want wires running down the center because it wouldnt make sense combat wise and its to easy to just slap 3 wired together in the middle like most do.

ill show you all what i mean.
ill have pics up as soon as i can get my photoshop up and running.

Well, a few general tips for you.

  1. Geek tip: Space Marines aren’t “anatomically correct”, strictly speaking…they are actually giants compared to normal humans. And its not that their heads are small, its that the armour around them is so big and massive.

From a practical standpoint, smaller heads are often used by artists to convey a sense of bulk and scale to the body. Think of how small the Hulk’s head is always depicted in relation to his body, then imagine if you increased the size of his head, how his body would look less massive.

2)A million polys? Are you working on a laptop? Are you sure about this limit. Even on lower end systems, ZB can usually squeeze out 4-5 times that amount per tool with relative ease.

If true, you might consider spinning your model off into subtools. One subtool for the head, one for the torso, etc. That way that maximum limit can apply individually for each subtool, and you actually have many millions of polygons over the entire body, allowing for more detail in each section.

  1. If you have the figure modelled already in Max, you can import the figure into Z with the smoothing groups intact. Marcus wrote a plug in for importing smoothing max smoothing groups into Z…you should be able to find it on the scripting/plugins forum. That way, all the creased edges will be perfectly intact and mechanically precise, and you can just use Z to add detail.

ok so my spacemarine is all done and ready for import and im going to start by throwing the helm in zbrsh first. however the smooth and crease plug in isnt working and so all the egdes go blaaaah… and it goes goop like most.

it says:

[attach=157575]thingk toshowrawr.jpg[/attach]

[attach=157576]helmetitime.jpg[/attach]

Attachments

thingk toshowrawr.jpg

helmetitime.jpg

Huh. Dunno, Ive never actually used the plug in as I don’t benefit from the use of Max.

There are still things you can do though, with a bit of effort.

In your external app, you can apply a very fine bevel to all the edges you want to remain crisp. This “reinforces” them through the subdivision process. Complicates your geometry a bit more though.

If you dont want the extra geometry, you can assign a different material to each of the logical smoothing groups, and Zbrush should import these as separate polygroups ( or at least, it can be set to do this). These polygroups will assist you in isolating elements to use with Zbrush’s native creasing functions, which I wont lie, are a bit of a pain for complex models. Once you get all that creasing assigned , keep it up through maybe 4 SuB-D levels or so, but not all the way to the highest SuB D level, to keep the edges from being impossibly crisp.

[edit] Or, you could play around with the new Hard Edge planar brushes in ZB 3.5 , and re sculpt the helm in ZB :slight_smile: This sounds like the most fun to me.

oh yea any comments on the helm? any, " i dont like that" or hey maybe you should do this?"

just a thought couldnt put it in to zbrush because its going wierd on me so im going to go back and define some more things on the backpack.

I think the helmet looks fine bro. Pretty heavy around the neck area in terms of polycount though. Then again, is this a game model or just pure concept sculpt? In the latter’s case, I guess it doesn’t matter as much. I think it just needs a little bit of detail in zbrush, i.e damage, scratches, dents, etc.

I not sure if someone’s already mentioned ‘creasing’, but I definitely recommend that method of maintaining hard edges in Zbrush since the helmet base mesh is fairly low poly which makes it easier. It’s easy, just select the polys whose edges you want creased, and hide the rest, then just hit the crease button. This creates a fine bevel around the ‘creased’ edges which maintain the hard edge as you subdivide with smooth(sorry if you already know this, I just figured it out a while ago, duh! lol). You might want to add a little more geometry to the helmet so the polygons are more uniform. I find this helps in spreading out the polys evenly when subdividing in Zbrush (otherwise you get high poly concentration in one area, and low concentration in others which can affect your sculpt). Anyways, keep up the good work bro, happy sculpting.

P:S
Nice to see a fellow space marine fan. Those dudes are pure badasses. Check out my WIP of a Soul Drinker librarian…

[attach=158847]Sarp_Wireframe.jpg[/attach]

[attach=158848]Sarp_NormalMapped.jpg[/attach]

Attachments

Sarp_Wireframe.jpg

Sarp_NormalMapped.jpg

yea dude nice work your zbrush came out well, but yea im really confused on the whole crease thing, i think im just goign to chamfer every edge on the model and then throw it into zbrush.

as for the neck im just going to projection map some peices in max and some peices in zbrush, and yea its supposed to be a game model.