…
Great studies
Amazing work of anatomy
TOP 

…
…
Great studies
Amazing work of anatomy
TOP
…
sweeet 
i like his teeth. good job. good facial ‘volume’ too
Great study, fantastic expressions, splendid model, all absolutely excellent and even funny. Top job all the way. This is not just top row, it’s one of the best of the top row.
And inspiring, I must try my hand at a similar study. Thanks for showing us the way.
nice work it made me smile, the sculpts and also the ref. (proficiat en veel geluk op Toprow)
Thank you so much everyone, your responses has been nothing but hearthwarming to me. Hearing that this guy made you smile or feels alive is more then I could have hoped for. Thanks a ton! 
Point: Just used the webcam that’s built in the top of my laptop screen. Nothing too fancy haha.
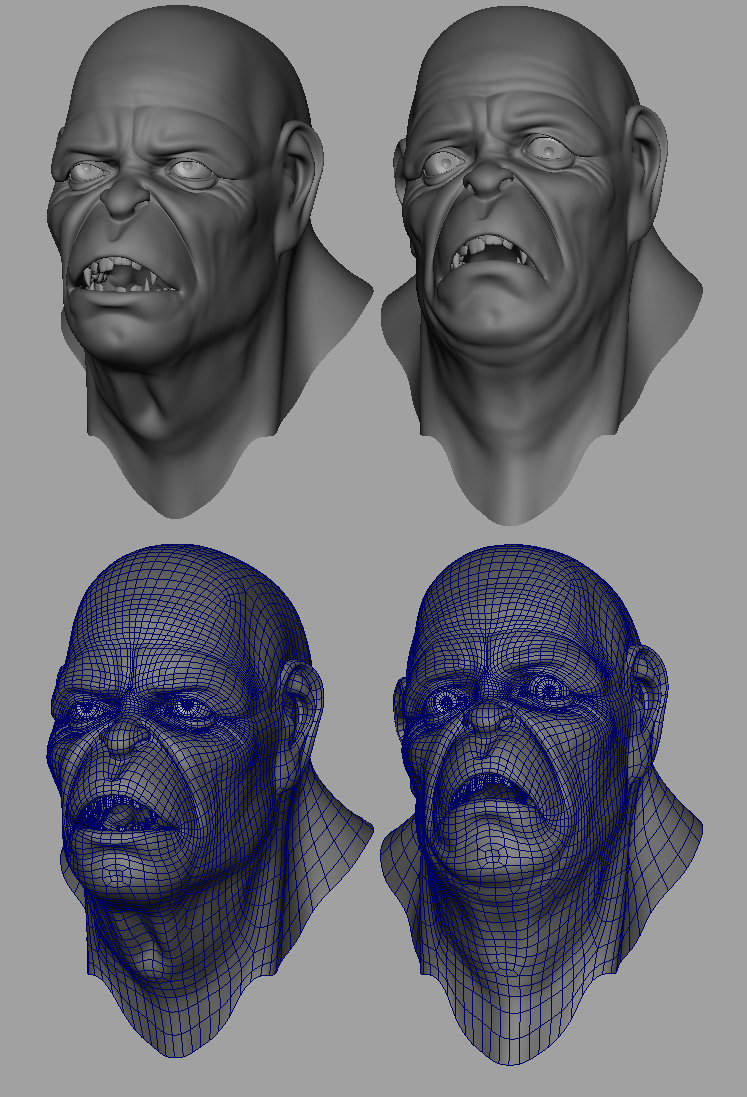
Aberrant / Neeraj: About your questions concerning the deformation and process about creating these faces. I aproached this model from a film production point of view. Meaning that the model doesn’t only has to work as still imagery but also will need the proper topological support to be able to move and deform correctly in animation.
Forming wrinkles in a polygon mesh gives you a completely different effect then blending in wrinkles in a painted or extracted displacement map. The effect of flesh and form compressing into eachother I believe can only be achieved properly in a realistic manner when it’s actually modeled in. The displacement detail is just along for the ride.
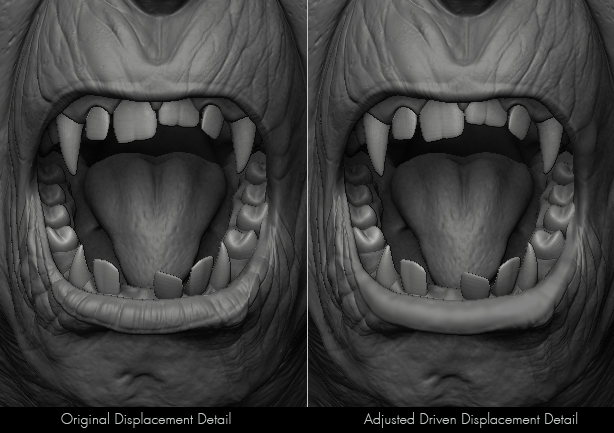
The basemesh I build therefor is fairly dense. All the big wrinkles and most of the wrinkles around the eyes were modeled into the original model in Maya. Most of the deformation for the expressions takes place there. The displacement detail I sculpted in Zbrush was applied to these shapes and corrected appropriatly later. These so called Driven Displacement Maps can be hooked up in the shader tree and connected to the blendshapes within Maya so they dial in when nescecary. These corrective displacement details were fairly minor, but absolutely crucial to achieving a realistic effect on screen. I’ve attached an image to show you an example of the corrective displacement work I’ve done.
The ‘Rage’ mouth on the left shows you the original displacement detail applied to the blendshape without any adjustments made. The ‘Rage’ mouth on the right shows the corrective work I’ve done, fading out the wrinkle detail on the lip, which happens when the mouth is pulled open this wide. The lips stretch around a much larger area and loose the crumbly lip wrinkles that showing in more neutral expressions.
The other image I’ve attached shows you the original Maya model and the ‘scared’ blendshape. Here you can see what happens in Maya and what was adjusted in Zbrush if you compare it to the final render.
I realise that for the goal of creating 15 still images, this approach might seem overdone or unnescary. I could have done it all in Zbrush, but in the end it saved me time. Ofcourse if I would ever have the intend to get this animated, it would actually work, which is a nice idea.
If you want to know more about driven displacement maps I can suggest to pick up a copy of Hyper-Realistic Creature Creation which is beeing published by Autodesk and is co-authored by Jeff Unay, one of the facial leads over at Weta Digital.
Hope you found this useful, let me know if there’s any other questions!
[]
[]
Thank you so much for this explanation in detail
ARG!! you and i are the same age, yet you are so much better than me. i practice hours a day and when i go to work i think all day about practicing more. then someone like you comes along that makes it seem effortless. please tell me that you are completely obsessed with 3d modeling and practice 12 hours a day so i can feel a little better lol… trolls should have long ears and pointy noses! what you made is an ogre! im just kidding… its flawless and im just jealous
Wow Awesome …great expressions…
Great expressions buddy!
Alex Oliver
amazzing expressions and studies
hahaahah my favorite is the silly face
haahhahaha
Fernando Issamo
Please make a video demonstration on how you did the expressions. I think the forum really needs a tutorial on how to do expressions in Zbrush.
That would make a great tutorial. One I think is long overdue in this community.
Impressive work, well-deserved top row, congrats on that!
Laying the mandatory compliments aside, your photo serious of yourself for the expressions is among the most hilarious things i’ve seen on this board. Especially your Drunk Expression, reminds me of Leisure Suit Larry in a weird way. Or a Penny Arcade character? Don’t fully understand my associations here, but it’s very, very funny.
Still, amazing work.
i just wanted to let you know that youve inspired me to start sculting in clay again… thank you so much!!! i hope to be able to sculpt a head and later make it in zbrush. you the man!!
brilliant work, your facial expressions really bring this character to life. Using displacement maps to animate the facial is a great idea, thanks for the tutorial.
Great Job it would be cool to see him animate through all the expressions… is that possible with how you built it??
wonderful ! So vivid the facial expressions are !
um…wow. This is a great “study” The muscle flow is awesome…
I would also like to add an ‘awesome’! Great choice of facial expressions
Very expresive and beleiveable. Awesome work.
great job
regarding your base mesh density prior to using zbrush… i’m not sure i understand why you’ve set it up this way
is it now possible, with ZSpheres, GoZ and Decimation Master to do all base modeling and sculpting in ZBrush and simply flip back and forth to make realistic expressions in a Maya rig for animation?
i just want to make sure i understand correctly the capabilities of the new plugins… and i’m wondering why you have set up your wonderful creature the way you did
thanks