Hi Steve
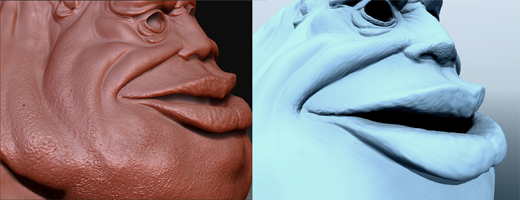
I’m having some problems with AUV’s texturing the whole body. I have tested each AUVratio setting and they all seem to be causing streching or strange aritfacts. I just can’t seem to get close to the level of detail or form in the Ztool. Increasing the map resolution doesn’t seem to help.
In short i’m a bit lost as to the best way to approach the UV’s and mapping of this charecter. In a previous post you mentioned about me sending you the Ztool, if you are still interested it would be great to get your expert opion on how you would tackle this charecter.
Hi
Has anyone experianced problems trying to bring 8192 x 8192 Normal maps into LW, I’m getting a message saying:
Could not load clip
Unsupported file type and/or file not found.
I get the same message when I try to bring in any 32 bit maps exported MD3 srtaight into Layout. Loading the images in Modellerseems ok.
Currently I can only seem to work with 8192x8192 after I’ve converted them to 8bit images in photoshop. But this will only work for the displacement maps not the normal maps.
I’m using ZB3.1 and LW9.3
Cheers
Mik
Hi Michael,
Texture stretching is often due to the condition of your model in LightWave. I tend to model really low poly objects, which is great for LightWave but bad for ZBrush. The best thing to do is to add extra edge loops to create a more even poly distribution so that almost all the polys in your object are the same size. This is critical to getting the best results. Also, you want to make sure that your subpatch object looks nearly identical to its base cage. The more disparate your cage and subpatch objects are, the more texture stretching you’ll get.
If you’d like to send me the object I’d be happy to take a look at it. I’m currently running behind on several freelance projects so it may take up to a week for me to get back to you. But if you don’t mind the potential wait, go ahead and send it to me at [email protected].
As for the large image sizes, I’ve heard of some users reporting problems with the TIFF loader in 9.3. I’ve not encountered this but I’ll test it when I get home and let you know what I find out.
Cheers!
Hi Steve
I’ll send you the ztool, it would be great just to get an expert eye on things. could the image size issues have anything to do with Ram I currently have 2Gb of Ram on my machine.
No problem with the wait, I can crack on with the smaller displacement and normal maps and set up some of the long shots
Is it ok to send the ZTLfile as a 3 18.8Mb Rar files to your private email?
Cheers again
Mik
Hi Mik,
Yep, that should be fine. If it bounces for any reason, let me know and I’ll set up a private FTP on my site where you can upload it. Please also send the original LW file (or the OBJ file you started with). 
Cheers!
Hi Steve
I just sent those files to the email on your website. I hope they came through ok. Let me know if there is any problems
Cheers
Mik
I’m using LW 9.3.1.
Has anyone else had problems using Steve’s Displacement Map DE-JCEK-EACADA-D32 code in LW 9.3.1.
Steve’s 16 bit code works fine, but the 32 bit just goes white in LW and won’t load.
I thought LW could handle 32 bit now.
Hey Steve… if your there and back again tutorial available in a downloadable format? I try to keep all my tutorial stuff available locally, incase they vanish off the surface of the earth, or my net connect goes down.
I get better results if I change the original
DE-JCEK-EACADA-D32
to
DE-JDEK-EACADA-D32
it changes it from Auto to Auto +A.D.F. although I’ve no idea what that means just now.
Mind you I say better but I’ve never got anything as good as I can get in Renderman for Maya. I can have a map thats full of detail and a mesh at as high a sub-d level as my computer will take yet still not get the displacement I expect. Its always lacking in detail. I’m obviously doing something wrong.
Thanks for the code will give it a go.
On the LW front I am sure with the next update they will have fixed the 32bit issue.
Helo Steve,
I use ZB with Lightweve 9.0, and I have unwraped uv. When I export OBJ to ZB and klick uv check ZB has crashed becouse there is no uv map.
Another proof that OBJ has not uv map is reload exported object to modeler.
How can I export OBJ from LW with uv? Please help me to solve this problem.
Sorry for my English
Unless you have not written it to save time, you are missing a lot of steps.
Create blank texture
UV-Texture
UV Check
Reasons for errors could be …
Overlapping UV
More than 1 UVmap
Best to read Steve’s tutorial. Really helpful
Hope this helps…
If you created your UV map in LightWave but it’s not being saved with the OBJ file, the most likely source of the problem is that the UV has not been assigned to a Texture channel before exporting from LightWave. Try this in Modeler:
- Open the Surface Editor.
- Click on the T button to open the Texture Editor for the Color channel.
- The default texture will be set to Image Map. Change the Projection from Planar to UV.
- Choose the unwrapped UV map you created. You do not need to assign an image.
- Export the OBJ.
- Reload the OBJ into Modeler.
- Check to ensure the UV map is there.
Your OBJ should have the UV map saved with it. If it does, you should be able to load the object in to ZBrush without a problem. If it doesn’t, there may be a problem with the version of the OBJ exporter. Make sure you’re using LightWave 9.3.1 or the new Open Beta for 9.5.
Hope this helps!
Steve
I’ve got a copy of the ZPipeline Guide for LightWave which is the updated version of the “There and Back Again” tutorial. You can download it here:
http://www.stevewarner.com/Tutorials/LightWave_ZPipeline_Guide.pdf
The tutorial was written for ZBrush 2 but the concepts still apply for ZBrush 3. I have plans to release a new version with a ton of updated material but it will be awhile before I can get to it as I’ve got my Modeling book for Wordware that I’m working to finish off at the moment.
Cheers!
Steve
You’re not doing anything wrong per se, but LightWave works differently than Maya so you have to use a slightly different workflow. I’ve got a lengthy tutorial in Issue 18 of HDRI 3D Magazine which covers the steps needed to recreate highly detailed models in LightWave. I’ll also be covering that info when I update my ZPipeline Guide document sometime later this year.
The best advice I can give in this short space is that you’ll need to use a combination of maps to recreate the details in LightWave. You should use a displacement for the overall form, a Normal map for medium to high frequency details, a bump for micro details and a diffuse map to help accentuate the details. The HDRI article talks about how to generate each of these as well as how to reverse-engineer a sculpted mesh so that you can transfer the details to dedicated maps like a bump map (which is critical in LightWave).
Cheers!
Steve
Thanks for the link, Steve!
Hey Steve, thank you for putting a lot of time and effort into creating that pdf tutorial. Ive tried out your tutorial a number times but I tend to get confused and it hasnt worked for me yet. If Ive got this correct…your tutorial is based on if you already have a lightwave model .obj that you export to zbrush, sculpt, then bring back overtop of the original lightwave model. What if I made my model completely in zbrush, and tired exporting it? What steps should I omit and take?
I just started a thread before seeing this one that I asked alot of these questions and posted the problems Im encountering. Think you could check it out when you get the chance?
http://www.zbrushcentral.com/zbc/showthread.php?p=453279#post453279
Wish I understood this stuff better haha.
Thanks for the reply Steve. I’ve not checked back here for a while as we’ve been busy on non zbrush stuff. But I came to the same conclusions. Rendermans sub-d and memory handling are just so far removed from LW’s that its crazy to expect LW to achieve the same. The only way is to compromise and use displacement for low frequency detail and the normal and bump combination for medium and high frequency. Its a shame and does show, especially when producing high res print work. But at least that can be photoshopped to reintroduce some edge detail.
But the single biggest problem we’re having now is re-uving. We’re used to a mudbox pipeline where you can simply export the lowest level, re-uv, bandsaw, cut and paste and re-top it as much as you like, load it in and get displacements and normals without any hassle at all. Thats just impossible in Zbrush as it relies on point order which is extremely difficult to maintain when uving within LW. Unless you use ProjAll on an appended subtool but then that can introduce all sorts of spiking that can be very difficult and time intensive to fix.
Its proving very frustrating to not have (or appear to have) that flexibility.
I’d be interested to hear about any LW specific solutions to this.
Hi AA-ron,
Sorry for taking so long to reply. My wife gave birty to our first child back in February and my free time has been severely limited as a result. 
If you create your object entirely in ZBrush (typically from ZSpheres), simply lower the Subdivision Level down to 1, enable UVs, Create an AUV or GUV for the mesh, then export it as an OBJ. (You may need to turn on the Tool | Export | Flp button to get your normals facing the right direction.)
After exporting your object (your mesh should still be at the lowest subdivision level), use the Displacement and Normal menus (or just MultiDisplacement 3) to create displacement and normal maps. (Make sure the maps are flipped vertically before exporting so the geometry lines up properly in LightWave.)
Once you’ve exported your object and maps, you can pick up the tutorial from the ZPipeline Guide for LightWave 9.
The one thing I will note is that if you start your object in ZBrush, your Level 1 Subdivision might be REALLY low-res. If that’s the case, it may make it hard for LightWave to recreate the detail adequately. The solution is to lower your Subdivision level to 2 or 3, then Delete the lower subdivision levels. Finally, export the mesh and create the new maps.
I do plan on updating the ZPipeline Guide in the next month or so, and I’m leaning towards doing it as a video series. I’ll post here once it’s ready.
Cheers!
Steve
I think that’s one of the hardest lessons for LightWave/ZBrush users to understand. LightWave’s displacement engine is really outdated. Hopefully LW10 will resolve this, but for now, we have to rely on Bump maps for the high-res detail.
If you’re doing a lot of print work, you may want to consider doing the renders right in ZBrush. ZB3 is capable of 8000x8000 canvas sizes, which is typically enough for most print projects, even if you’re using AA Half. I do freelance book cover designs and occasionally use ZBrush for the illustrations. Just pose your model, add a marker, drop it to the canvas and add all kinds of crazy detail. More and more I’m finding ZBrush to be the most capable illustration package out there.
I do have one solution in mind that should work, at least for the UVs. It basically involves transferring the maps to a different UV and goes something like this:
- In ZBrush, do all your basic sculpting but leave the detailing until later.
- When you’re finished sculpting the basic form, drop to the lowest subdivision level (assuming your base mesh came from LightWave) or a subdivision level with roughly 1000-3500 polys (if you sculpted from ZSpheres), then delete the lower layers (see note below). Create an AUV or GUV. Then export the mesh, create your maps (be sure to flip vertically) and save them as TIF (displacement) and PSD (normal) files.
(Note that if you started your mesh in ZBrush, the model you export should have enough polys to look vaguely familiar when brought into LightWave. If it has too few polys, it will make it harder to recreate the details with the displacement map.)
- Close ZBrush and Open Modeler. Then import your OBJ file.
- Create your new UV in Modeler (the PLG tools are best for this). Your model should now have the AUV or GUV from ZBrush and the new UV you created in LightWave.
- Load your object with the new UV into Layout. Apply the Displacement to the Color channel of the Texture Editor using your AUV or GUV.
- Add the Surface Baker Shader to your surface.
- Open the Surface Baker options and select your new UV (the one you made in LightWave). Check the Bake Color option to bake the color texture but turn off Diffuse and Illumination. This should ensure that the the color map is transferred with no change in its shading. Then set the map size to match that of your existing map. For example, if your displacement map is 2048x2048, set the surface baker map size to the same.
- Render a single frame. The details of your displacement map will be transferred from the AUV or GUV to your LightWave UV and the map will be saved to disc. (You should be able to retain the high-frequency detail of your displacement by saving your map in the .hdr format and then converting it back to a TIF in Photoshop.)
- Repeat for any other maps (i.e. bump, normal, etc.)
- Open your object in Modeler. Delete the AUV or GUV, leaving only the LightWave UV map. Apply this map to the Color channel. Then export the model as an OBJ.
- Import the OBJ and reconfigured displacement map into ZBrush. Subdivide the model to the level you previously had it. Then use the Displacement function in ZBrush to apply your displacement map to your model. (You will need to tinker with the displacement strength to find the right setting.) This will restore the shape of the object to what it was back at the beginning. You may need to do some minor adjustments but they should be relatively minor.
- Now that your object has the new UVs and looks like it did at the start, you can continue detailing the high-res model. You should also be able to use ZBrush’s Retoppology tool to adjust the flow of your mesh, although I haven’t tried it using this technique and can’t say for certain.
I hope that helps somewhat!
Cheers,
Steve