i’ll try
thank’s
Leo
Phew!
And I thought I was the only one having problems with spotlight.
Thanks for pointing out about the manual on the folder.
I seriously haven’t thought about that at all(no I’m not kidding)!!!
I haven’t found how to paint on model yet but I wanted to say that there are some other really nice how-to’s in there.
I better start reading!!!
You also need to make sure you have RGB or MRGB on and Zdepth (or whatever its called ) off.
Doesn’t work
Leo
I’m glad to see I’m not the only one having problems with spotlight! I’ve read and re-read the manual at least 10 times, but I can’t make spotlight function the way it is shown in the preview video.
- I load a ZTool (in this case a polysphere) subdivided to 6.
- I go to lightbox and double click a texture.
- Nothing happens
- I go to lightbox and double click again and the texture and widget comes up.
- I adjust the texture to paint
- I turn on the RGB to 100% and Zadd to a lower value 10.
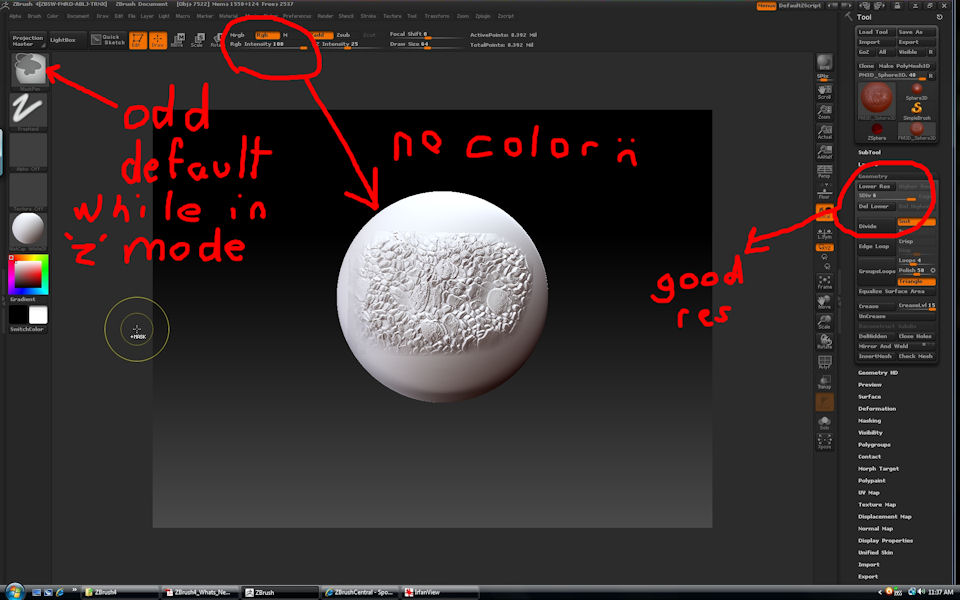
- I hit z to begin painting. Unlike the preview video the texture doesn’t disappear so that I can clearly see my object? Instead, the texture stays in front of the object.
- Upon pressing z again I move the texture out of the way so that I can see what’s been painted.
- This is where its weird sometimes my color information will be applied and sometimes only the z depth will show up.
I’m probably messing up something basic, but I havn’t been able to figure out what I’m doing wrong…  .
.
Gary
PS I would super enjoy a clear tutorial on this subject. Another issue is when I downloaded the documentation for ZB4 the tutorial pdf comes up corrupted.
AMD Phenom 9750 Quad-Core 2.4GHz
8.00 GB Memory
64-bit OS
NVIDIA GeForce 9800 GT
Windows Vista Home Premium
- I hit z to begin painting. Unlike the preview video the texture doesn’t disappear so that I can clearly see my object? Instead, the texture stays in front of the object.
I find that when I increase the Spotlight Radius setting on the widget, the texture disappears like it should. It looks like the radius is set to zero by default
1 Like
That at least is helpful thanks!
- I find a triple+click invariably works.
- If you only want to paint turn off the ZAdd switch.
- As Richard says, you need to set the Spot Radius. See here:
http://www.pixologic.com/docs/index.php/Spotlight_functions#Spotlight_Radius - Z is the hotkey for the Spotlight dial. To turn Spotlight itself on or off press Shift+Z. You won’t then need to move anything out of the way (though with the Radius > 0 the Z hotkey will show/hide all images).
Painting through Spotlight is sensitive to the Rgb switch and the Rgb Intensity slider. (Additionally, turning off the Samples>Spotlight Projection switch in the Brush palette will disable Spotlight painting/sculpting but this is on by default.) Also you will need a mesh with a high enough polygon count to receive the paint or sculpting detail. Low resolution meshes will still show color/deformation but with loss of definition.
If you use the Spotlight Radius then you will have a better feel for what’s going on.
SpotLight
1.-Load a Project or ZTL file
2.-Be sure your model have enough poly
3.-Texture Palette>Add to SpotLight button or Double click on a texture of your choice in Light Box
4.-Use the SpotLigh widget using the control to get desired results
5.-The shortcut is Shift+Z
6.-To enter paint mode press Z
ps:from the guide link in ZClassroom
Yep read this load of times as stated above, but this doesn’t address the problems as stated in my original post :rolleyes:
Gary
sigh…
Gary
Tried turning off the Zadd and now I’ve got color. So I guess with spotlight you can only use the RGB or the Zdepth, but not both at the same time. Odd but I can live with that. I also do not see the advantage of the spotlight default being set to “0” to begin painting because I can’t forsee a time when I wouldn’t want to see what I was painting on. Maybe, start at “1” and be able to dial back to “0” would work?
Gary
Attachments
Maybe not 
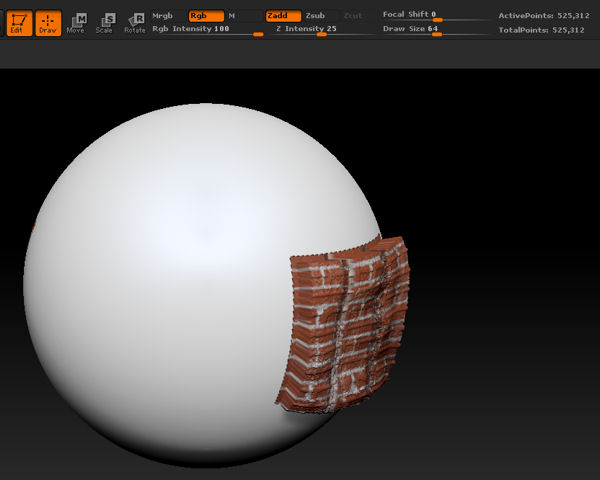
I think at present the Spotlight workflow is quite tricky. I describe the steps I followed:
- Select a Tool (e.g. the Sphere3D), and draw it on the canvas
- Increase the poly number, say to about 500 K
- 2 times (I don’t know why 1 doesn’t suffice) double click on a texture, in Lightbox->Texture
- Now you should have the texture on the canvas, and the Spotlight widget. Increase the radius of Spotlight with the widget, and change size, orientation and so on, as you like
- Activate the Edit button for the Sphere, and click “Make Polymesh 3D”
- Activate the RGB and the Zadd button ( I used 100 for RGB and 25 for Zadd)
- With “z” you activate the Spotlight. The widget should disappear, adn you can paint on the sphere.
This is a preliminary result I obtained:
[attach=209664]Spotlight su sfera con colore e zadd.jpg[/attach]
Hope this helps.
Ciao
Attachments
“6) Activate the RGB and the Zadd button ( I used 100 for RGB and 25 for Zadd)”
Seems your getting different results. Since your getting the proper results, and there would have to be some differences in something, what is your OS and what kind of graphic card are you using?
Interestingly, when I turn the ZAdd off and then turn it back on again it works properly. 
Hi.
I am running ZB4 under Vista Business 32 bit. The graphic card is a Club3D Radeon HD 5750, with quite old drivers, that I have to update.
As I said, at present I find Spotlight a bit tricky to work with. Also after reading the documentation, I had to make several attempts, before finding the correct (I hope ;)) recipe.
Ciao
Ciao,
Thanks for that info. Yeah, after a couple of hours of fooling around with SpotLight, I’m getting the hang of it as well. Its such a powerful feature I wanted to make sure I would be able to use it. When Pixologic shows off their features its so exciting, and you just want to be able to do what they showed. For instance, cutting out a portion of a picture. In the video they showed parts of the image painted in red and then magically the red became transparent and they could cut out a door or window. So, I tried the same it took me a while to figure out how to change the red into a transparent area. (make sure that one of your colors is pure black 0,0,0 and then place your cursor over the area (red paint) that you want to replace with pure black (transparent) hold the Ctrl down and dial your paint widget positive if black is your primary color, or negative if black is your secondary color. Your red area becomes transparent.) A clear tutorial would show these features. But, I guess discovery is part of the challenge.
Gary
I am having the same trouble with spotlight. Objects with uvs done in uv master wont paint. Other objects do (ie no uvs). If you cant use paint with spotlight, try to just paint a stoke on your model, bet you cant.
As usual it will be one button, so I will put the answer here when I have it.
Check that you don’t have a texture on your model. If you do, you won’t be able to paint color through Spotlight.
Yep, that was it. Switched texture off and it is working. Thanks man. I knew it would be one button ha ha.
Yeah, but one button out of so many… Glad that fixed it. 
The thing I like least about zbrush are those Doh! moments, where you simply cant blame the software :D.
Just to add an extra 2-cents… There’s a Spotlight basics video on You Tube …