Here are a couple of updates
The turtle now has a funky platform and the low poly centaur now is posed

Attachments


Here are a couple of updates
The turtle now has a funky platform and the low poly centaur now is posed
Hi Everyone,
It’s been a couple of weeks since I posted anything. I said in my last post that my next project was going to be Anubis. But I decided I had better do a female anatomy sculpt for my portfolio.
This is her is her current state. The base mesh was created in Maya. Her hair was extracted from a mask on her head, then edited in maya.
Those who are familiar with 3DSK I am using Simona D as my reference through out this project
Please could I have some crits 

hey sparky,
nice start on her so far, female anatomy is a a pain to sculpt. most of the anatomy is off which makes her look wierd. u will be better of at a lower res sculpting the basic forms. spend time on the low res making sure proportion, form and silhouette is good before u move on. good to see u are using awesome reference. to help with get the silhouette and proportions spot on. use the image plane in the background to get the picture your reference in the background so u can line up the model and line her up. Work from low poly to make sure all the forms u are adding gesture is good before moving on. make sure u get as much of each subdivision as possible before moving on.
keep working dude u will get there. female anatomy still give me a freakn head ache lol.
Hi Gilbert, have you done any more sculpts after your female centaur ?
Yes your definitely right about females being a pain to sculpt…hehehe
Yes I need to stop going in at all guns blazing and just take my time.
I know the forearms are weird as I’ve always struggled with them and yeah she needs smoothing in a few places.
Hi Sparky3d, I found Scott Eaton’s stuff very useful for body study, some things are free. Recently I found very useful the imageplane plugin to load a reference in the background.
hey there Sparky3D, you have some cool sculpts, and loved the idea for Michelangelo’s base, totally cowabunga, dude!
About your female sculpt, there are some things that could be improved on the anatomy and gesture.
 (for example, this one: http://t2.ftcdn.net/jpg/00/10/56/17/400_F_10561701_fvmM1mD2rTDBU4vxYX10B6escseO8nQe.jpg)
Work from the lower subdivs upward, check for references and you should do great! Hope these tips help
Cheers
cltax_ I have been on Scott Eaton’s website before, but couldnt and can not find anything thats free to aid, I see he has now put a load of action shots now on his site, but that will come in later, when posing commences…hehe
And thank you for reminding me about the Image plane plugin, I have had it a while but totally forgot about it, and it came in perfectly for the the corrections in the pic
Hi Luis, thank you finding my thread
and your lovely comments and my work
Its a good job I have more than one monitor so I can have your crits on one and zbrush on another…hehe
and thank you for the great crit
From your crit so far I have adjusted the silhouette of the face and moved the ear up. (The image explains what had happened)
I shall work some more on her tonight, correcting the ares of which you have suggested to address, even though my mom says I should take a week off from 3d modelling, as I spend to much time on it…hehehe
Sorry if the image is a little bit big…hehehe I have a bad habbit of that…hehe
[attach=256106]Head_issues_fixed_ish.jpg[/attach]
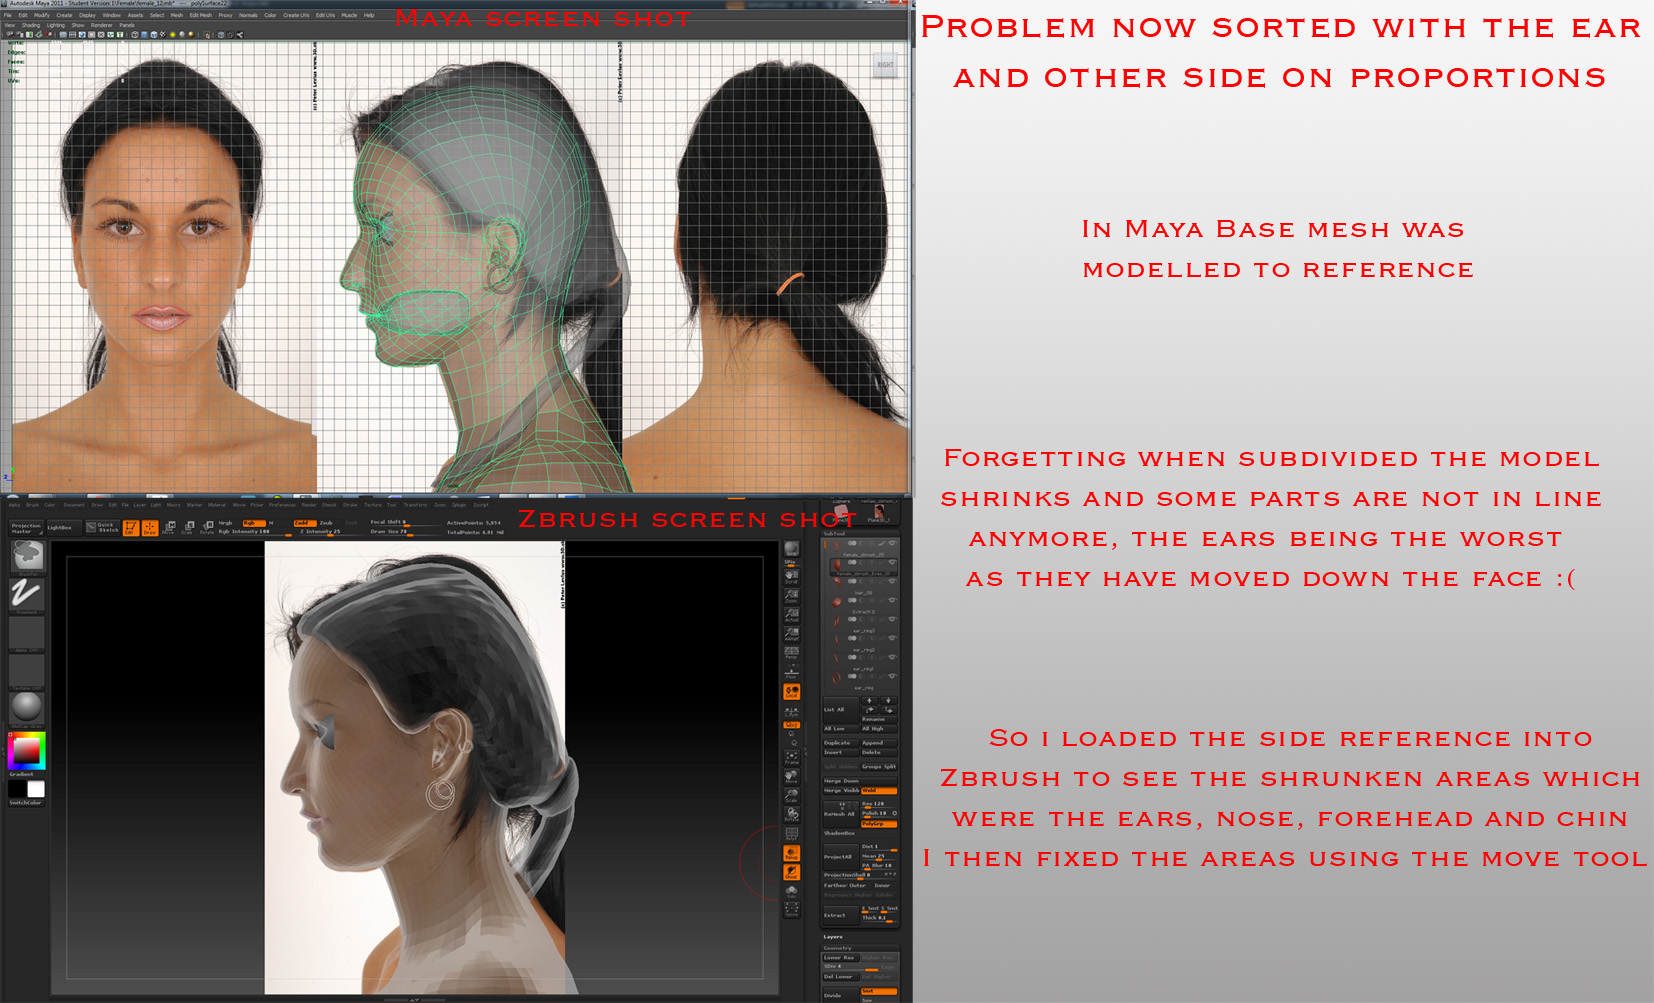
I’ve just loaded in the reference from maya that I made of where the facial features are all a lined with each view, I noticed some areas that need adjusting from the front view, I will got on this tonight
Keep it up man!
Getting your forms first before detailing is key. It is too tempting with all of ZBrush’s power to start detailing and pinching areas. Once you get through a few models you’ll find your balance.
Another thing to keep in mind is Zbrush renders perspective based on your visible model. Your images from 3d.sk were taken from chest up, so you’ll want to hide the rest of the body,(polygroups would be handy), to get the right perspective. I love Image plane for storing views so my model always aligns to the same spot Hope this helps.
You should render Tangent Space normal maps for your game models as well.
Good luck,
Hi Turchik
Thank you for your advise, yes it is very tempting to go at it all guns blazing…hehe but yeah need to hold the rains in a bit more and take my time with it.
I dont know do to do the polygroups thing, I want to avid subtools, but how can i go it so all the parts will be affects when sculpted, yet they have there own group thing ?
Yes she will be a game mesh when done, I am unsure about clothing at the min, although I am thinking of just giving her plain sort of clothes like jeans and t-shirt, as I do not want her to be a superhero cyborg kind of thing
Sparky, you can create polygroups in several ways.
One way is hiding part of the mesh (ctrl+shift+drag), then go to the menu “polygroups” and press “group visible”. Then you can show everything (ctrl+shift+click on empty canvas), and press “shift+f” to check the wires and polygroups, you should get two areas with different colors.
Another way to create polygroups is from masks, just mask part of the model, then press “from masking”.
Aaaah Cheers Luis, I shall have to have a play 
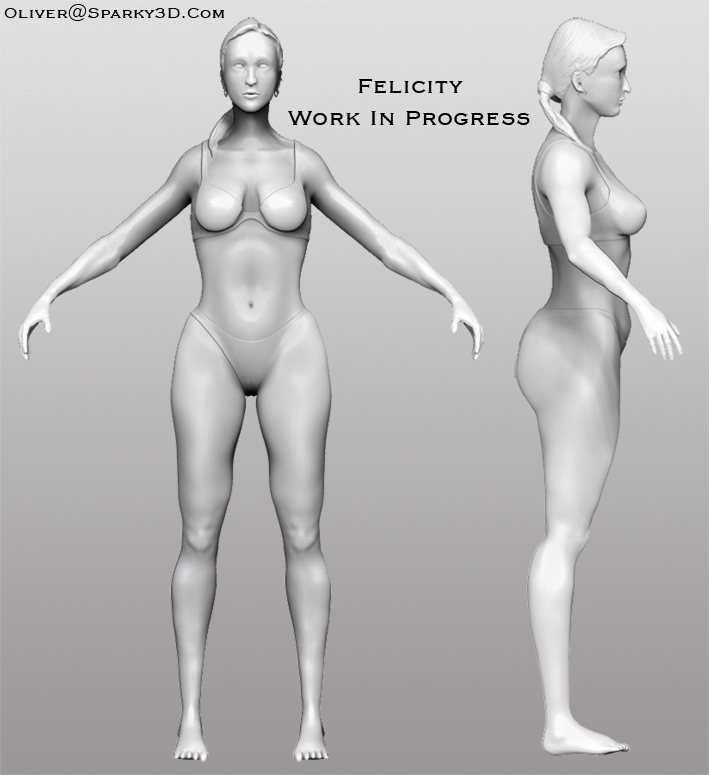
Hi Everyone
I’ve worked on her a tiny bit today, the changes are hopefully enough for you to see a difference.
So yeah any crit please on areas that you think need addressing and what not
Ooooh And I’ve even given her a name “Felicity” is that a sad thing to do, I dont know…hehehe

An issue I came across when I extracted the skull for the hair was that, when extracted, I could not edit the extraction apart from the edge, why is this, why could I not sculpt on the extraction, so what i had to do was export it out then import into maya. so there a button that needs to be pressed or something to enable the extraction to be edited ?
It usually adds a mask when you extract so just have to unmask everything on the extracted subtool.
Cheers Jaradv
Hey there Sparky.
The torso looks a lot smoother and better, however:
The hips need to be wider than the waist, that’s a very feminine feature.
The ass needs to be smaller, remember that the biggest muscle there wraps around the back of the leg, and the bottom of the buttocks rest close to the body, creating a crease.
The feet and hands look small, the feet’s length roughly equates to the head height, and the hand equals the distance between chin and hairline.
The navel still looks a tad lower than it should.
Hope this helps, keep at it!
Cheers Luis
Corrections made are -
the widening of the waist, adjustment to the ass.
Still to do widen her wrists, i think the hands are proportionate, I think they may look a little off due to how they are positioned.
I double checked her navel with the reference and they are bang in line with each other.
I have also given her some underwear to cover up her modesty 
Of which I extracted from the mesh, exported and imported into maya, to then build a base mesh from that.
Do you see any other areas that need addressing ?
[attach=256665]felicity_Sculpt_wip.jpg[/attach]
Hey Sparky, it’s good to see you working on this 
It looks better, more curvy but it could still be improved.
I’ve taken the liberty of adjusting your pic in Photoshop, just to try and illustrate how to improve the gestures (it’s crappy, but I hope it helps).

I’m no expert on these matters, but there are great books (I recommend Scott Spencer books, for one) and possibly good resources online. Check, for instance, the gesture drawings that some folk make.
The goal is to find imaginary wavy lines that connect different parts of the body, so that these parts appear interwoven in the structure as a whole.
Luis thank you very much for the paint over, I shall import it into zbrush image plane, as that will be a good way to use it as a guide
