awesome…man…
Congrats…
awesome…man…
Congrats…
Pure Perfection!!! such a brilliant job you did there pal! amazing!! 2 Thumbs up!  small_orange_diamond
Magnificent!
awsome and top row as expected…congrats man
amazing job , congrats on the top row , I like the clay render very much as well (can u share some info about that too ?!  )
)
Great Sculpt… Like the detailing and the process. Final result looks perfect. 
Wow… Great work man! Thanks for sharing!!!
That is an inspirational work, … congratulations for the toprow
Really nice work and breakdown, Gurjeet. Congrats on the top row too.
This is too good. Which UV has the one with the face unwrap?
Beautiful work!
wow Thank you zbrushcentral for toprow !!,
Thanks alot guys for overwhelming response , I really appreciate it ,
manilamerc: That is not there bro i will post that too if you are interested ,
I will be posting some vray break down soon , :D.
Gurjeet, kudos dude, definitely top row material. Congrats. And thanks for the workflow breakdowns. Would be interested in the following:
*Some notes on the facial and body anatomy.
*Skin texturing and rendering workflow.
Wow!. That’s awesome. I started working on exactly the same concept a couple of months ago, it’s now going on the backburner, mine doesn’t even come close to this. Amazing work. I’ll keep practising
Hello thar,
I have a quick question if you have the time:
For games or Marmoset, in your opinion, is it better to have multiple UV organized maps or an organized single layout? Which is better (performance wise) for the Marmoset viewer?
Thanks Guys,
@ Frederic :sure man I will try my best as i will get some time till than you can check this video done by Leshiy3d its very use full for skin shader in marmoset :
")
@ Ivy-Mike :It will be great see your version too man , best of luck !!
@Takai: its really depend on your requirement,you can go with one uv sheet or as far as nextgen gaming its perfectly fine to have different uv layout for individual parts like lowerbody , upperbody , head etc…,
Here i am posting just my light position and mat setup I will try to post more detail breakdown as i will get some time,
I used linear workflow for vray rendering ,rendered two passes one is multimatte which i use for separating bg to character for better control,
and rendered vraydirt (AO pass) with vray extratex and used as multiply in PS,
cheers !!
A hearty congrats Gurjeet, very proud to see your artwork on ZB toptow. That is indeed a beautiful piece with loads of hard work.
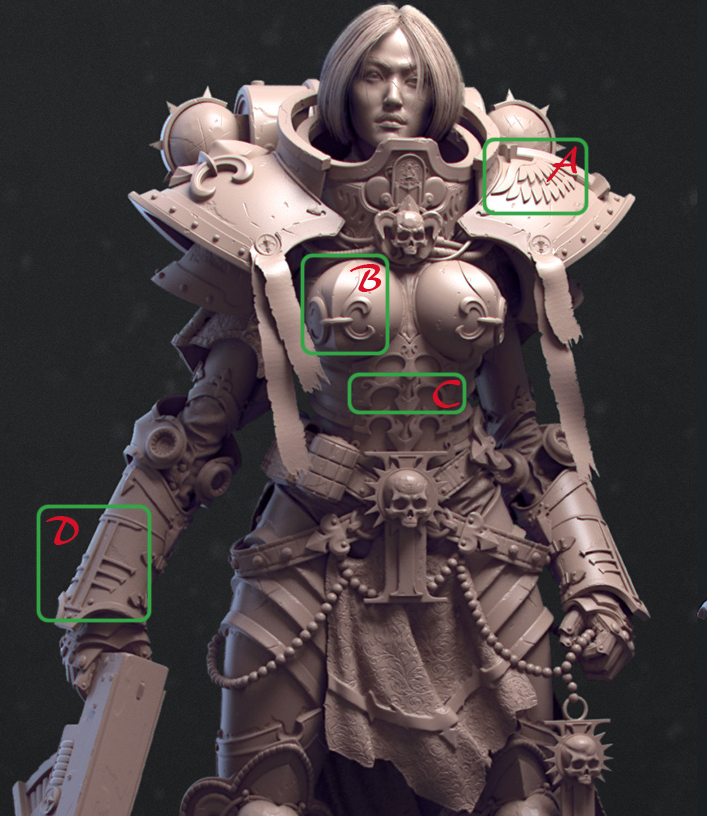
Would you mind answering few modeling techniques that I find very interesting on your character.
I have used your clay render image to mark out the area that looks a bit tricky, can you please share how you modeled and snapped those designs on the base shape.
I would also like to know the process on achieving the realtime hair. I’m having a tough time in achieving a better result.
Thanks and wish to hear from you.
Cheers mate
Super Awesome Gurjeet small_orange_diamond
Excellent work. Love this all.
Thanks guys,
Kaushik : I basically modeled those on grid after that copy (instance) and roughly put on place and now used bend modifier on grid version (same time instance copy will be tweaked atomically ),
as i have zsketch done so its easy to judge what and where i want, for © it was done by retopo over mesh directly, that works for me there must be better techniques !!
for real time hair if you have checked breakdowns done by Tom parker and Danilo Athayde ,
so only thing you need now is patience  !!
!!
