ZBrushCentral

Seams in normalmap?

Hi evandiaz,

Thanks for your reply but the seams are still there having tried that.

I have found one work around that at least limits the effect of the seams.

Its very strange, I have discovered that this problem occurs even when I apply a bump map to my model using the displacement map that is outputed from zbrush yet it doesn’t seam :wink: to to carry over to the diffuse map generated by my vertex painting. Also if I use the displacment map as a self illuminated colour map for the model there are no seams what so ever, therefore it is not the map at fault.

My ‘theory’ is that because this particular model doesn’t make much use of the normal map since the model really only needs to look quite smooth, the seams just stand out more. A model like those classically associated with zbrush with more reliance on deeper definition from the normal map possibly just do not appear to have seems even though they are in fact there…

A work around using the process outlined here with one addition: up the contrast of the displacement map A LOT before pressing ‘crop and fill’.

The reason this works is because the seams are unrelated to the alpha depth of the map.

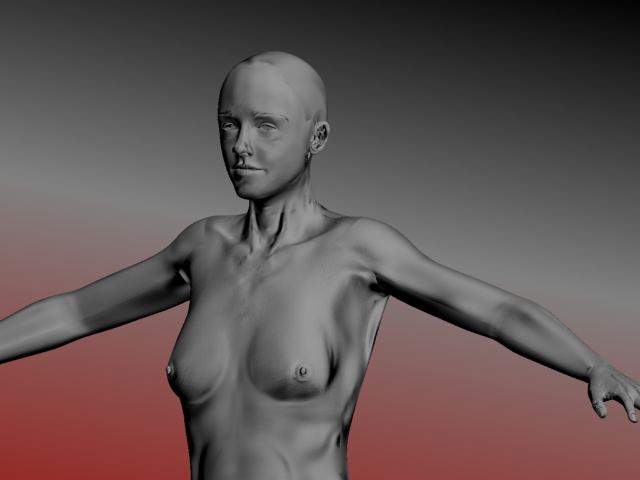
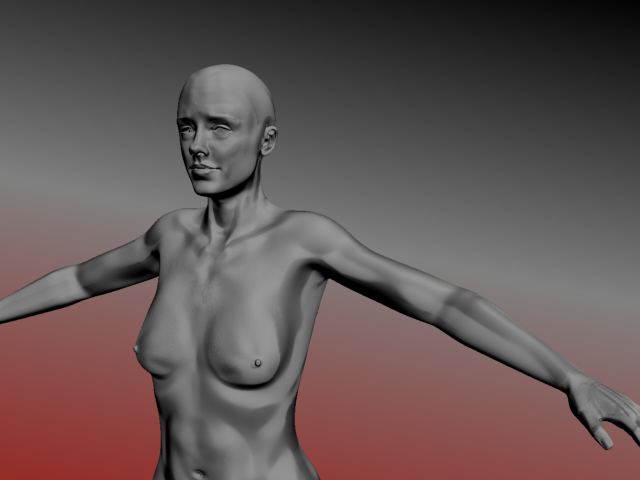
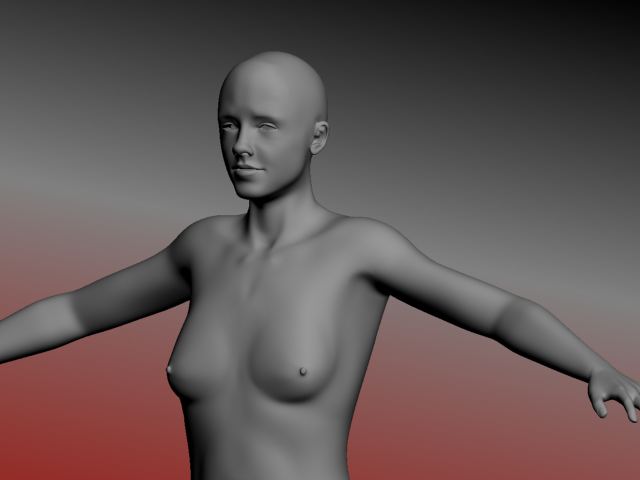
Below is my model with no texture what so ever (and a nasty backgrond):

without.jpg](http://javascript<b></b>:zb_insimg(‘74884’,‘with_new.jpg’,1,0))

Here you can see the effect is minimalised quite a lot, although still pretty bad around the head.

Having just written all that I am just going to play around the ‘mid’ setting when creating the displacement map, I have got a feeling it might be the real answer.

Ill post my results when I know for anyone else who goes through this thread.

Spence

Attachments

with_old.jpg

with_new.jpg

No changing the mid setting first to 0 and then 100 only made the seams worse.

Gutted.

I am dealing with seams in my displacement map. It truly sucks that there are some artifacts no matter what you do(as this is an almost naked figure).

I wish I could manually overpaint them.

With my normal map(32 bit) generated in the displacement exporter, I got nasty seams–however, I made a new 32 bit map at level 5 of a 6 level model and deleted the lower levels and the normal map came out seamless. It doesnt have the lower level contouring however but it works for the little wrinkles and folds.

If only I could do something similar with the displacement.

Yeah thats a good tip generating the displacement from a higher subd level to just pick out the finer bumps, thats what I have done get my bump map.

Ive been doing some more reading and am wondering if its got anything to do with the suv setting in the geometry menu. It looks like your supposed to have it turned on when you subdivide. Can anyone confirm whether this could affect the seams further down the line?

I tried turning on SUV but I didnt see a difference with the displacement seams.
I read that if the uvs have diagonal discontinuity it can cause seam problems but I am not sure what that means.

Did you press suv before you subdivided your model each time…?

Not sure what that means either maybe its refering to a change in direction of the diagonal line (the edge between each triangular poly) in the quad polys if that makes any sense??

Did you press suv before you subdivided your model each time…?

**You mean was I using it when I sculpted the mesh?
Nope.
Hmm wonder if it would have made a difference.

Anyway for this mesh I used a pelt mapping method so most of the seams are in back.

I am not sure what I can do to alleviate the seams since I notice them on other models though I have to get in close.

Now I have a problem where the level 5 normal map shows up in the view port but NOT in the render.

Its all these button pushing problems that make this stuff un-fun.

Edit: I found this thread on the displacement seam subject: http://www.zbrushcentral.com/zbc/showthread.php?t=47361

I was googling for threads and also found it mentioned that one click “view dependent” in the subapprox window to deal with normal map seams.

Snape,

A couple things that may help. One is that very different texture resolutions for parts of the model that are next to each other can very likely cause a seam which is the visual transition from a low res to a high res normal map (or bump, or diffuse for that matter). The second is that your normals don’t look quite right in your renders. Though I can’t be sure, my suspicion is that your y-coordinate is inverted. In max, under normal bump, make sure you have tangent space (assuming you generated tangent space normal maps in ZB) and experiment with inverting the Y, or green coordinate and see if this makes the normal maps render properly. This can also result in seams in some cases. Another issue which crops up occasionally, is that the UV’s on the original model have some of the face UV’d “upside down”. In the UVUnwrap modifier, go into faces subobject mode, up to selection on the menu and select inverted faces. If any of your UV’s are “upside down” they will show in red. You can also check for overlapping uv’s in this same interface which will also cause problems. Good luck!