thx a lot mate… i use this script from like a year…and it works just amazing …thx again …
The problem I am now having is getting creased edges on my mesh to render in maya 2008. Does anyone else have this problem?
I originally built my low poly cage in maya ( with some creased edges) and then exported it to Zbrush as a .ma file so as to retain the creases.
After sculpting in zbrush I took my mesh back into maya to render with displacement maps ( which has worked fine on other models without creases)
I can get my model to render through the MentalraySubdivApprox with creases if I have the cc mesh export attribute checked, but with this I get the displacement map seams. If I uncheck the CC mesh export I get no displacement seams but it smooths all my creased edges.
Is anyone else having this problem? Is there a way to render with creased edges but without the displacement map seams?
It its not one thing, its the other. 
Thanks!
thank you so much!!
Friends, is it worth to update Maya 2010 - did they fixed those issue? Would be great if anyone tested it.
I’m also thinking Zbrush + Modo instead of updating Maya.
I’m not getting a successful render of displacements in 2009. I’m also using zbrush 3.5 r3, but I seem to have the same issues with 3.1. When I use Scott Spencer’s script, I get a too soft looking render- details get lost. When I don’t use the script, I get artifacts around the UV borders. If I turn off smooth UV in the export options from zbrush, I get no seam artifacts, but the displacement map looks off, kind of hard edged where it should be curved. It appears that by turning off Mi Export CCmesh is what makes the render appear soft, but with it on I get the artifacts. I didn’t seem to have this problem with Maya 2008. Is there a new script or fix for 2009?
Thank you in advance
Craig
Thanks for the post
I’m wondering what value should i plug in for Alpha gain in maya. Is there some value i can begin with and then anchor from there??
thanks
Also on the subject of alpha gain:
@Scott:
Did you mean the values in the maya 2d_file_node were now alpha gain 1 and alpha offsett -0.5 for a 32bit displacement created in ZB3.5 R3 instead of the previous 2.2 and -1.1??
(Assuming that the mid point is left at 0.5)
I noticed that gain 2.2 and offset -1.1 bloated my model and that gain 1, and offset -0.5 looked correct.
Thanks for your time
James
the gain and offset are a ratio.
Meaning if you can scale the intensity of your map by shifting the value range.
Displacement is more about what looks right rather than a science.
Note: For Maya 2010 on Windows OS
I have found converting your .tif files to a pyramid .map file will render nice
you can do this on windows by clicking on start, then typing in cmd
This will bring up a command shell
navigate to your directory using cd to change directory
Once in the folder where your .tif file is type
imf_copy -p nameofimage.tif nameofimage.map
the -p is to convert to pyramid texture, in maya use the mip mapping filter on the file node.
Hi jimeeh,
Based on my experience the new alpha gain and offset values will be 1 and -.5 which is what they were always intended to be. I get really dead on render details with that setting.
As for the image conversion see the script in my signature to make that process easier.
Cheers!!
Scott
Thanks scott!
I assumed the old 2.2 came from saving the displacement in the sRGB colour space of a tif file, which meant it needed a multiply by 2.2 to be correct.
I’m guessing the new displacement maps have this done all ready to the rgb values? or something like that:qu:
I’m not really sure.
James
Hi
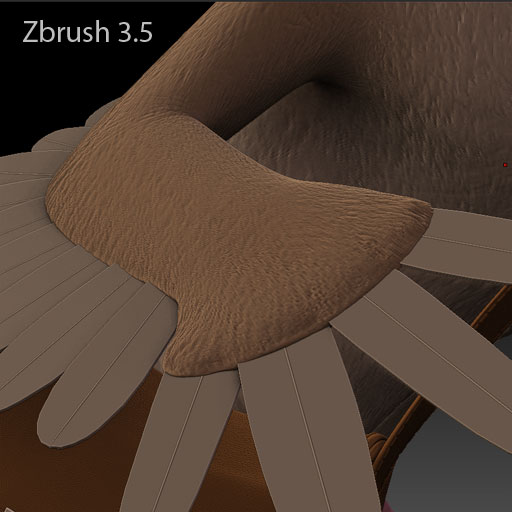
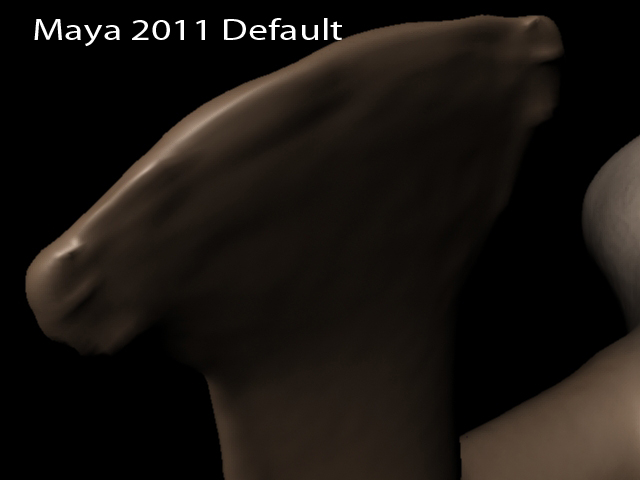
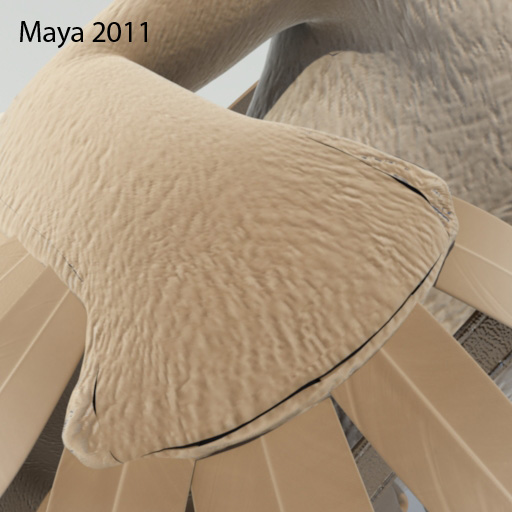
Even though I’ve been using zbrush for many years, I don’t use it on a regular basis and need some assistance with a uv seam problem. I’m using zbrush 3.5 (first time) and have tried to solve the problem in both Maya 2009 and 2011. When I export my mesh (level 1) from zbush as a .ma with my displacement and color map, the uv’s gets messed up. The uv’s look fine at first glance, but zbrush un-stich them into many small shells. When I render the model with these un-stiched uv’s (default), I get no seams, but the displacement looks ugly/bulky where the uv borders are. To solve this problem, I manually re stiched my uv’s in Maya again, but now I get large uv seams/cracks! I’ve tried both adaptive and DPSubPix displacement, but ended up with the latter one and have tried the Mrg button in the export section, but still has the same problem! This project has a very tight deadline so please help.
Attachments

edit…
It sounds like you have forgotten to turn off “grp” and turn on “mrg” in the export submenu under tool.
Personally mental Ray in Maya requires patience (one size doesn’t fit all)
judging by your model, you may be able to get away with a slightly higher Rez base mesh and a bump map.
Having said that I think the problem was in the way you exported your mesh from zbrush.
Also you should make it a habbit to establish a link between Maya and zbrush early on, by exporting and reimporting your mesh as obj.
Hope that helps
Thanks for quick reply. New features are always buggy and the export as .ma feature in zbrush 3.5 is no exception! I’ve already tried exporting my mesh as .obj in order to keep my uv’s stitched and it works, but it does still not solve my problem. Yes, I might get away with only using a bump map and then use a blend shape to correct the mesh where the displacement was very strong, but will then also lose a whole lot of details on the legs etc…
Is really the Zbrush to Maya workflow this buggy or can there be another solution? I’ve done this with success many times before…
It’s not IMO “buggy” anymore than every other 3d app out there, most likely less. I have been using 3.5r3 in production and alot has improved even the ASCII export.
Having said that Maya will re-order vert Ids on a mesh to suit its convention.
So its good to establish a connection early. I would go so far as suspecting windows xp playing some part in it too.
Anyway, you should export your mesh to Maya, run the clean, re-import.
If it doesn’t fix it then I would bring in the Maya mesh and use project all.
Then only export the map not the geo, provided uvs and vert are the same.
As far as blend shapes and disp goes, you should really be using disp only for details and not for form.
If you like post your mesh and I’ll take a look see.
hey i used to get this sort of problem a lots time
whenver i exported it again and again
so this is what i did selected all the uvs in maya and clicked on merge uvs
done the patchy uvs were whole again
and believe i am dead sure this works
so be happy and keep zbrushing
yes merging uvs in maya will fix the uv seam issue, but the issue still remains with the map generation which is why you need to bring the new uvs into the mesh or use it to rebuild.
I’ve checked my mesh and its uv´s for faults several times. I’ve re-merged my uv´s in Maya when using the buggy .ma export method in zbrush and have imported these “new” uv´s back into Zbrush before exporting my displacement. Other suggestions are appreciated? I hope I’ve missed something obvious that can easily be fixed.
I have an issue with a displacement in Maya I have tried the file in 2010 and 2011. It does not render at all , screen comes up black. The other nodes in the scene do come out with their displacements in tact however one object doesn’t. I use the zbrush 3.2 and work off of a mac book pro.
I have rendered several scenes with mental ray and have never had this problem. I have tried switching the morph target on the original mesh and other thngs like exporting a .ma file all with the same results. The wierd thing is the displacement shows up fine if I choose high quality render in the perspective port. Any body else ever had a problem with this?
use polygon cleanup to fix non manifold edges in maya,and it will render.