ZBrushCentral

Questions and Troubleshooting for ZMapper

So no one has gotten any normal maps from ZMapper to work in the Doom 3 engine yet? Somehow, I find that hard to believe. So maybe I’m not asking in the right forum…

Anyway, if anyone who HAS gotten them to work in D3, please post your presets. I’m gonna try asking elsewhere. Thanks

Should normal maps used for displacement be color or gray? Mine are color but samples I examine are gray. Which is it?
Thanks.

Hmmm, tough crowd. I know you are out there, I can hear you breathing.

Ok, When I click on “Create Normal Map” my character gets the correct looking grey texture with the normal map on it, but when I exit Zmapper it is replaced by a messed up texture. Which essentially looks like this. This is the texture I export. Is it supposed to look like this? I don’t think this is correct. It does not work correctly in 3dsmax.

Attachments

goblinnormalmap1.jpg

That looks like a valid normal map, but the UVs look like they were generated in Zbrush using AUVTiles. Did you mean to do that?

kaibosh - a normal map should never be grey. It should red, green and blue. While in ZMapper, press 7 or the Texture button in the upper right to see the normal map.

Normal maps are not used for displacement but are an alternative to displacement maps.

I do not see anything inherintly wrong with your texture map. Please post detailed step-by-step descriptions of what you are doing as well as images of the normal map on the model and rendered on the model in max with the problem you are experiencing. :slight_smile:

I can’t answer your question as worded and need more info. :slight_smile:

Ryan

Thanks for your replies, I appreciate it.

I was using the AUV button or the GUV button since it is not clear to me
which is preferred.

Now when I am doing this I do not press either one.

I have had some limited success since I posted. Now the normal map I create is more solid and maps onto the character in 3dsmax better. He is still all puffy and distorted though.
Ok, here is what I am doing exactly.
I create a basic model in 3dsmax. At the poly level I select all the polygons and set their smoothing groups to the same.
I export as an .obj.
I open zbrush.
I import the .obj.
I open the texture pull down menu and set the size to 2048 by 2048 and hit New.
I hit the divide button several times until my model is at a higher resolution.
I model it so it looks nice.
I set the resolution back to 1.
I open Zmapper and hit the Object mapping option (instead of tangent, though it is not clear which is preferred of these either).
I hit the Create Normal map button (or is it displacement?) I am writing this from memory so I can’t look at it.
It calculates and I get my model spinning in low res with the gray normal map on him.
I exit zmapper and the texture is in the texture box.
I export it as a .BMP (instead of a .tff though it is not clear to me which is preferred.)
I export the tool as an .obj.
I open 3dsmax and import the model .obj.
I then follow Aurick’s tutorial that is in the tutorial section. (the one with the head with the big mouth and little nose.)
I do everything but then when I render my model is all blown up like a marshmallow. It is like the strength is too strong for the displacement effect.
Should I adjust the Tool:Displacement: Intensity setting before I make the map? Turn it down? It is at zero now.

Anyway thanks for your help. I am getting closer.

@kaibosh you have to put the normal in the bump channel not in displace

Really? But I was following this tutorial by Aurick or CvH or someone and it says to put a displacement map.
Check it out.
http://www.zbrushcentral.com/zbc/showthread.php?t=32020

Maybe I have the basic terminology wrong.
here is the way I do it.
Create a “normal” map in zbrush.
apply the “nomal” map to a “displacement” slot in 3dsmax.
Is that right?

ok i make a little test and then i post it here so you can see hwo i do it

kaibosh - a normal map is different than a displacement map. I recommend getting the ZMapper documentation hereand giving it a once over. I know it is thick reading but it will be worth it. I would recommend pages 75- 87.

Ryan

hi im working on a project in which the base mesh is produced in maya and have hit a wall where every time i try to create the normal map and preview it with zmapper it explodes attached is a screen shot of the mesh as it explodes

our work flow goes as so

1 import obj from maya the uvs are laid out left to right in there own 0 to
1 space
2 store mofph target
3 polygroups-uv groups
4 divide the mesh to lvl 5 and do basic modeling
5 apply the zbrush bump material to the model at 50% grey
6 create a texture 4096 by 4096
7 select the area im going to work on ie one part of the poly groups say
the head
8 go into projection master and in rgb mode useing varied shades of grey
paint some detail pick up now
9 go to the texture pallet and make texture an alpha
10 with only the poly group i have been woking on visible go plugins
zmapper
11 set to tangentgent space N.Map
12 preview high resolution level it explodes as per screen shot
if i ignore this step and go into the open configuration tap and set to
maya tangent space _ headusMr_2 and go create normal map it
calculates the normal map as it should and im able to export it as a tiff
apply it in maya and the texture is distorted i can post a image of this
if that helps

i also set the displacement _ intensity to .5

i know im missing a part to the procedure xploding mesh1.jpg

hi im nearly there attached is a normal map produced with z mapper as u can see it has criss cross lines through out the mesh not the squigles thats me just testing the lines come out in my render is this how the mesh should look from z mapper

displacement is set to .5
texture sise is 4096
the zbrush bump map material is applied to the mesh
color is mid grey 50%
its been taken into projection master and had the squiglly lines painted
texture has been made alpha
and into zmaper wher its set to tangent space n map
open configuration maya tangent headusMR_2
and create normal map
at level 5 the mesh is 1811184 polys
at level 1 its 750
it had a morph targer set
polygroups uv groups was set
the only other change was to delete hidden before i took it into projection master as the model has 14 uv sets in maya
it took quite along time to come up with a map anyway attached is screen shot

Attachments

ZTexture_test_01.jpg

This is my thread of the issue that bothers me

http://www.zbrushcentral.com/zbc/showthread.php?t=32401

I’ve got a Toshiba Laptop, 1gb of Ram, ATI RADEON 9000 128mb, 3,3 ghz Pentium 4 Proccesor. WIndows Xp Professional 3d max, Mental Ray, Vray, Final Render Zbrush.

This issue happened after I format my computer. Zmapper was running smoothly without any error. When I reset my computern this great problem came to me and I don’t know what is related, I think is video card graphics or something like that

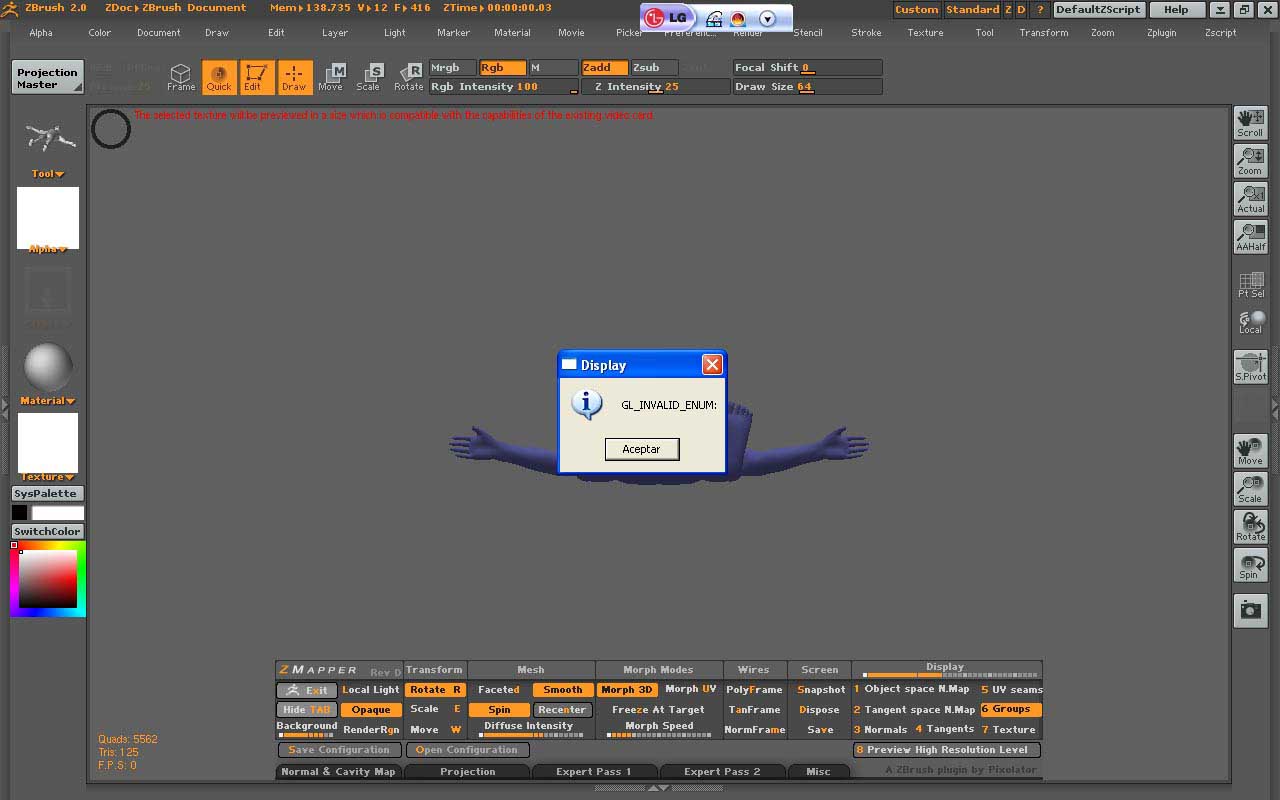
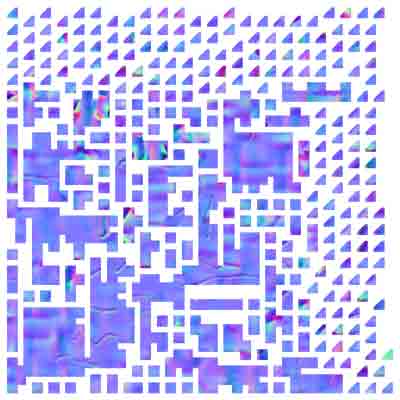
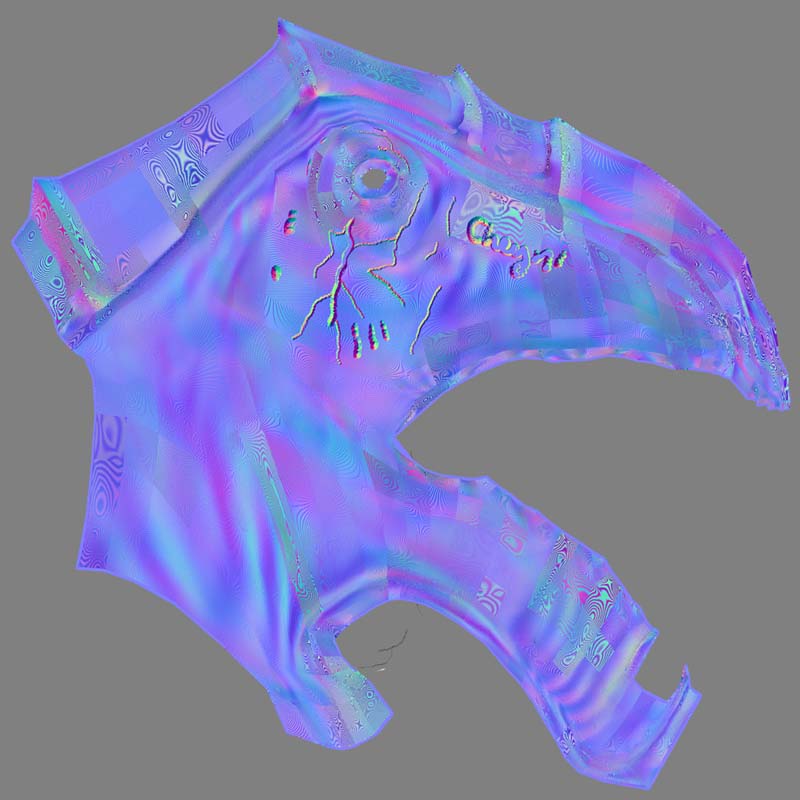
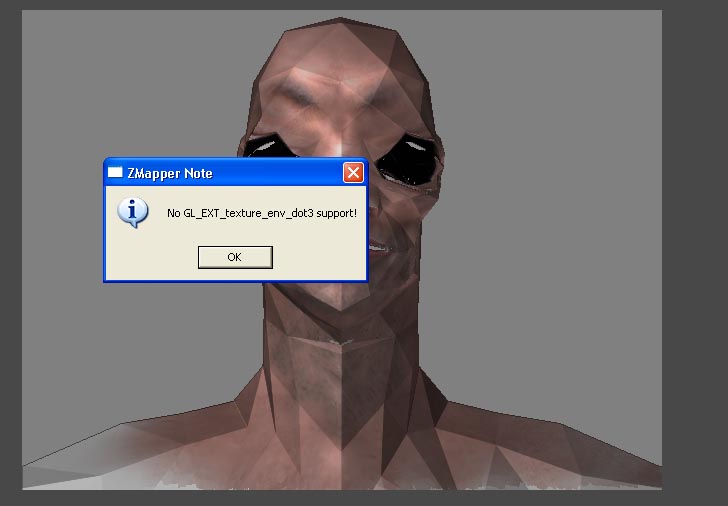
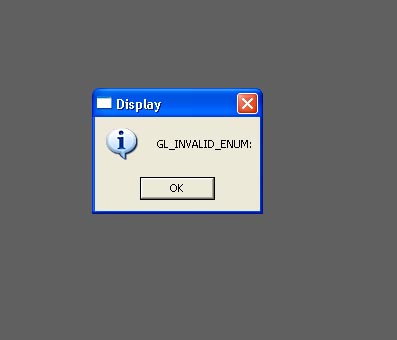
I format my pc and reinstall windows and zbrush. Put the zmapper and then a problem come to me. I don’t know if is related with the OPEN GL or DRIVERS of Windows. I also try the zmapper on the university’s computer and also its the problem. When I run up zmapper it keeps constantly sending me message of this errors shown in the picture below. Any one who can fix this problem.

Attachments

problemzmapper2.jpg

Ruben Drakkar - Have you reinstalled the drivers to your video card? The problem is most like that you do not have Open GL active on your card. I can not say how to make it active but that would be the first place to look.

Cheers,

Ryan

oldandgrim -

Sorry for the late response on this. I can not tell you anythinw without seeing the mesh and your UV layout. If this is still a problem, can you upload them? I haven’t seen this problem before.

Ryan

Zmapper is working great! I read through the post and saw there is no way to project the cavity map. Since this isn’t possible, is there a way to transfer uv layout similar to the maya polygon uv transfer tool? It’s based on distance approximation. This way you can create a cavity/displacement map from the high res sculpt yet have the UV layout like the re-topo’d low poly model. Any thoughts?

delaney - sounds good. I haven’t done this though. Any other takers? :slight_smile:

Ryan

Takers? Heh I know it SOUNDS good, I’m wonder HOW you go about doing it with zbrush or directly in zmapper. Thanks

I have the same problem with no OPEN_GL support

I have a 3d labs wildcat realizm 200, 512 MB gfx card

which has opengl support as well as direct x
problem gfx card.jpg

Attachments

problem gfx card_2.jpg