ZBrushCentral

Questions and Troubleshooting for ZMapper

The make and model of the graphics card could be relevant, it is possible that your system is like that used by Mentat7 who also reported this problem.

It does occur to me that Pixolator might know exactly what this issue is already, I’d say there would be a better than average chance of this. Still any information you and anyone else might offer can’t hurt.

The first thing to do in a case like this is to go to the video card maker’s website and make sure that you’re running the most current drivers. If you have installed the newest drivers and still have trouble, then we will need to know the exact video card that you’re running.

Hey Bboy,
You should see a multi-colored map applied to your object as soon as you leave ZMapper. If not, then probably something wasn’t done right. Now, I can’t speak for Maya, but in Max there’s a lot of flipping going on. Fortunately, ZMapper provides options to flip the map so you can generate the map however you need it. From the sounds of it, you’re not generating the map correctly since it appears white in ZBrush. Try to get that correct first, the docs are great here, and then move it into Maya. Hope this helps some. :slight_smile:

Ran into a similar OpenGL problem as others, but not quite as severe (no crash). On my system I get about 1fps refresh rate in ZMapper for very simple objects (6k tris). The normal mapping process runs at normal speed, as does ZBrush itself. Just the ZMapper display sometimes only updates at 1fps. It seems to happen most often when I have other graphics applications running. For example, if I start Max and load a scene, then start ZBrush/ZMapper, I often run into a problem. If I start ZBrush without any other application being open, then no problems.

Personally, it sounds like two packages competing for resources (contexts, memory, etc.). Maybe Max doesn’t free it’s resources when minimized…or maybe it’s a clash between Max’s DirectX driver and create OpenGL contexts…Anyway, I have a temporary workaround, but would love to see this resolved. I’m running a GeForce 6800 with latest drivers.

Otherwise, very cool plugin guys. Really got me into the usefullness of normal maps. :smiley:

Is anybody else having problems with Zmapper not starting because of the “Multiple (#x) UV-Regions Detected” dialog? I’m importing a simple grid from any 3D app (I tried XSI and Maya), which really isn’t anything fancy (it’s one big UV shell). And still Zbrush creates several differently colored UV regions (around the edges) and demands that I handle each region seperately.

This is all the more perplexing because I never had this problem in any of the beta releases of Zmapper. Only now, with Rev D, does that warning appear and the workflow is broken. Does anybody have an idea how to avoid multiple UV regions as far as Zbrush is concerned?

@ReplicA

yeb. i used the “flip red preset” and a lot of variations of it, but i still have problems with the illumination/seams> torso-arms.

SpriteD - What graphics card are you using and does it support Open GL? Open GL will be required for ZMapper to work. It is important to note that ZBrush does not require Open GL.

tortilla1- Cavity maps require a surface that is full of ups and downs, ie. lots of cavities. Does the model you are testing have these wrinkles? Please post images of your attempts along with a detailed breakdown of what you did and I can help further.

Thank you for the interface notes. Are you saying that when you click the Create Normal Map button nothing happens? If so please give your system specs in the post and I can research from there. In terms of the progress bar, ZMapper is a completely separate program from ZBrush. ZBrush opens it within the ZBrush canvas area but that is all so it is necessary for it to contain its own progress bar.

Bboy - If the model is simply upside down then there is no problem. It is probably spinning upside down. You can freely rotate the model as you wish. Please post images of your results and detailed workflow notes so I can see more specifically what is happening.
ZMapper creates a texture not an alpha so you will find the normal map in the texture palette.

Langsuyar - Just as a test it would be good to shrink in the UV shell slightly and see if it is the proximity to the border that is causing ZMapper to think it has multiple UV-Regions.

ghostDog - at the risk of repeating myself, if you are seeing seams in your final render then your settings are incorrect. What is your final client? Max or…? Can you post images of your final rendered model?

Cheers,

Ryan

ok im using the preset 3ds max best quality setting in zmapper…and im still getting bad normal mpas… geting seems and the normal maps just still dont look as good and as sharp as normal maps created inside of max. What am I missing here? Im sure its something im doin wrong but im basically curious if anyone else is havin any issues with using z mapper normal maps inside of max? i have played with the sharpen mesh and i see how its useful but the normals are still comin in fuzzy and just not clean like they should be

ok im at my witts end here with this z mapper. Here is a mesh i brought into Z and just quickly sculpted in a little detail. Ive wasted 2 days now trying to get a somewhat decent normal map out of it and i cant get anything even close. As you can see in the picture i provide I have my hi rez on the left at division 7 which is mostly clean …and beside of course is a really bad normal map. I have tried all max 7 presets ( im using 8 ) and the max 8 preset shared i n this forum. I have tried upping the samples and the subdivide… uppin the sample the hole in the glove gets a lil clearer but still looks like trash. Also the more I up the sample the more i get these blemish marks in the normal that shouldnt be there. Can anyone explain to me what in the world im doin wrong… Im so confused as to how i cant get any good results

Attachments

crap-normal.jpg

NOSAJ462 - can you post examples of your issue? It is hard to qualify “not as good”. :slight_smile:

One thing you might want to consider is turning off presmooth normals (set it to 0) in expert pass 1 tab. If I remember correctly, Max did not presmooth its normals and this becomes apparent when you’re trying to put too much detail into your highest resolution level and it is just barely holding it.

If you provide pictures I will be able to tell right off if this is it. :slight_smile:

ryan

Ok, looks like we cross posted. Can I see the same angle but with the texture map, not rendered just as a texture map? Also your UVs would be good. You may not have enough resolution in your map to pick up the details you want. Try going into ZMapper with a 4k texture. Go to the texture palette and create a 4k texture, then enter ZMapper.

ZMapper will then use the 4k map instead. If you get better results then you should consider your UV layout. :slight_smile:

Ryan

ok here is my Uv’s and normal… Im not sure what you mean by texture map of the same angle…Ill give the 4k a shot…but i got a question if im doing a model in which the maps cant gp over 1024 X 1024 how does that work… do i jus tdo the normals hi rez then when they are done shrink them down to 1024? also what is a 4k texture i assume 4000 x 4000

also those shots before were all in z brush not in max… it looks just as bad in max though

Attachments

uv's.jpg

Ok i tried goin into zmapper with a 4k texture map… it didnt make a bit of difference.

Hi guys,

I’m kinda stuck with Zmapper at the moment. Here’s my prob:

I’ve got a high res hand model with bump texture applied to it.

I want to be able to transfer the details of the high res hand + the bump maps to a different topology( different UV layout ) low res hand.

This doesn’t seem to be possible at the moment, and only a transfer of geometry is allowed. Anyone got any ideas on this?

I was able to successfully transfer the high res details to the low res hand and it’s all good…just need to get the bump map details across as well without having to repaint the bump on the new model.

Thanks,

Mark Soon

Im also finding out that wherever i use the pinch tool comes in very pixelated? Is anyone else havin this problem. I was very much lookin forward to being able to use pinch with zmapper.

here are some tests i did using the pinch tool. as you can see the normal is comin out rather pixelated and crummy:cry: 
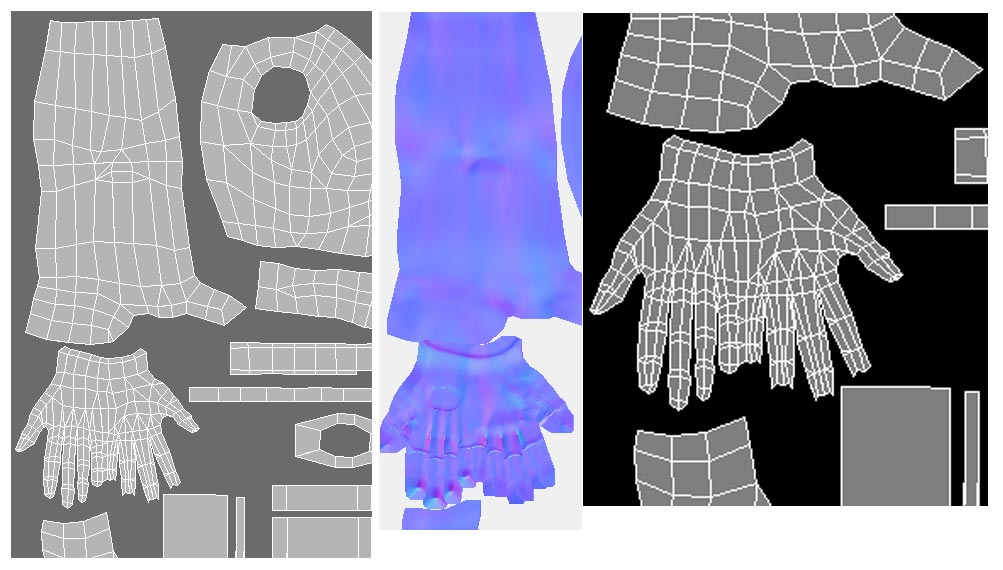
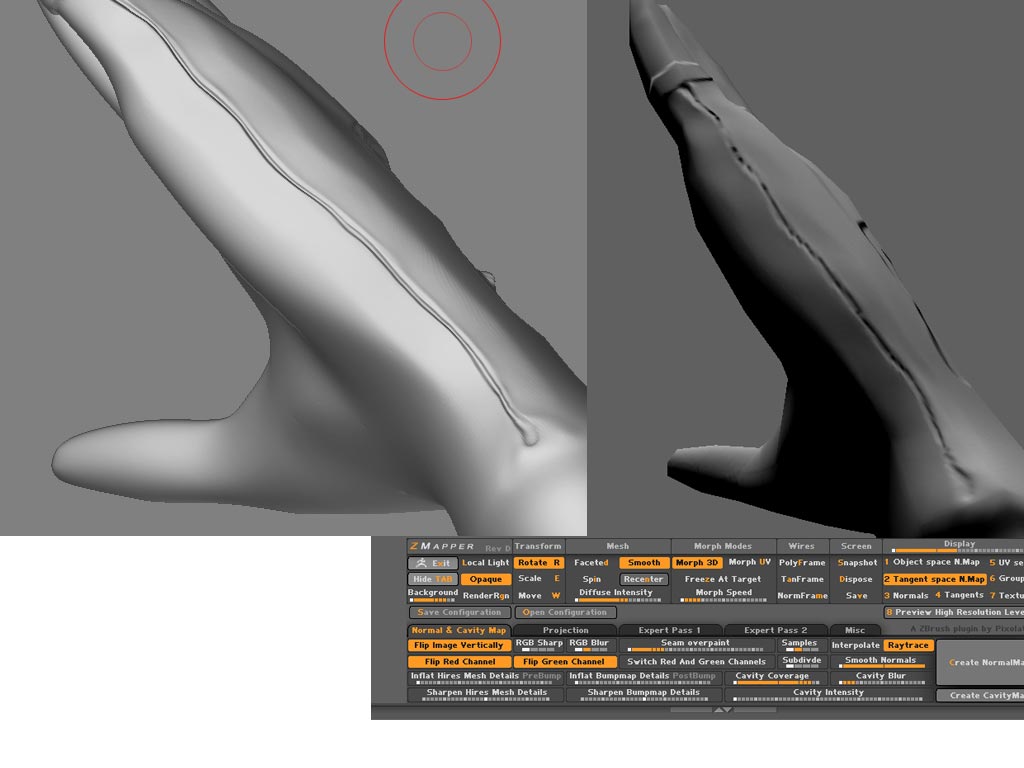
Man i hope to god i can get this thing figured out by tomorrow im goin nutz:evil: All these shots are all form inside z brush.

Attachments

pinch.jpg

SpriteD - If you look at page 2 of this thread I had a similar problem. I just installed the latest drivers for my graphics card and ZMapper worked OK.

msoon2k- You can’t currently transfer bump maps when using the Project Normal Map features. Depending on your need for accuracy there are ways to transfer textures (or bumps as texture maps) to different uv layouts. Ken Brilliant did a tutorial here showing some ways to do this here:

http://www.zbrushcentral.com/zbc/showthread.php?t=10335&highlight=transfer+textures

If you need accuracy, this technique may not work.

Nosaj462 - I will look into your problem today. :slight_smile:

ryan

Thx Ryan I appreciate any help i can get :slight_smile:

Nosaj462-
Everything points to this being an issue with your texture resolution and your UV usage. As a test it would be good to clone your model (Tool:Clone) and assign AUV UVs (go to the lowest resolution level and click Tool: Texture: AUV). AUV will give you the optimum level of UV usage.

I tried to duplicate your problem and was not able to get the same results with a plane.

zmapper-Tests.jpg

ZMapper will work with the pinch tool if you are using raycasting which is on by default. For example, the middle area used the pinch brush and came out just fine. The upper area was meant to duplicate your glove and it came out fine as well.

Try adjusting your UV usage with AUV uvs or with a new UV layout and see if that clears up your problem.

If it is the UV layout then you may want to consider moving some parts of your models UVs into separate UV regions to get more UV area. To do this visit page 27 of the Maya guide here in our ZClassroom. :slight_smile:

As a side note, most productions use multiple UV regions for ZBrush models. It is rare for one model to fit entirely in the 0 to 1 UV region.

Cheers,

Ryan