Hi Steve, thanks for the quick reply! 
Storing a morph target before you make any changes is actually a critical step. Without it, you won’t be able to get back to your original mesh and LightWave will have trouble replicating the changes made in ZBrush.
So if i don´t store the model when i import it, i will not be able to go back to the lightwave model, but if i export the sub 1 model from Zbrush and use that as my new base model, can i do that and use the displacement applied in that model? If i do that i should get the results i was looking for or at least something close to what i see in Zbrush?
Yes and no. You should be able to load in your original OBJ that you exported from LightWave. This time, create the UV in ZBrush and store a morph target. Then boost the subdivision level up to something like 5 or 6. Finally, load in the Displacement map that you exported before. Flip it vertically (assuming that you filipped it vertically before exporting it) and then apply it by boosting the Intensity value in the Tool/Displacement menu (where you create your Displacement maps). That should recreate the effect of what you did before. In my experience, it takes a bit of trial and error to get this to look just right, but it should enable you to recapture the effect without having to redo all the work again.
That´s intresting i will try that later! 
It’s also worth mentioning that no matter how much you subdivide your object in LightWave, it will never look 100% like it did in ZBrush. There are a couple of different reasons for this, but one of the primary ones is that LightWave doesn’t support sub-pixel displacements. To get around this, it’s advisable to use regular old bump maps to simulate minor details and displacements for major details. Remember that displacements should ideally be used for the types of shape-changes which will affect the object’s profile. But minor details such as pores, wrinkles, etc can all be achieved with bump maps or normal maps.
OOhh so that´s why Zbrush can handle insane amounts of polys without freezing, i hope Newtek can make some changes to Lightwave programing and let Lightwave support sub-pixel displacements! I heard that even Poser supports that!  And it would be nice to have a bridge plug-in to Zbrush, something like the bridge plug-in of Maxon Body Paint!
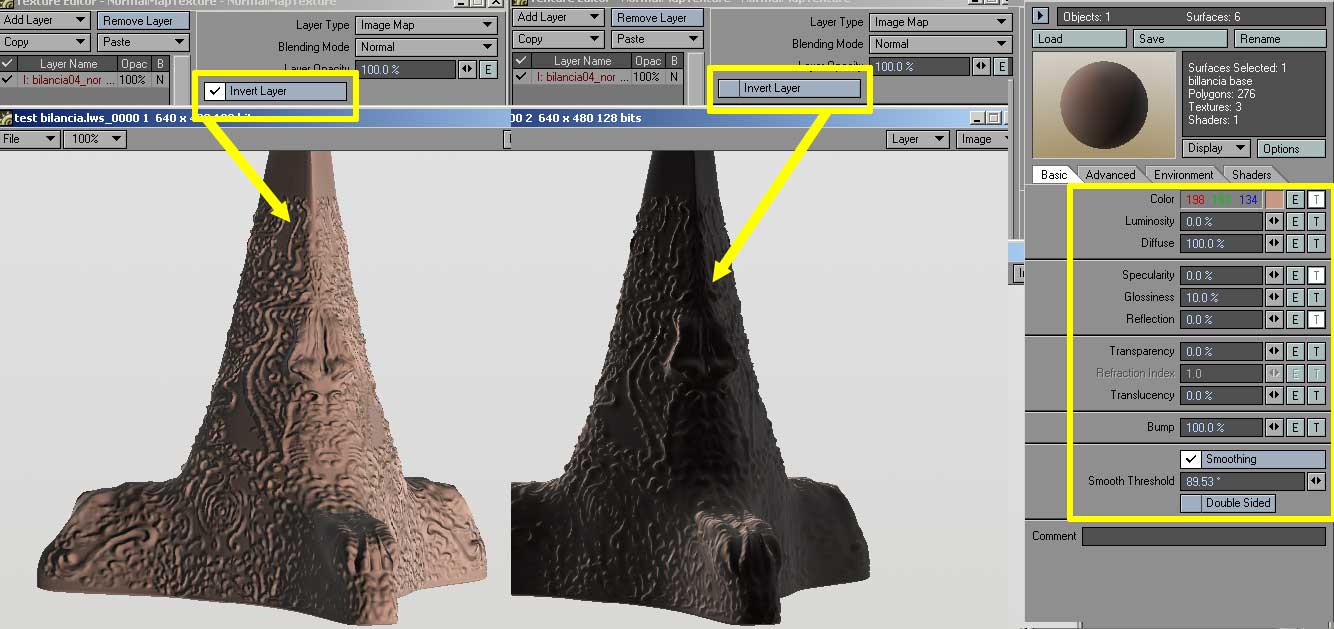
Normal maps weren’t covered in my tutorial and my work on updating the tutorial got delayed indefinitely due to other projects. So for what it’s worth, here’s what you need to do:
I have started to learn how to create Normal maps for game models using Lightwave, and looks pretty sweet! It´s like a “super bump”, if i use that i should not need displacements or it will be better to use both? I will try to follow your tutorial and apply the changes you mentioned in your post, and try to create some Normal maps in Zbrush, i guess it is easier and faster than Lightwave´s technic! Thanks for the mini tutorial on Normal Maps!!
Also, keep in mind that if you’re using the Displacement plugin for LightWave (as described in my tutorial), you will need to adjust the Render Subpatch level in LightWave. Typically for characters, this will need to be bumped up to an inordinate amount, such as 20 or 30. The primary reason for this is that you’re asking LightWave to apply displacement on an object that has fewer polygons than existed in ZBrush. For example, if you subdivided the object in ZBrush until it had 1 million polygons, you’d need to increase the Render Subpatch level in Lightwave to about 1 million polygons to match what you saw in ZBrush. In practice, this isn’t really necessary. Just keep in mind that the more you subdivide your object in LightWave, the closer it will look to what you had in ZBrush.
WOW! 20 to 30! That´s really high, and i thought that 5 was too much!  The higher the poly count in Lightwave the closer i will get! So if i go something like 1/3 of the poly count of the High Poly i should get something similar to what i see in Zbrush, but with less quality.
Another odd thing, this is about Zbrush, i have the Ogre model brush in subdivision level 4, when i load the “tool” of the ogre and lower the subdivision level i mess up the model :evil: , i can´t go back to the high poly model because when i do that the model goes crazy and “implode” it self! Don´t know why that´s happening! Any idea? 
Thanks Steve for your time!
Cya
Lorigosolo
 !
!


 The higher the poly count in Lightwave the closer i will get! So if i go something like 1/3 of the poly count of the High Poly i should get something similar to what i see in Zbrush, but with less quality.
 BTW, just in case you weren’t aware, I did a series of articles for HDRI 3D last year which picked up where the ZPipeline Guide left off. They help bridge the gap from ZBrush 2 to ZBrush 3.1 and offer a ton of tips and tricks that I’ve discovered for getting the best results with LightWave. They’re definitely worth checking out if you can get ahold of the back issues.