Thanks for those images. I will try that technique this weekend and post my results. 
Okay, here are my results.
I did what you guys recommend and modified the UVs so they are vertical and horizontal. I Baked the normals in Maya, Zbrush and Xnormal. The bakes in Xnormal and Zbrush gave me pretty noticeable seams but the bake in Maya almost gave me no noticeable normal map seams.
I created the character base model in Maya and subdivided it about 7 times in Zbrush giving me something around 2.5 million polys, I did some really rough detail work around the UV borders for my testing purposes.
For the Maya bake I exported the low res model from Zbrush and the 6th Subdivision model in Zbrush (750,000 polys) used the transfer maps tool and got a really clean normal map. The disadvantage with using Maya is I can’t use the highest Subdivision level from Zbrush because that would crash Maya. Zbrush and Xnormal in theory are better solutions because I can extract a normal map from the highest Zbrush Subdivision level; unfortunately I got really bad results. I’m not saying I didn’t get any seam artifacts in the Maya bake because I did, but they appeared on edges that aren’t apart of the bordering UV edges, so I thought that was a little weird. Fortunately these artifacts are barely noticeable from a reasonable distance so its not a huge problem but I would still like to know why that occurs.
Its pretty important for me that I can bake normals from the highest Zbrush subdivision level. What program did you (derkomai) use to bake out your normals and what were your settings?
<span class="fontnone">I included some images so you can get an idea what kinda problems I’m facing.
Thanks
Attachments


3DTerry, I’m having exactly the same issue. If I bake a normal map in Max, there’s no problem, but I can’t get a 3 mil.poly mesh inside Max, to get all the detail.
Zmapper-Xnormal normal maps, always have a seam-problem in Max.
I don’t know why, but people who really know how to use a normal map from Zbrush in a 3d program like Maya,3ds Max,Softimage etc. are not talking very specific about it.Is it some kind of a secret?
There are more than 100 questions about problems in normal maps, and there’s not a specific way.And I don’t think hiding the UV seams, is the ultimate solution…I’ve seen a lot of game characters, from different sides of view, and there’s not even one seam visible.As for their UV layouts, are full of non-hidden seams.
I’m just quiting…
ne3go, I agree, there must be something that we’re not being told. I’m currently trying to use the Decimation Master tool to extract my highest subdivision level out of Zbrush and bake a normal from that in Maya. I will post the results when I get some extra free time.
I don’t know if this is any help. I think I came across something similar recently, and found a fix which makes little sense, yet worked.
I’d make a model, maps etc. Everything was fine, maps created as normal, looked ok and so on. Flipped the maps as normal so they’d be orientated correctly in Lightwave. But would then find one side of them wouldn’t appear quite right, while the other side did. No overlapping UV’s or anything.
Found just inverting one of the channels suddenly fixed the opposite side. Neither side was symmetrical or anything, but it suddenly removed the seams that did appear on one side and not the other, without harming the previously working just fine side.
Did you select a specific region and invert the channels or the whole image Mr Newbie? Do you have images of your work? Model and UV map before and after?
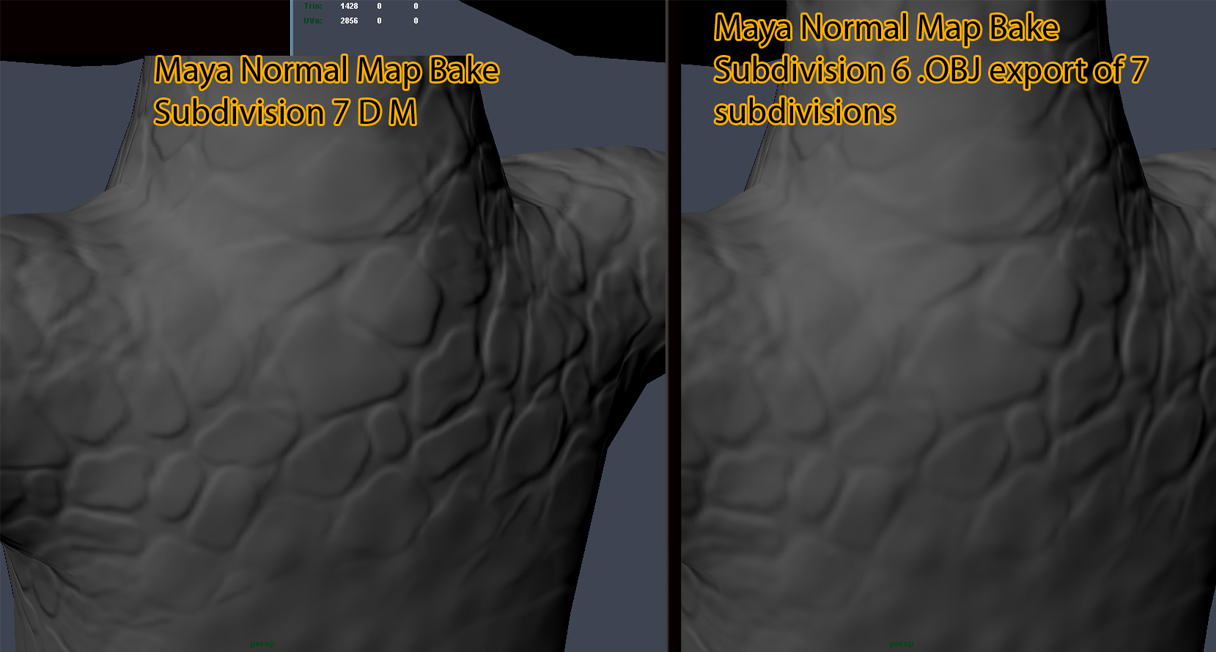
In the following attachment I included a screen capture of the low poly model with a normal map baked from a 750,000 decimation model (Left Side) and the other was created from a OBJ export one level down from the origianl high res model from Zbrush. The decimation normal map is slightly better than the image on the right. So if I cannot create good looking normal maps from Zbrush I will just use decimation models and bake normal maps from them in MAYA. Not my ideal method but it works better than anything else i’ve tried.
Any other ideas anybody?
Thanks
Attachments
Nope, just flipped the Y Channel from within Lightwave 9’s normal map node (after previously flipping the whole image before exporting from ZBrush so it would work at all). I honestly don’t know how or why it worked, in theory it really shouldn’t. I would think doing it would fix that side but break the other. I either used GUVTiles or AUVTiles (not a big fan of UV Mapping so any quick fix solution is great by me). I’ve no idea if this would work in anything else, or if it was a quirk or what, but it’s worked fine for me ever since. Maybe it’s just down to how ZBrush lays out the UV map? But even then, I really can’t explain why it doesn’t instantly break the opposite side, none of the tiles are duplicated. So I don’t know.
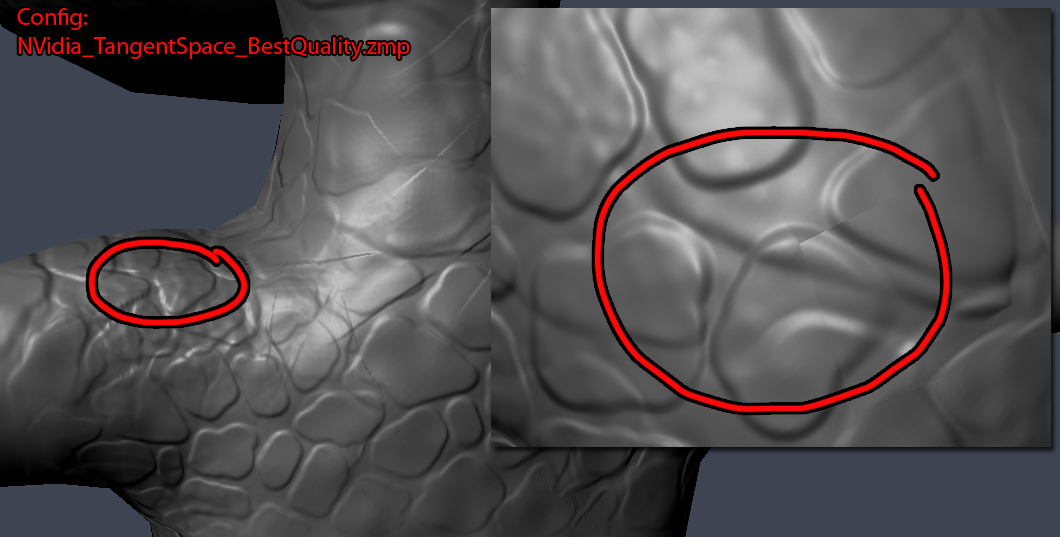
So I found a fix through some more research and it turns out all I had to do was use another configuration from the ZMapper Config list. I’m a Maya user and I would always choose Maya Tangent Space Normal Map Best Quality. Unfortunately I would always get really bad results. As it turns out, NVidia_TangentSpace_BestQuality.zmp is the best Configuration I have found so far. Yes I get seams around the border edges of the UVs but from a reasonable distance you can hardly see them. I am posting an image so you guys can see my results.
At work we have access to the Gears of War 2 Unreal 3 build. Looking through their characters and exporting them out as .OBJs and applying the textures and normals back to them in Maya, it turns out they too have many noticable seams on there characters and objects. Some seams are hidden rather well while others aren’t. But again alot of the noticeable seams can’t be seen from a resonable distance.
I believe these issues will always be present with normal maps and the only way to hide normal map seams is through good UV layouts and the ability to hide seams.
Attachments
3DTerry thanks for the research. I’ll try myself the Nvidia configuration and see the results