ZBrushCentral

My first sculpt attempt... please criticize ;)

HAHAHhahahaha… that’s pretty hilarious!!

One of the most interesting aspects of this process of leaning to sculpt human form has been discovering my own biases. It’s amazing how much one’s own psychology goes into their art. To explain what I mean, I should give a sentence or two of my recent history… I used to weigh 410 lbs (186 kg), and lost 241 lbs (109 kg - no surgery, I did it the old fashioned way) and the consequence of having been so large is that I now have considerable amounts of loose skin… so in my bodybuilding efforts (which I started a couple of years ago) I’ve been very concerned with traps, pecs and delts in order to lift the skin into a more normal appearance. (Though I do work the entire body - those are the body parts I tend to “prize” the most.) These things that I have been so focused on creating in myself have come to life in my sculpt, even though I didn’t consciously make them disproportionately larger - which I find utterly fascinating!

That being the case, I trust I’ll fare better in the bias department when it comes to sculpting women, since I have no personal biases, only preferences.

I will definitely do that… in fact, as part of my lifestyle change, I have made a number of friends who are also into natural bodybuilding (one is actually a pro), so I’ll check out their photos… easy peasy. I’ll probably run this by them to and see if they think he’s been hitting the flyes too hard (or not working the bis and tris enough) hahahaha…

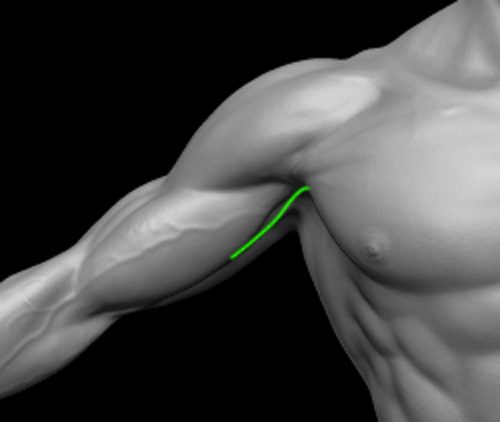
Hmmm… that bit I based on what I could feel under my own skin… What I represented visually was what I could feel, in terms of how much of the bicep and pec overlapped, and how far up the bulk of bicep seems to go. Obviously, everyone’s tapers into a tendon, but that doesn’t mean it’s right as it is… perhaps it’s a case of individual morphology, but I want this to be “right” (in the range of acceptable human morphology), so if it’s clearly “wrong” then yes, it needs to be fixed. Maybe that was a mistake using myself as a reference (again), since my own morphology isn’t quite normal… lol. I’m gonna have to look at some reference photos on that as well I suppose.

I really appreciate you taking the time to explain things in such detail, and to even take the time to make diagrams and such - it really is quite thoughtful, and much appreciated.

Yeah you losing weight explains alot. I know a guy who was overweight during his teens, so his chest grew larger than the usual, and now that he has lost weight he has a massive ribcage. It looks good as long as you tone up the rest of your body. I seem to have the opposite problem due to asthma. Congrats on losing weight by the way. I started bodybuilding about 4 months ago and I’m gaining pretty rapidly. Have to stop for a month though due to a kink in my neck.
So yeah your sculpt looks good, but I think the main thing is the chest and the underarm bicep/pec spot.
Tthe hands and feet look really good btw.

hahah… yeah me too. (I’m working on it!!) …and thanks!

Me too! Just par for the course I guess…

Exactly!

Ooohhh newbie gains - they’re the best :wink: Sorry you got sidelined, but it will come back fast when you start training again. It’s far better to heal from an injury than to push yourself and risk making it worse imo. I had a shoulder issue, and thought it was all better, and reinjured it (not even during training), so you can’t be too careful. Best of luck!!

Thanks… the hands were fun. :wink:

Just found a great site that contains the good free images from 3d.sk
This photo here is a good one for studying the underarm/bicep spot.
http://fineart.sk/photo-references/male-standing-poses/08

Justin - thanks for the great site link! That site is awesome.

I found a couple other images there that give some hints as to how to approach that region:

http://www.human-anatomy-for-artist.com/photos/show/id/73545
http://www.human-anatomy-for-artist.com/photos/show/id/72288
http://www.human-anatomy-for-artist.com/photos/show/id/46488

It seems based on those photos (and the one you posted) that my connection point is actually good but that the bicep tapers too quickly under the shoulder, and that it would work better filled it a bit farther down… so not moving the attachment point of the bicep but just filling it in, like so:

bicep fix.jpg

What do you think… an appropriate fix?

yes thats exactly what I was trying to get across. It was hard to explain.

So, I hope this fixed the bicep taper issue - and in doing so the arms do look a little bigger, hopefully enough to look “real”…

…I’m getting anxious to try the retopo process… first time for that too. Starting to wonder if putting on fine details isn’t better done AFTER retopo from a workflow efficiency perspective… rather than projecting them onto the retopo’d mesh.

Sean, I was planning on retopo’ing right here in ZBrush by first making a topology plan with polypaint then using the traditional zbrush method using a zsphere and edit topology… if I found it too difficult or awkward I was considering 3D Coat as the alternative, as I understand it’s got really phenominal retopo tools - just want to avoid spending much more money on this :wink: I know Blender is open source/freeware, but I’m not sure it’s retopo tools are any better than ZBrush’s - I haven’t heard either way on the issue honestly, only that Blender has a bit of a learning curve in general, and since I already own Lightwave 3D which IMO has a great renderer, I just never figured I’d ever need Blender for anything. In any case, I figure I won’t have any issues with retopologizing in ZBrush, the tuts on it seem simple enough.

I would suggest useing the retopology tools inside ZBrush, they are not bad at all when you get used to them. And it’s not that slow, ofcourse a more complicated model requires more time. I’m not sure how other retopology tools work tho, but the way it’s done in Blender is the way you’ll do it in ZBrush. Atleast you know how to navigate in ZBrush, with blender you’ll have to sit down and spends some time figuring it out if you havent used it before.

3D Coat makes any other retopology tools look like $*&%
It has voxels, texture painting, retopology, UV Mapping and Rendering. Best of all, it has amazing hard surface features. I would highly recommend it.
I usually sculpt the basic form in 3D Coat with voxels, Retopologize it, UV Map it, then sculpt in zbrush and polypaint it.
Its extremely cheap for what it offers too. $99 for the educational version, $349 for the full complete licenced version. Thats way cheaper than ZBrush and it can do a whole lot more. Very easy to learn too. Anyway I’m going on a rant so basically it is worth the money.

That’s pretty much what I was figuring. :slight_smile:

That’s what I’d heard about it… well, not the “$*&%” but lol :wink:

I’m sure it’s worth every penny (as is ZBrush imho) and I was very, VERY impressed with their video demos and gallery. I chose ZBrush over 3D Coat as an initial sculpting tool primarily because of it’s user base, in spite of the fact that it was a couple hundred less. It was kind of a one shot deal, as my budget is kinda limited just now. (I’m not a student, so I can’t get the educational pricing.) At 350, I think I’m going to wait (I might be able to squeeze a purchase out of my finances, but it would make for a very difficult winter, financially) - in any case, it is on my list of stuff to get, including the upgrade to Lightwave 11.0 which has some really interesting new features, and the Maxwell plugin for Lightwave, which from what I’ve seen one of my best friends do with it, takes rendering to a whole new level… oh and MARI seems to take polypainting to a whole new level too - I’m interested but I need to see what I can do with polypaint first before I even think about saving up for that. (Hopefully ZBrush will do all I need it to so I can save some money there.)

I also want to upgrade to the latest version of Reason, but that’s gonna have to wait, as that’s almost strictly “hobby” stuff. (Crazy fun program though if you’re into music.)

Suffice it to say - I’d better start selling some models (or get a side gig modelling), or I won’t be able to afford any of these, lol. It’s funny, I started writing software as a hobby when I was 8 years old… it became my profession for years (and I’m pretty #$% good at it imo) but it’s been starting to get to the point where I’m no longer in love with that particular creative process. When something I love becomes more about politics, time management and perfoming “the job” according to a standard that isn’t really the best way to do it; rather than about being creative and doing something I love doing really really well, then I think it’s time to let it go. It seems like the entire software industry has become about just “making something work by XYZ date, regardless if it’s the best way or not” than about “creating something great and doing it really well”. It’s like my engineer half and my artistic half are being forced to go to war, and imo it’s unnecessary. So, I think I’m ready to start a new adventure that utilizes all of my skills and abilities (including software under the right circumstances)… it’s one of the reasons I took up ZBrush - to see if I had the potential to be successful in this arena on a professional level.

I guess you guys didn’t need to know all that, lol, but it felt good to say it regardless.

So, I took some time off to do some painting and just get refreshed - and started back working on my guy. It’s retopology time. I got the head done (well, planned/drawn out), and I gotta say, planning topology isn’t NEARLY as fun as sculpting. Oh well, gotta get it done one way or another… maybe because it’s my first time or whatever, but somehow I’m finding it kind of mentally exhausting drawing lines that all must flow and make sense for animation and make almost only quads with little to no triangles and zero >4 sided polys. (sigh) Wish me luck!!

It doesnt have to be quads… SOme places triangles are okey

Well, I finished retopologizing and polypainting. Both were more time consuming than I anticipated, though being my first time at each, I was figuring out some things as I went along. One important lesson for polypainting was that lighting makes a HUGE difference in how things appear. I was getting really “bland” looking results using the default lighting, and could never get the dynamic range of the skin right until I realized that little bit - my reference photos had higher dynamic range due to the lighting. Anyhow, here’s the latest, c&c welcome as always.
front_detail.jpg
back_detail.jpg
front.jpg
back.jpg

No comments? Either it’s totally perfect or totally sucky haha… oh well. :wink:

Hi Robb, It’s looking very good to me … not that I am in any way an expert in anatomy. Don’t get frustrated and just keep up the good work! Cheers, David :smiley:

Thanks David :smiley:

Sean,

Thanks for the comments. I greatly appreciated that you took the time. While I’m sure I could keep tweaking this model until the cows come home, I have to set limits on myself to be practical, and move on. As such, I’ve put a freeze on the modelling phase, and have moved on to learning all I can about the texturing process, which I suppose is the thing I was hoping for the most critique on during this phase. Next up, clothes, hair, etc.

I’m actually into bodybuilding myself, and have a number of friends into it as well. Prior to getting into ZBrushing, I had several anatomy books for bodybuilding, including the Strength Training Anatomy book you referenced in that Amazon link… in fact, that book was my first resource!! Since I’ve started sculpting, I’ve picked up a few more anatomy books, but ones focused on art, and I am slowing going through those, soaking them in.

The pecs have been adjusted so that they flow out from the armpit where they connect to the humerus… in the older version they went pretty much straight across, but others pointed it out, and I gratefully changed it accordingly. So take a look at earlier pages to see that discussion, and for a more defined view of the sweep of the pecs for this model with the MatCap Gray applied, and once you’ve seen the previous images, please let me know if (and why) it still looks wrong to you. (And try to find the version with the straight across pecs too, for reference, I think it’s only a few pages back.)

Regarding the number of abs, I have to respectfully disagree. The rectus abdominus has 6 segments, four above the navel and two below. (The two below appear to have a small dip in the middle in some physiques.) In the most well defined physique, where the abdominal portion of the pecs are showing, it looks like an eight pack. Those are the two segments that might be throwing you… it looks like an abdominal muscle, but it’s actually an extension of the pectoralis major. If you look at Strength Training Anatomy, there is a great diagram in the back of the book that shows this abdominal portion of the pecs… visually, it looks like an 8 pack as a result, and my mistake on this sculpt (now that I’m re-looking at it) is that these pectoral segments are a bit smaller than I actually sculpted them… I sculpted them with a greater sense of “abness” which is partially incorrect. Regardless, these are the “8 pack” abs that are only really visible at extremely low body fat percentages.

I’m not sure what you mean about the collarbone, would love to a bit more on that.

Though the modelling phase is over for this mesh (so it won’t be changed), I want my next sculpt to be absolutely perfect, so I would love to hear your thoughts on this in more detail.

Will do!! Thanks for taking an interest.