ZBrushCentral

Male head - Final and render

Just spent a couple of hours tweaking along the suggested lines (squarer head, wider forehead, corrected the naso-labial fold, made the ear stick out more at the back, remodelled the back of the skull and corrected the neck, made skull widest behind the ear…) I’ve left brow and jaw with the same basic structure as I will go for this slightly slender head. I’ve also tweaked the eyes and eye sockets.
I’m not sure I see a great deal of difference but I hope it’s better overall. MaleHeadWIP2.jpg

I’ll work a bit more on the ears before moving on to the detailing.

Detailing and texturing. C&C still welcome. I’m not quite finished yet :wink: [attach=80898]MaleHeadWIP3.jpg[/attach]

Attachments

MaleHeadWIP3.jpg

Nice texturing. The model is coming along well. Can you post more angles (front / left / right) so we may provide C&C on form.

Reminds me of Paul Weller btw. :slight_smile:

Thanks for stopping by Elexir.
Here is a bunch of other angles.
WIPangle1.jpg

Attachments

WIPangle2.jpg

WIPangle3.jpg

Oops, sorry, it’s not exactly front/left/right, but the model is 99 per cent symetrical at this stage.

Oh well, I guess no news is good news :wink:

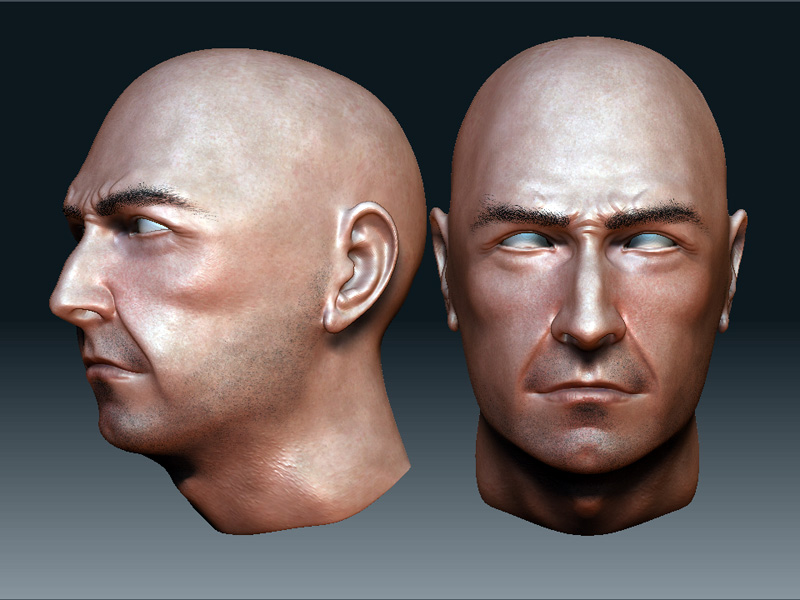
Looks pretty good. I am glad to see you fixed the back of the head.

Generally speaking, the proportions are OK. The ears are too high on the head though. As a general rule the top of the ear lines-up with the center line of the eye, and exends to somewhere between the tip of the nose and the mouth, depending on age etc… You should wiki the pinna (ear) anatomy for a good reference on the basic make-up of the ear. You are incorrect in a few places. The Concha (hollow at the opening to ear canal) and Crus of helix (the part that rounds-into the Concha from the helix (the outer cartilage of the ear)) need some tweeking.

Now, you may not care about this if you intend to cover the ear with hair, for instance, but it might be good form to get it right, especially if you intend to reuse the model.

The frown looks to have an extra fold that seems unnatural. I am referring to the outer-most crease. The angle of the fold does not seem to fit with the general mechanics of how they would be created from the tensing of the Corrugator on Frontalis muscles.

Minor crits really. it is coming on very well, and I am particularly impressed with the texturing.

:slight_smile:

Hi Elixir, very kind of you to take the time.
I can fix the ear some more. The only thing that might be difficult is to lower it, as I fear it will interfere with the texturing and stretch the skin. That’s something I think has to be fixed at the topology level on my base mesh, which I do intend to use again. So I’ll do that.
Generally the ear is the bit I like least. I’ve found it very difficult to avoid blobbiness (i.e., I can’t really get the shape of the cartilage to flow, regardless of which division level I use, it always ends up looking lumpy. Again, it may be partly a topology problem as this area of the mesh is very stretched due to insufficient number of edge loops on the base mesh. Another reason to start again from scratch.)
I see what you mean with the frown. I can get rid of this one easily.
I think I’ll finish this model now, adding the changes you suggested, and keep the more heavy duty stuff such as the bottom-up remodeling of the ear for my next try - starting again from scratch with a retopologised base mesh.
Thanks for your comment about the texturing. I’ve spent quite a lot of time on this. I stored the fine pore and wrinkle details in a separate layer and I find the ability to tweak the intensity fantastic. The colour was applied using a mixture of skin textures and standard brushes with colours picked from different areas of the texture map - just applying and superimposing layers for hours on end… Glad you like it.
(By the way, credits to Monsieur Legrain, whose wax skin material I’ve been using for these renders - It’s a very flattering mat for showing off skin textures).
EDIT: The brow was an experiment (black colour and displacement using a very fine brush at the highest subdivision level. I’m also deeply unhappy about it so any suggestion for nice, natural-looking brows that would not involve just projecting a photo would be highly welcome.)

Post your base mesh in Frame mode from front and side, perhaps some suggestions on it may help you with your next model.

Thanks Elixir. I really appreciate your help.
Here’s the base mesh, done in Blender using edgeloops.
It’s based on a photo ref, though not one that looks much like the character in the end. ManBaseMesh.jpg

Your base mesh looks to be over-detailed in places and not detailed enough in others. Please don’t think I am pulling it to peices… it’s just my observation, and someone else may dissagree.

The ear area has very little detail, in opposition to the eyes, nose and mouth, which have considerably more. What this may lead to is a higher polycount than you really need, because you may be subD-ing more to get the required details in the ear. What I am trying to say is there needs to be more balance. This can of course be rectified quite easily by bringing the ear detail up to the same level as the eyes on our base mesh. What I have found with ears (if you are building from a primitive) is that you need to create more edge loops, which is essentially providing you with the extrusion that you are looking for in the ear.

Here is a link to an experiment I took part in to build a base mesh in ZB from a cube using edgeloops. For the level of detail you have in the rest of the face I would expect something more like what I have (in the link) as far as ear detail (not that I am any Guru). Hope this helps. :slight_smile:

http://www.zbrushcentral.com/zbc/showthread.php?p=349197#post349197

Hi Elixir. I suspected that was the case. I noticed while sculpting that I was seeing huge differences in density in various parts of the mesh, and obviously not in the areas where I needed them.
This mesh is not as bad as previous ones, but I do find it one of the most difficult parts of the job. Trying to get reasonable densities in some areas and not in others without ending up creatings tris everywhere is a real puzzle. Your mesh looks very elegant in this respect. I’m going to save it and have a very good look at it.

There is nothing great about my mesh, but thanks for the compliment. It was, in truth, just the best I could do with just edge looping, which can be quite limiting. The way to go is retopology, but it tends to crash A LOT. I am in the middle of retopologizing a new base mesh which should put that one to shame. I actually learned a lot from this thread, which changed my outlook on edge loop and flow:

http://www.subdivisionmodeling.com/forums/showthread.php?t=907

You should take a look, if you are interested in creating a really good base mesh.

Thanks mate. Another great reference. I’ve immediately bookmarked it.
I’m rendering a version of my model right now with a few clothes and accessories. I’ll post it as soon as it’s cooked.
Thanks again for your fantastic help.

So here it is. Clothing also done in ZBrush, but as before, I had no energy left to spend any serious time on them. This was rendered in Indigo, using the disp map as a bump map. Not ideal, and not the most subtle, but I used quite a high subdivision level to export my mesh and there weren’t any overly daring shapes in the sculpt so it’turned out kind of ok. I used two passes (SSS and Phong), composited in PShop.
Thanks again to Elixir and Fatkid who provided much welcome and much appreciated help throughout. FinalS.jpg

Good job, buddy. Looks great. :slight_smile:

It looks great. How did you do your hair?

Hey man, this model came together nicely! Good job. Glad I could help. The ear and the brow wrinkles are looking a bit off, but everything else looks reasonably convincing. You changed the mouth as well since I saw it last, and it definitely looks better. Looks great in fact. And the textures and materials on the clothes look really good too. What’s cool is your next model is going to be even better!

Thanks for the kind comments. And as I said, thanks guys for your help earlier. I know this is far from perfect, but I felt I needed to move on now and use what I’ve learnt on a different model.

Headkitchen: I wish I could do hair. But I haven’t found a way yet. Users of Blender and Indigo are a bit disadvantaged in this department - no hair and fur system and no particles. So I guess you mean the eyebrows. Well, these are mostly painted in the projection master, using very fine strokes as well as different colours - black towards the centre, greyer towards the outside). There is a bit of geometry too, using a 2-to-4-point standard brush, with black colour
and a little displacement.
There are actually eyelashes two, which are geometry created in Blender and alpha-mapped. But they’re hardly visible so I’m not sure they were really worth the effort.

Thanks John. Obviously, the lack of displacement remains a problem with Indigo. But otherwise, I really like the images it produces.