ZBrushCentral

Making Hair with the Ring Primitive

hey who would have thought being a hairdresser could be this much fun!
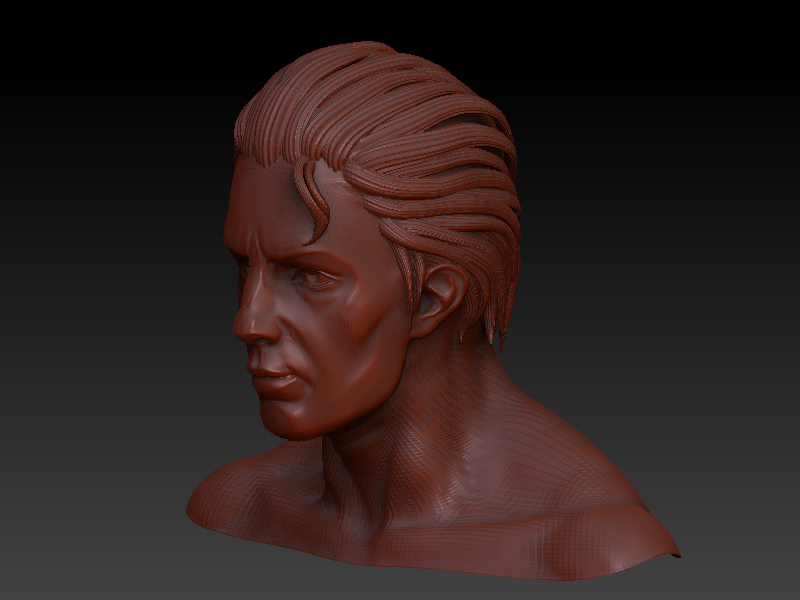
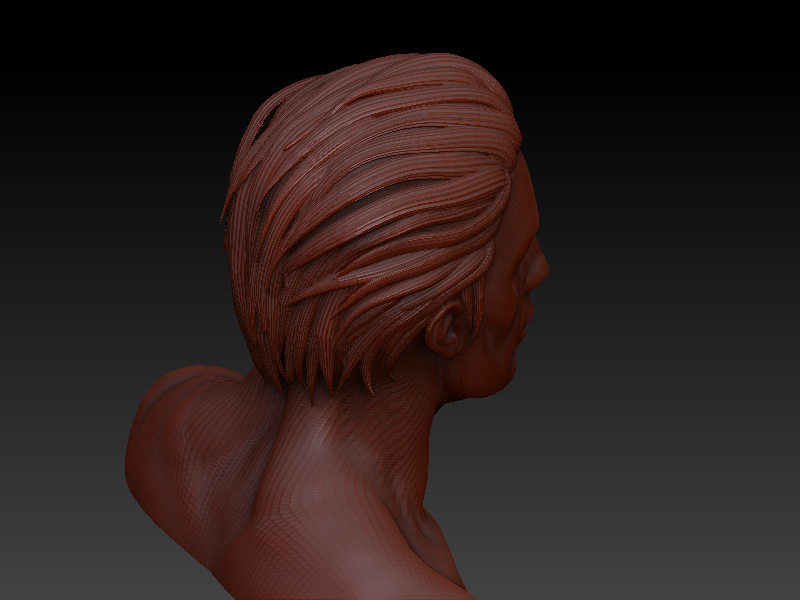
that long wig looks great cwahl!
i was messing round with the degree of inflate and you can get some nice long strandy bits to play with
and style. this ones a bit too harsh and sharp looking- itneeds to be softened.

oh and a massive thanks to boozy for that ref to multi marker editing and the joy that is the reposition button- what a revelation!! makes adjusting all these elements a dream.

what fun!!

Thanks for sharing your technique, looks like a good way of fleshing out the hair volume. :slight_smile:

Thanks for sharing these tips! :+1:

I want to make some transparent 3D columns of falling water for use in Adobe Atmosphere (Atmosphere is my main reason for learning ZB).

Looks like these hair techniques could be just the thing for water columns too.

Thanks folks! :stuck_out_tongue:

This is a AWSOME modelling trick. Thank you so much! I’ll be playing with alot.

p.

perfect. Thanks for going further of this technique from this thread: http://www.pixolator.com/zbc-bin/ultimatebb.cgi?ubb=get_topic&f=4&t=001577

Would someone be so kind as to give more detailed steps for this? Like how do you set a row to 1 or 2, how do you inflate, how do you mask, etc? I don’t use ZBrush enough to fill in the steps.

Maybe a ZScript?

Riggsd- I’m not Zscript savvy enough to do a Zscript tutorial.

But I’ll try answering the questions you’ve asked-

Firstly you have to have an object selected and in edit mode before these options become active.

Inflate- Goto Tool menu/ Deformation submenu.

Mask all/Row and Select count- Goto Tool menu/Selection submenu.

When using Selections, Mask all first, then choose select count, then Row (and after inflating press ‘clear mask’.)

Note- A low polygon object will produce less rows at setting 1, than a high polygon object with the same setting. Keep that in mind and adjust accordingly.

Hope this helps…

GREAT READ.
Thx for sharing :+1:

okay… i understand all steps, but selection option is nowhere to be found in the tool menu…

This tutorial is 5 year old, it was for zbrush 2.0…

Facepalm.jpg

Its old but perhaps its still possible…

@Vindicate: Maybe the word “selection” confused you a bit. :slight_smile:

The author of this tutorial said:

  1. With the ring active, go to the selection menu, mask all and select Row at setting 1.

In other words: Select the ring 3D tool, open the Mask-Palette,
click on the “Mask all” button, set the “Sel” slider and the “Grd” slider to 1,
click on the “Row” button (continue with the other steps…)

Hope that`s right.

okay… the sel and row options has been removed from tools>masking. this makes this action quite hard…But i don’t beleive that this way of working has been removed, anybody know of a workaround. or has the sel/row been moved to another section, if so, i can’t find it…

Those buttons and sliders havent been removed (please see the screenshot). But as far as I know theyre only available before you click on the “Make Polymesh3D” button. If you want the same mask for your Polymesh3D then, please see here(post no.3):

http://www.zbrushcentral.com/zbc/showthread.php?t=67591&highlight=mask+alpha

[attach=157384]row.jpg[/attach]

Attachments

row.jpg

Well, this is a blast from the past. Good to see this technique still has some interest.

Hey guys, Well its 2010 now, I believe that thread has been open for more than five years, things cahnged inside Zbrush, I am actually using Zbrush 3.5 and the row option is nowhere to be found …
Too bad, I would have loved to try out that technique but I already spent hours trying and find this damn option and it seems like it has been removed, so please if anyone has an idea let me know.
Thanks in advance!

R

Moni-Poroni’s post shows you exactly where to look. And as she says, those settings are only available for a parametric object. That’s any of the models in the Tool palette that end with “3D” in the name (other than Polymesh3D). If you use a polymesh object, those options will no longer be available because they depend upon the mathematical uniformity that only comes with a parametric/primitive object.

imaginative :lol:

Neat idea. Here is the result i got.
[ATT=]hair render.jpg[/ATT]
[ATT=]hair render2.jpg[/ATT]

Attachments

hair render.jpg

hair render2.jpg

this so cool tutorial, i like your stuff but on thing , i can’t find row in zbrush 4 r2 any help will be greate

thnks