Is there a brush that can be used to lift the surface of a model, but preserves the details beneath?
I am making some bas-reliefs and have areas that I want to accentuate by gently raising or lowering in the z-axis without losing the surface details or shifting in the other axes. There are other (non bas-relief) times I would like to raise or lower a surface without disrupting the underlying detail.
Among others, I’ve tried the following:
Move tools with ALT-click-drag.
This kinda works, but requires multiple spot click and drag applications. Making for messy, unsmooth transitions.
Inflate brush, with The >Transform > Modifiers> set to Z only.
This works on properly oriented bas reliefs, but I haven’t figured out how to save those transform settings with a brush.
I suspect a brush like this might already exist.
Any ideas would be appreciated.
Thank you!
I think you’ll be very interested in the new “Contrast” features Paul and Jospeh demonstrated in the 2021.5 Sneak Preview.
That’s not helpful to you at the moment however, so I’ll draw your attention to the Tool> Masking> Cavity masking feature, as well as the Brush> Auto Masking> Cavity Mask feature.
These features will allow you to mask the recessed areas and further extrude or brush only the raised areas. The Auto-Masking feature will let you do this with a brush in real time. These, coupled with the Transform >Modifiers set for the correct direction, may help you achieve better results.
Thanks, Yes! That was helpful.
It’s not what I was asking for exactly, but I definitely will use the new contrast feature and contrast brush. Very cool!
Here’s an example video of what I’m trying to accomplish. Lifting whole sections of a bas relief gently (without increasing the local contrast). Bumping out the forehead and cheeks. In the video I use a move brush (Alt-drag). But it requires spot by spot application. It works, but hard to control and sometimes leaves rings
If you or others have ideas, I would appreciate it!
Cheers
PS Sorry the vid is so short. having upload issues!
fwiw - perhaps try the Ehance Detail macro, which I believe came in with ZB2021. At the recent ZBrush summit one of the many ZBrush gurus explained the technique behind it (edit the macro to see what it’s doing.) Anyway it’s aimed at enhancing detail and you can wind it back with the layer slider. Cool thing is you can also wind it negative. So maybe it’ll help in it’s own or in conjunction with Cavity Masking mentioned by @Spyndel. I used it to pop the detail of thousands of snake scales which are quite smooth relative to the creases that form their borders. Seemed similar in that respect to your relief sculpt.
You may benefit from a multiple subdivision level process, and working on the figure as a separate 3d object. This will open up many options for you. Multiple subdivision levels are a feature in later stage sculpting, not something to be feared.
One of the perks of having a mesh with a clean, low poly base and multiple levels of subdivision, is that you can sculpt on your mesh at different levels of resolution simultaneously. The mesh performs differently at lower poly than it does at high poly. A low poly mesh is much easier to sculpt on or manipulate without distortion–it is not sensitive to fine detail. It can be much easier to blur a nice soft mask. It is much more responsive to smoothing than a high poly mesh. A high rez mesh resists smoothing, but is very sensitive to fine detail–those rings you were talking about.
So for instance, you could sculpt fine detail at the highest level of subdivision, then drop to a lower level of subdivision to make coarser changes to the form of the mesh. When you switch back to high subdivision, the fine details will still be intact, but the form will have been updated without the distortion common to trying to affect that change at high rez. You can also smooth very fine surface details at high subD, without “melting” the form like you would at low subD. If you tried to do this all on a high rez mesh without subD levels, it would require a lot of brush adjusting and different brush selection. With multiple subD levels you can just move up and down and create different effects with the same brush.
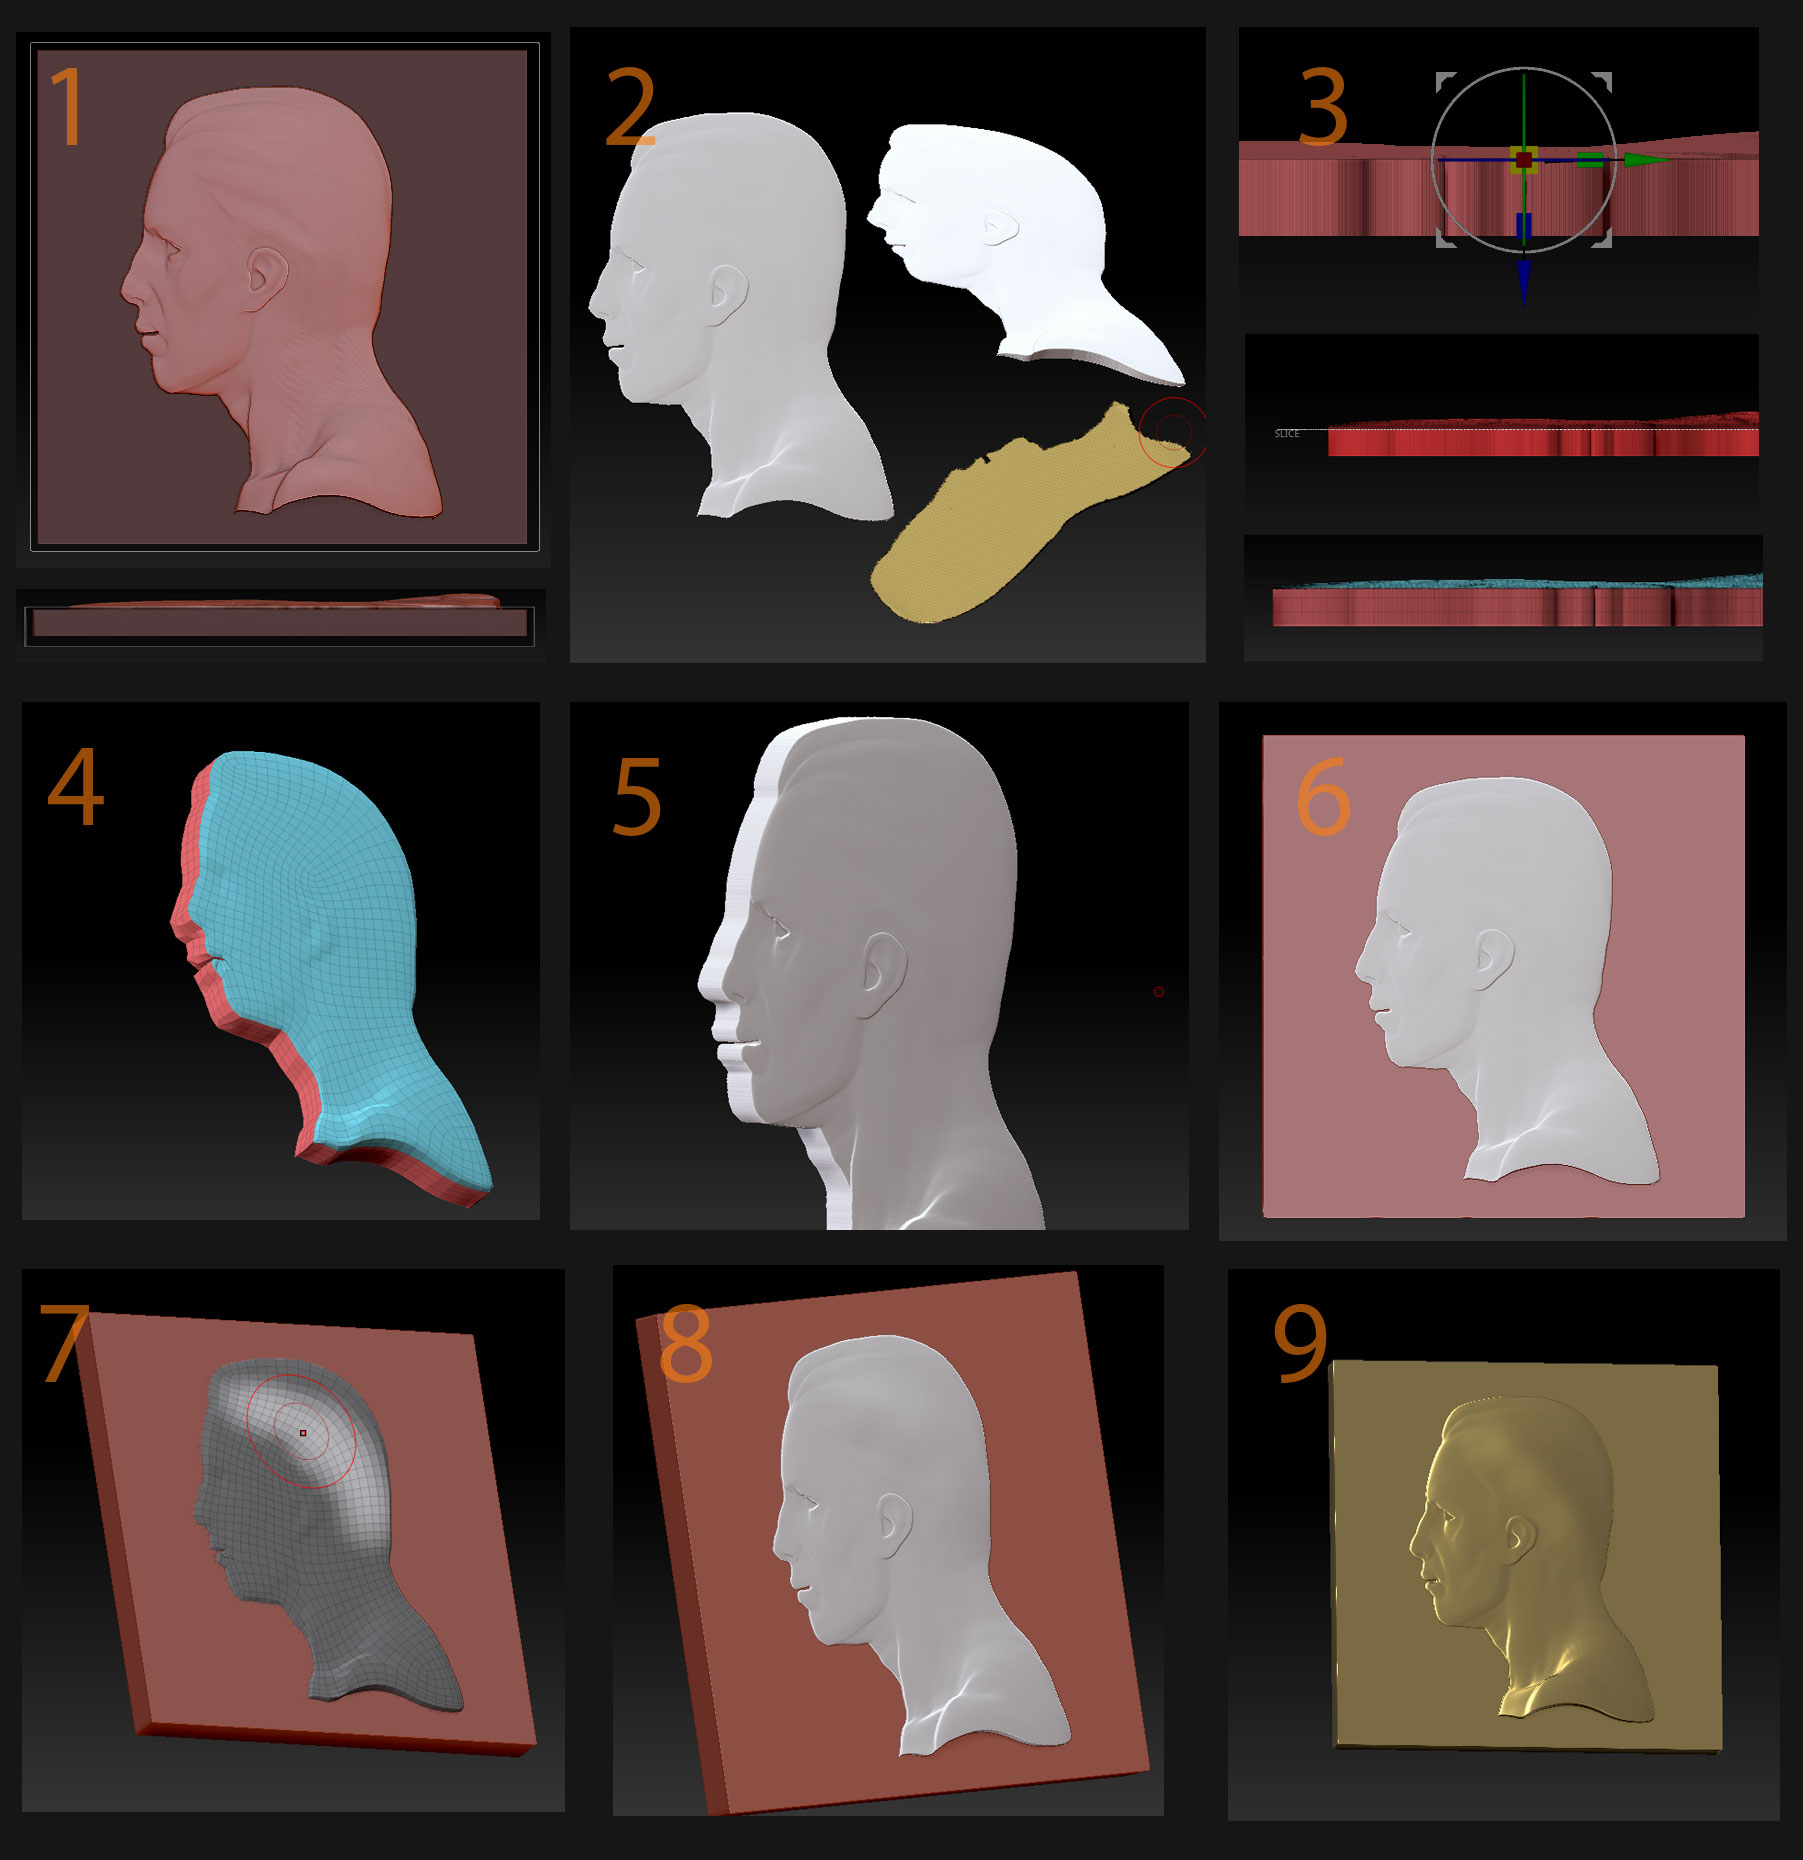
I’ve condensed a quick tutorial about one way I might go about setting this up below:
Here I’ve started by duplicating my target mesh–the object on which you want the relief to appear, and shrinking it just below the surface. This creates a surface just underneath the actual exterior of the object, that you can sculpt up and through the top object non-destructively. This lets the sculpt and the figure base remain separate objects, which will give you many more options for manipulating them. Note–Ive simply stamped an alpha into a cube to mimic relief. I realize this is a no-no. You would most likely sculpt your detail in. I only do this for expediency.
The exterior surface of your base object can be used as a subtractive object with Live Boolean to non-destructively “slice” the top of your sculpt off where it meets the surface. It will also assign a separate polygroup to the bottom of the mesh, which will be useful in the next step.
I transpose-extrude the bottom polygroup to pull out some thickness for the object. Then I use the Slice curve tool to slice the very top most portion into a separate polygroup as closely as I can. Then I mask the entire mesh and slice through the extrusion to create some loops there (if you mask the mesh before slicing, it won’t change the polygrouping). The reason for this is those loops will help ZRemsher understand the object better than the long, stretched polys will. You could also just perform multiple extrusions to do the same thing.
Additionally at this point with the mesh at high rez, I’m going to Ctrl-click on the current undo history state blip in the undo history line. This will mark this stage of the mesh as the projection source when we re-project the detail later.
I ZRemesh the object with “Keep Groups” active. ZRemeshing into low poly is a complex subject in itself, and beyond the scope of this post, but you should be able to get decent results with some trial and error. It would be useful if you were familiar with ZModeler to touch up the results.
Once satisfied with the low poly topology, subdivide sufficiently to capture the incoming detail, and use the Tool> Subtool> Project> Project History function. This will reproject the detail from the earlier history state. You may have to increase the .Dist slider if there are gaps in the projection.
Append the new multi-rez character back into the Base tool. Now you have a base, and a multi rez sculpt as separate objects, giving you a whole lot of freedom to manipulate one without affecting the other.
You can drop to the lowest subd level, and begin gently sculpting with brushes like Standard and Inlfate set to low ZIntensitiy, so you can gradually build up volume in a forgiving manner. Alt-Moving will also be more effective here without distortion. You can also mask your target portion, blur as desired, and invert to only affect a certain area with a nice smooth transition.
When you switch back to high subd level, the mesh will be updated with the volume changes, while leaving the high rez detail intact. Minor imperfections can be smoothed here without significantly affecting the form of the mesh…
When satisifed with the sculpt and the placement, you can again use Live Boolean to fuse the objects together into a solid one piece mesh, while leaving the original subtools intact to effect further changes if desired. Depending on output goal, either decimate for print, or again ZRemsh to create a solid multirez object for texture creation and digital render.
This is excellent. I really appreciate the detailed tutorial. So many tips here.
I do love working with subdivs and the new project history is really nice, but I often get shattered results after projecting from a zremeshed tool.
I will try adding loops on stretched polys with the slice tool. And thanks for the tip about slicing with masking on without adding new polygroups…
And I will separate the base from the character. That should help with a few things including keeping the total polycount down.
@Spyndel I’m really looking forward to 2021.5 contrast features you described. The demos look great. Also thick skin is interesting. But Errors installing on my mac (error while unzipping … Zplugs/QtLibs.zip ).
I submitted a ticket…
PS thanks again for the workflow suggestions. Really utilizing the lower subdivs along with the Standard Brush and move brushes is what I needed.
Be sure to follow the installation instructions. Either use ZUpgrader to upgrade your existing Zbrush 2021, or uninstall your existing version to use the standalone installer. It needs to be installed to that location, and can’t install over top of the folder if it already exists.


 (error while unzipping … Zplugs/QtLibs.zip ).