ZBrushCentral

Levels of detail in different areas of object

Sculpt Creation:3dsMax
Detail Creation:ZBrush

A few weeks ago I purchased ZBrush as well as the “Get Into ZBrush” series KurvStudios and Southern. I also watched some of Sim’s training that a friend had and of course all of the free stuff I could readily find on the web. Wielding this new found knowledge I decided to embark upon my first character and competition.

I have to say, ZBrush went beyond my wildest dreams in some cases and fell short in others. I think that the falling short is mostly due to my lack of understanding of its capabilities.

Here is one such area:Is there a way to hyper-detail certain areas of a mesh over others?
For example; I ran into an issue where I did not have enough computer power to subdivide the mesh enough to get the details I wanted. Partly this is due to lack of experience in the creation phase as this was my first time (I used 3ds Max for all creation), but partly this was because of the simple fact that polys on the face will never be the same size as polys on the chest and with the way the mesh is subdivided the subdivided mesh on the face will always be much, much more detailed than the rest of the body. I don’t want this on a mostly nude model.

Here is what I think needs to happen, but I don’t know how:


  1. Detach certain portions of the mesh somehow so I can achieve much higher subdivision levels
  2. Do my ultra fine details
  3. Somehow return these objects back to one single object
  4. Export a combined deformaion or normal map back to 3ds max for my animation purposes
It seems that I ran accross something from Aurick on this, but have been unable to find that thread again.

You can see what I mean on the differences in levels of detail by looking at my character here: http://www.johndhosch.com/forums/showthread.php?t=2
So far it is my only item in the portfolio since I just started building one for public viewing. Much of it is experiments so don’t expect anything earth shattering:).

First, apply your UV mapping to the model.

Second, hide part of the model and then clone it. (Tool>Clone) Delete the hidden polygons (Tool>Geometry>Delete Hidden). Select the cloned copy and invert visiblity, then delete the hidden points there, too.

You now have two separate models that match up to become the whole. Repeat the last steps as necessary to break your model down as much as you need to.

When done, select each part and press Tool>Geometry>Crease to prevent contraction caused by subdividing the mesh. Also, press Tool>Morph Target>StoreMT so that you can return to the original state (since you can’t import anymore).

Divide your models and detail them. When done, return to level 1 and switch to your stored morph target. You can now create your displacement or normal map.

Because the model was UV’d before you split it, these multiple maps can then be combined to create a single map.

Thank you for the amazingly fast response.

I will attempt to do this on a test model tomorrow or Tuesday at the latest.

I am building tutorials for my forum’s methodologies database. I will use the concepts you describe and post this tutorial with screenshots for public viewing once I work out any kinks.

I am not finding how to inverse visibility? Can you direct me there? I am sure it is something that is right in front of me:confused: .

Ctrl+Shift+Drag on a small portion of the empty canvas.

I recommend that you view the Partial Mesh Visibiltiy tutorial that’s included in ZBrush’s Help system.

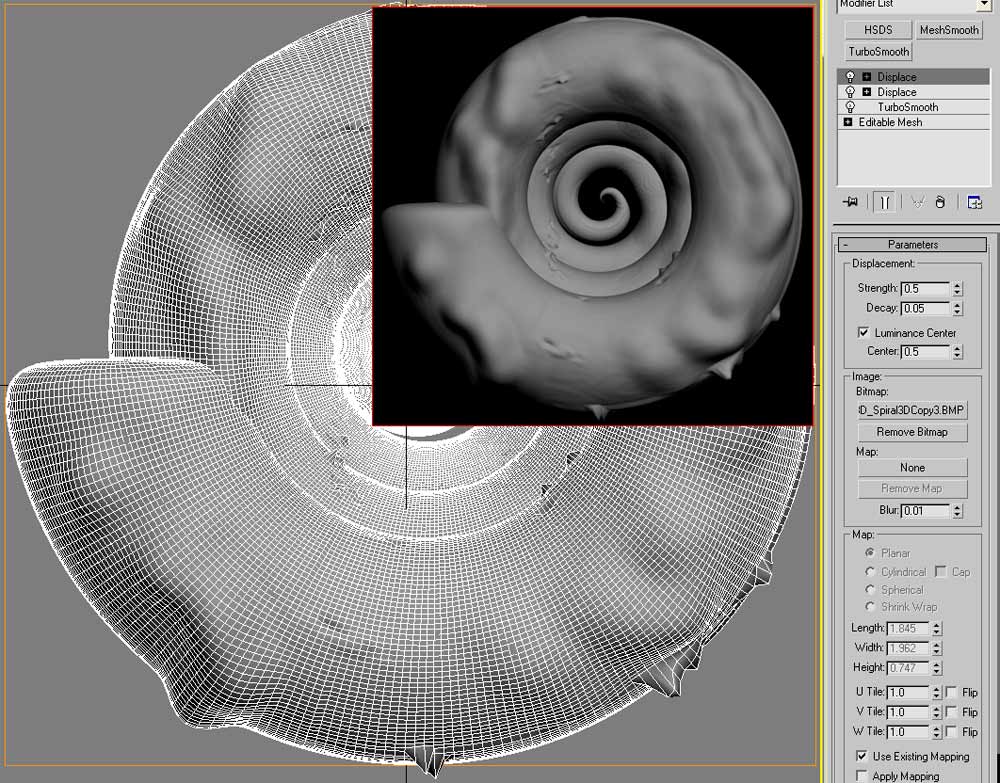
testdisp01.jpg

I tried out what you discribed on a test image. The concepts are working fine from the point of getting them to work on the model. My problem is with an odd anomily. There are “tears” where the seam (I am referring to where the two halves of the morphed objects came together. is located. There is also an odd occurance of “spiking” long the edges.

Do you see anything on my settings that looks out of place?

Here is what I THINK happened and I will do further tests to see if this did occur. I tried to make sure I did not do any displacement where the two maps would come together, but I may have accidentally let the brush move over this area. I have no idea what is causing the spiking in the other areas though.

NOTE: I tried both flipping and unfllipping the “V” and it seems better with it unflipped in this particular case although I have had it work both ways in the past.