ZBrushCentral

Learning the tool.

Ok, i suspect that the only way to go is manual retopo.

After several tries with automatic retopology, remesh, dynamesh and so on, the only decent way to rebuild low res mesh and all subdivision levels seemed to be a manual retopology. Used the “append zSphere” technique. The edit topology tool seems to be a bit clunky with those big bones on my way, but after several “click-and-error” i’m starting to get accustomed to it.

My only question now is “all those tris will become an issue? should i restart in another fashion?”

BPR_Render.jpg

On the left the original, on the right the retopologized mesh.

Hi again Umberto,

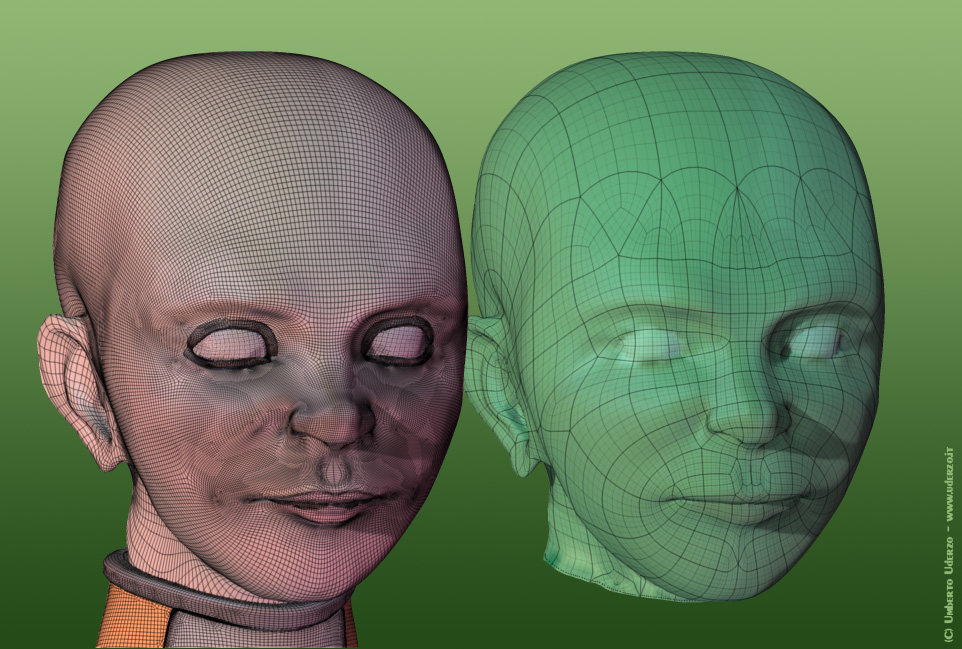
Meshes…topology…it’s a pain!
Manual topology is by far the best, if you’re willing to invest the time, but I don’t think it’s really worth it unless you are making models for animation. (As for triangles, they can cause some problems for the smoothing algorithms etc., but because Zbrush converts tris to quads when you subdivide, rendering in Zbrush is OK with them – but in other apps with the low-poly mesh, maybe not so OK.)

Qremesher is good. It does take a few tries to get everything working right. To help with the hands you can mask them to tell Qremesher to add more geometry there. Or, you could take the basic mesh that Qremesher gives you and manually draw the topology for the hands/ears etc.
Just remember when you’re setting your target poly count that you need to be able to divide up to the same number of polys as your high-poly version to project all the details, and each subdivision level multiplies the count by 4.
The biggest frustration with Qremesher is the spiraling edge loops. They make adding polygroups a bit difficult. You can kind of correct them manually, but again, it takes time.

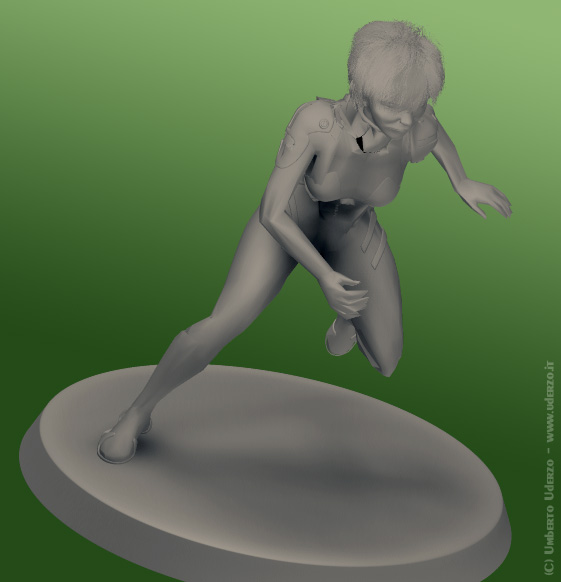
Low-res dynamesh is generally not the best approach – not for really low-res, anyway – because you’ll lose the fingers, and possibly even parts of the arms and legs. But then again, if you’re not looking for a really low poly mesh, dynamesh can give good results at low-medium resolution (50,000 - 100,000 points), which shouldn’t be too bad for posing, but still it might not work with the fingers unless you really spread them out first.

My biggest piece of advice is to not get too hung up on topology. It is important, but just get something that will be OK, and get the job done so you can move on… It can take such a lot of time up, and it’s better spent on the other things, in my opinion. And besides, even with a good mesh, when you pose, things will get distorted and you’ll have to resculpt parts anyway…

Yep! I experienced the spiraling edge loops of qRemesher!

After several trials the only decent solution i found was the Decimation Master, then the Transpose Master. Also with decimated mesh the ZSphere rigging was absolutely unusable, too slow (ok, i don’t have a first class pc, it is pretty old dual core 2.6 Ghz with 4Gb ram and Win7 32 bit, but it is really slow…)

The only “thing” i was able to squeeze from the mesh was the following. Woah! Posing is difficult! :slight_smile:

I still need to understand if it’s better to sculpt directly into the final pose or not for stills…

pose.jpg

One more thing: ZB keeps crashing frequently on this (relatively low poly) mesh. It happens usually when i do a mistake and want to reload the fresh project. Looks like ZB cannot handle that “swap” and crashes with an out of memory error. I tried setting mem parameter to 4096 (too much for my system) and also to 2000 but it doesn’t look like it influences the crash frequency.

I also read that “pirated” copies of ZB tend to crash but mine is regularly purchased so i wonder if really ZB is so sensible to environment humidity or if it’s my machine or my usage of the application. Many headaches are due to memory crashes and not to sculpting and so on.

So… after a bit more organization in the pose approach i managed to get this result.

It contains a bunch of anatomical errors, but it looks promising for a sculpt start. I’m a bit more happy now. I tought i’d never manage to pose this mesh.

Tried also working with layers. I supposed that a layer could work as a mesh pose holder so i created a new 3d layer (in rec mode) then started with transpose master. At the end of the pose i discovered that the layer was disappeared. Am i doing something wrong?

pose.jpg

Looking good!
Posing is very difficult. I found using the mannequin first of all to be very helpful. I also liked Ryan Kingslien’s method of duplicating just the figure without the subtools and posing that first, then replicating that using transpose master with the figure all the subtools.
Just a couple of crits for the pose as it stands: her left arm looks a little stiff and unnatural – it would naturally bend a little more at the elbow; and her head also seems a bit stiff – probably just a little adjustment to the angle is all it’d need.

As for using layers for the pose, yes you can: just click the “Layer” button in transpose master and it will create a new layer for each subtool with the pose on it. But, be warned, I’ve encountered some problems (noise on the mesh) when using pose layers when I also have texture/detail layers.

As for the best method for a creating a still image, the general advice is to pose early and sculpt without symmetry; you’ll get the best result that way, but you need to be pretty comfortable with anatomy, and, of course, it takes twice the time that sculpting with symmetry does. And to a large degree it depends on the model. Something with a lot of symmetrical features will be, naturally, more accurate if you sculpt with symmetry and then pose.
…I’m still working out my workflow with respect to this too. Lots of experimentation!

Nice colours, outfit design!
The forms (anatomy) are almost there! turn her neck so shes looking forward (obviously), add them eyes, and dont keep every finger the same
(you probs just havnt gotten to it yet)
as per your colour choice (suit) maybe she’d look better as a red head ??

As far as the layer rec, i use this a LOT (for animation) and have never had it disappear…is your model really high in the poly count? does it have uvs? can you have the layer palette visible while you transpose so you can see exactly when is vanishes…can you recreate this issue? also i never transpose the whole thing on one layer…ie one layer for the arms, legs/feet, torso, hands…maybe you pushed the math too far and it failed

(sidenote)
My very first sculpt was of my ex,ex,ex naked in the same pose :+1: but her hand was casting fire…that was zb3

I just read ur previous posts :stuck_out_tongue:
You really need a a new pc man…i used to have so many probs with a quad core, 4gb ram back in the day and your pc is more outdated…
I got an i7, 8gb, 3gb nivida and i have never had a crash in 2 years (except when animating and i have 400+ subtools and i accidentally click show all (eyeball icon) in the subtool pallette and my memory isnt compacted at all…which i would expect with so many subtools

Your layer did disappear cause the motherboard/ram could handle the process, you have got to work more low poly for now, no transposing High Poly models…also did you up your threads so zbrush uses both cores for intensive process’ ?

good luck

let me tell you something about projecting details after dynamesh/retopo

PORJECTION will achieve flawless results 100% of the time! but thats not your experience is it…
Projecting is an art, and untill i mastered it i thought it was garbage. I can take an 16 point low poly sphere and project ANYTHING(4 million polys ON TO IT!

tip1: project every level of subD, 1 at a time WITH NO SMT
tip2: level1 to 3 are often the most important prjection levels as they dictate how the higher levels recieve fine details
tip3: turn on ghost and use the move brush to pull the messed geo over/out of the original (now ghosted) mesh then project again
if there is anything that is messed it means moving the mesh around at level 1-3 to support your higher details

if theres one thing you’ll learn in your time with zb, it has plenty of secrets.
ive said too much.

Thank you teeg and jeh for you comments! They are really helpful!

First of all, i discovered that my beloved Vaio SR4 should be dismissed (aaaargh!) and never tought that its nemesis would be ZB (i tought it would be modo). Anyway, i must find my hard sculpting way on this machine for some other months because of money (i spent all my bucks on ZB license :slight_smile: )

The mesh is about 4.5 mil points (i don’t know how many polys, how should i read this info?) Anyway, i suspect that the frequent crashing was due to the project where i left a bunch of intermediate unused meshes. After some “diet” it looks more stable.

About the pose, tried to follow your hints, even if posing fingers is really tricky (i usually end up skrewing them into an inform blobby thing). Changed hairs length and color. She looks a bit more “savage” now.

Jeh, about your first sculpt, i also choosed someone i know well for my first one (my wife) but i should have waited because now she is tired of being shredded and reconstructed so frequently :smiley:
I will try to follow your hint on projection, adjusting each level before the projection should bring better results, sure!
And about ZB secrets, you’re right. It looks designed to give you “the knowledge” over the time, like martial arts :slight_smile:
I don’t know if i like this design, but one thing is sure: i never been able to get a mesh like this one with other softwares, so there should be some wisdom in ZB!

pose.jpg

Worked on hairs, neck, hands, feets and some other small details. Still lots of work to do, i discovered that many sections were skrewed by the posing phase. Sigh! :slight_smile:

I think that this pose could work well over a big mecha thingy shoulder… mmmmh… hard surface…

pose2.jpg

ladies make great inspiration :slight_smile: LOOKING GREAT, a huge mech (full metal panic style) would be awesome indeed…
now for some eyebrows…

and moving finger does suck; are you transposing fingers at a very low subD? prevents mush

ya the new PC can wait, you can still get away with a lot in zbrush on your viao…you can build a PC for cheap eventually

Yep! You’re right! Eyebrows!

Yesterday i tried to explore a bit UV mapping and texture but i was late at night and understood nothing. Today i’ll retry.
About fingers… too bad this mesh has a sad and long story to tell, in short i lost all lower subdiv levels and i was not able to rebuild them without skrewing all suit details (they are done with edgeloops). Next mesh i’ll do better (hope). Maybe i’ll try by retopoing it in final pose and transfer all edgeloops details directly to a texture map, but i think it will take me a bit to understand the mechanics. A thing i didn’t yet understand is if ZB allows only polypainting or also texture painting… should i unwrap UV on a texture file and edit it with, say, Photoshop?

About mecha thing… considering the suit design is derived from Evangelion series, maybe an Eva/Panic hybrid should fit. And i don’t need to model the full mecha because only the upper part should be visible. Well well, now for some fine touch to this model, then going for the mechy!

Cheers!

Just wondering… if i retopo this pose, should i get rid of all overlapping meshes (knees) and work out only an external surface or should i rebuild also hidden mesh parts? Supposing that the pose will no more get substantial changes, i think it’s better to rebuild only the external mesh and stop, but would like to know some others opinion about…

Thanks!

Polypainting on High-poly models = texturing (you can use spotlight to paint actual photos on your model well aswhich you can blend like in photoshop ie multiply,screen etc ((brush options)).) after painting is complete, create “texture from polypainting” which requires UVs. This method doesnt require flattening the texture/uv like you would have to do in PS.

Flattening the texture/uvs an photoshoping is generally for bringing into maya etc…if you stay in ZB you can avoid it.

ALSO we all lose our low poly the 1st time :stuck_out_tongue: sometimes the 2nd too…

As far as re meshing all external polys…you will have eliminated polys which is good, your uvs will have less islands which is good, but if your not leaving zbrush all you doing is saving some resources…its a good practice and a MUST for video game meshes but if you just doing a ZB illustration you dont have too eliminate those polys… if you combine the knee external to the leg, if the matcaps are different you will have to use the material blend feature in render settings which can suck. Also if you repose her after you have combined them it will distort those smooth lines more then you may like.

A single mesh can be remeshed and re projected much better then one having all those unseen polys.

take care

Well, so i think i’ll avoid retopo because my target is a simple illustration. I’ll rework some distorted elements anyway.

I tought that high density mesh for detailed polypainting was more resource intensive than a “simple” texture. I understand that polypainting is more versatile and easy to use but… isn’t it heavier?

Thank you!

Artwork is so much fun, isn’t it? I’ll add that you need to have a dense enough mesh to support your polypaint, from it you can create a texture to apply to a lower density mesh as in game engine.

zbrushs magic is handling high polys…ive read uvs can slow it down more :stuck_out_tongue:

Oooops! I think i understood why i lost my layer on my first “transpose master” session.

I wanted to transpose my character on a layer to get both the “T pose” and the posed mesh. So i added a layer in recording mode then activated the transpose master… I just discovered that the layer still exists but it is related to the head subtool not the entire tool.

So layers are subtool related? Isn’t it possible to get a “the whole picture” layer?

Thank you!

P.S. So i’m supposed to follow your hints and going on with polypaint :slight_smile:

Fixed some little details and reworked hairs. Well, really don’t know if old hairs were better… maybe.
Didn’t manage to get decent eyebrows… sigh!

Anyway i feel pretty satisfied with this one, maybe i’ll rework hairs but now it’s time to jump straight into the mecha thing!

pose3.jpg