Nice designs! Well sculpted too. Thanks for sharing.
-ShaneO
Nice designs! Well sculpted too. Thanks for sharing.
-ShaneO
Thanks folks!
Hey Jake! Yeah it’s been a while. Hope you’re well. Yes. These (and others) are in toy stores now. 
hahah… these are great.
-r
Hey guys. Thanks.
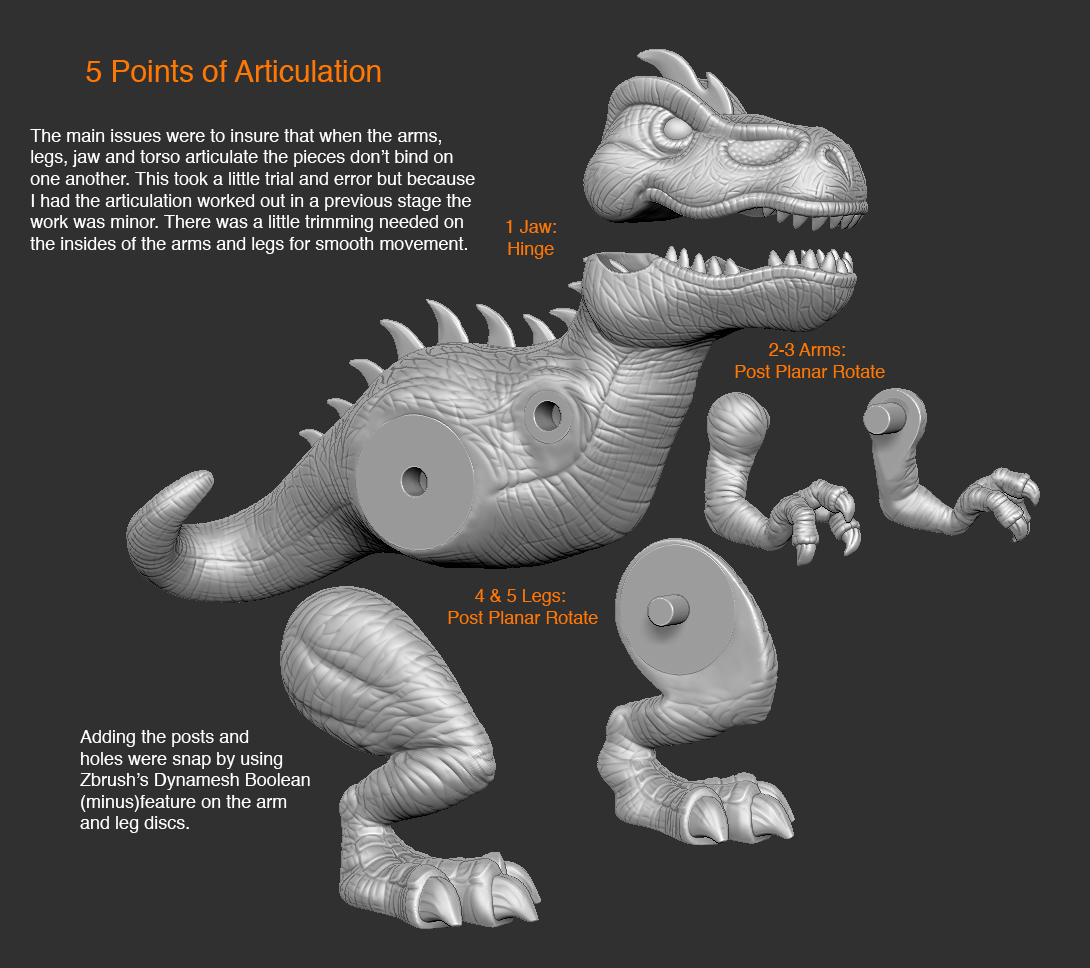
The sculpting of these dinos were started and completed in Zbrush. Hasbro has many internal Zbrush users as well as a host of mechanical experts that work out the function and articulations of the toys. The larger Green dino had the most mechanical components of all of the sculpts that I worked on. The art director and I discussed the price points of the toys, how much articulation and mechanical components we could have in the toys. The Green one has lights, sound and 5 points of articulation while some of the simpler ones have only 2 points of articulation with no sound or lights. More bells and whistles = more cost.
There were several advantages of working in Zbrush for the project verse traditionally or with other sculpting packages some of which were that we could do many different variations of articulation adjusting for cost or exploring different ideas for movement, change sizes quickly and make edits in minutes. Saving time…saving money.
In the end some sculpts were used with a lot of articulation at medium to larger sizes but also the same sculpt minus the articulation points were used at smaller sizes. Same sculpts but just without all of the different components thereby offering another product to put in the cart. Zbrush was a champ through the entire project! There’s simply no way that I could have done this project with it.
The general process went like this:
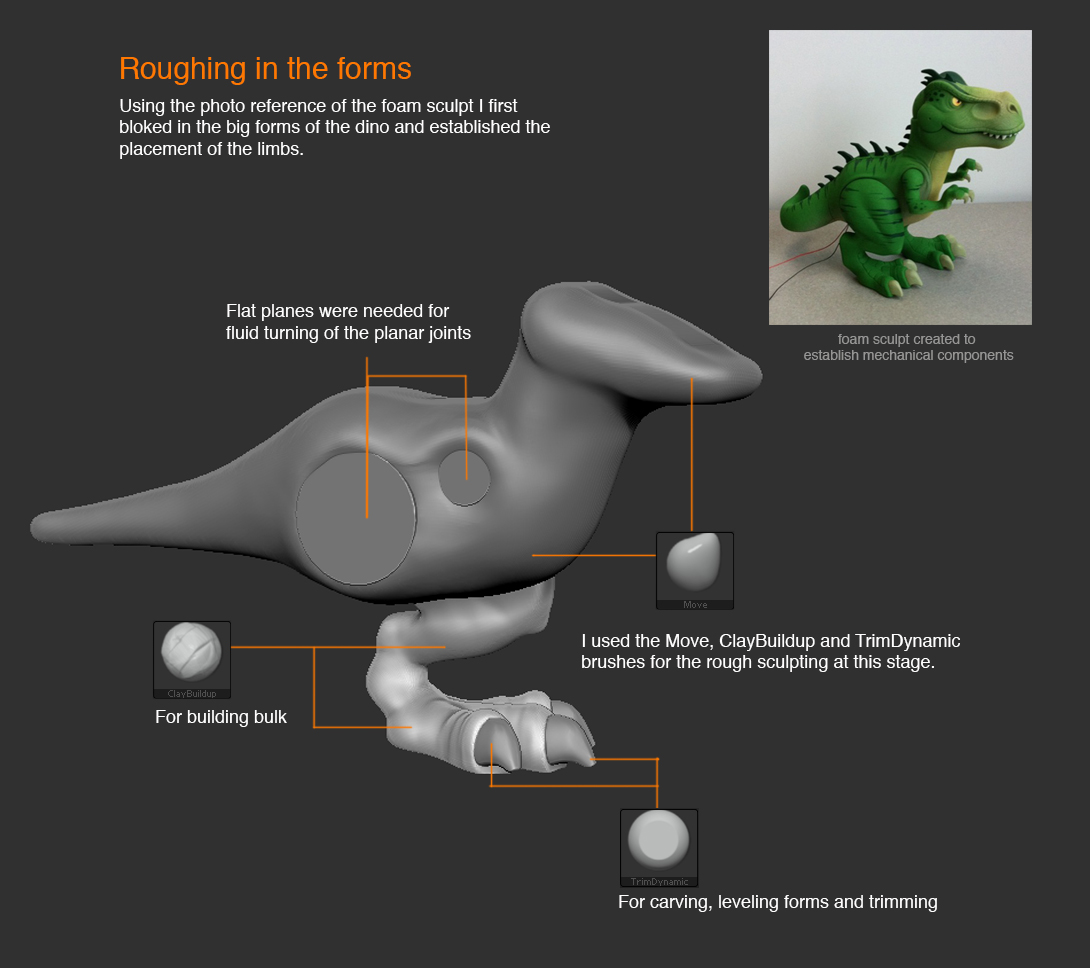
The art director approached me with the project to do some initial character sketches of the dinosaurs that he had in mind. This is for Playskool so they had to be cute and fun. As posted above I generated some 2D sketches of the dinos and made some general color suggestions. The art director gave some notes about the line up of characters and we presented the results (sketches) to the team. They love the sketches and gave me the green light to do the sculpting. Before starting the sculpting my AD and I discussed price points, articulation, deco and colors. Then the sculpting began. For the larger dino (Green one) a foam model was built internally so that the mechanisms could be established. That was handed off to me then (photos only) to do the digital sculpt. I did not do any of the internal structures for the mechanical components. That’s the job for the engineers. My job was mostly aesthetic. Make them mean but in a ‘cute’ sort of way I think is how it went.
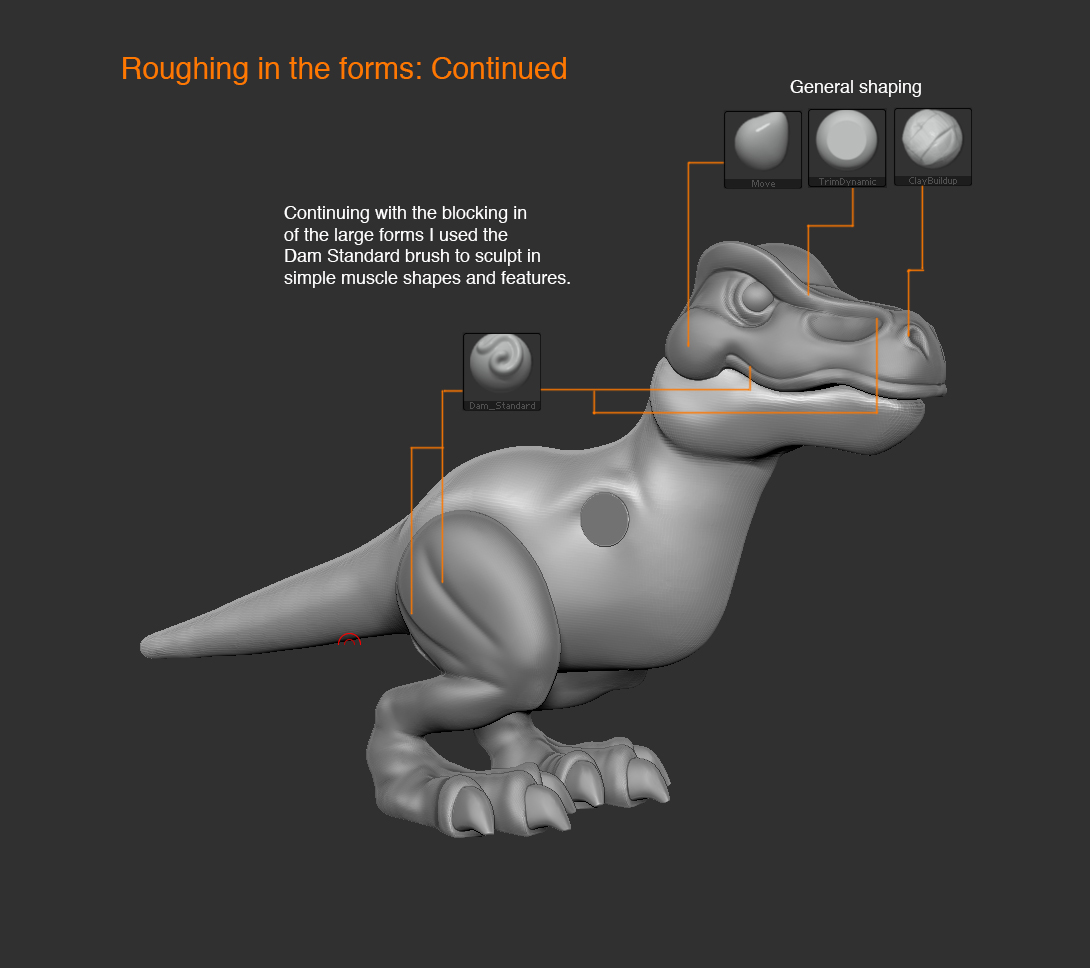
Anyway, here are a few breakdown images of how the project came together in Zbrush.

Some really neat videos of the internal mechanisms for the dino.
love the inner mech movies!
Thank you for the Tips on creating the wonderful toy.
Thanks for your words and for having a look. Once the toys are on the shelves it’s typical to see the sculpted details soften a bit and the articulation to be ‘slightly’ over engineered but these actually turned out pretty well I think. The large green one is especially nice in person. Cool sound and lighted eyes.
Such a fun toy to have on my desk…temporarily at least. We’ll see how long that lasts with my curious son who has a thing for dinos. haha. I guess that’s the sign of a successful toy though…a little beat up and randomly thrown about the house. Good times.
Great work! Thanks for the breakdown!!
haha super cool. great job.
Cute dino toys!
Warner!
These are absolutely drop-dead gorgeous sculpts! Thanks so much for posting the breakdown process and videos too!
-Steve
good job!
Love this - I’m actually working with the guy who did one of those mech videos, recognized his voice straight away! Both of you are geniuses!
Warner - do you collaborate on projects? Would be great to talk - [email protected]
Cheers
Wow! Top Row!! It’s awesome to be recognized amongst this ocean of Zbrush talent. Thanks for that!
And thanks for all of your comments, mentions and supportive emails. Very much appreciated. Cheers guys!
That’s amazing. Tanks for sharing and congrats for top row!
great!~
…and realisation!
Would you have the kindness of explaining how you made the discs and posts with a little more detail?
Also, did you hollow them out before printing?
Sure. The ‘discs’ for the legs and body as well as the posts were created with simple Zbrush Primitive cylinders. I then turned them into Dynamesh meshes so that I could use Zbrush’s subtract dynamesh feature to establish the holes in the body of the dino. Before creating the holes though I made sure to duplicate the post geometry and enlarge them slightly so that I could use them as ‘cutters’ for the subtractive boolean process. The larger holes allow the posts to fit comfortably in place without binding.
Regarding hollowing out or ‘shelling’ the toys: Hasbro’s internal team of CAD people do this step insuring that it’s super precise. Zbrush can do shelling too but in this case it was a step better left up to them because they ultimately decide the final size of the toy and therefore can gauge how many millimeters the shell will be (typically 2mm). Also, some of these sculpts were used at different sizes. So, doing the shelling process at one size with a 2mm thickness would work for one size but probably will not work for another size should the scale of the dino be sized up or down as the walls of the toy may be too thin or thick. Additionally, there are some mechanical features, screw holes, glue flaps etc that need to be used with these toys so those features were left to the CAD folks as well. There’s a lot of work that goes into producing the simplest toys sometimes that we never really consider…but it all has to be done to bring those toys to life.
Very cool stuff. Went to the Toy r Us website and purchased a few. Love the oversize elements to make them more playful looking.