I always forget the retopo tool for those cool complex pieces.
Thank you for the break down.
I always forget the retopo tool for those cool complex pieces.
Thank you for the break down.
Awesome work, and thank you for your time putting together the tutorial!]
Awesome process , that would be helpful when taking an concept to Zbrush, specially when it has so many parts. 
you are not responding at your website so I’ll post here
amazing work and amazing tut, thank you so much I just have 3 questionsat the point when you said “Here are a few shots of the progress through this phase of the modeling”
you did all those shapes like the one on the forehead by retoping directly on the surface and giving them thickness?
wouldn’t it be easier using panel loops? or is there any drawback in panel loop method?
when you said “Here’s another example this process. I used the ………. as the sculpt went on.” could you please elaborate these steps like when you said ‘panel edges’ are you referring to the edges of those separate pieces? or when you said editable poly are you talking about max? my understanding is you retopologize whole organic part of the model and via mask hid the other parts of the original tool or model and then did all the sculpting on the original model and projected that on the low poly version you did earlier am I right?
and this is just simple newbie question
say you want some simple flattened tubes like the one above the ear, on the surface of the face is it possible to create such constructs using curve tube snap brush or any other brush ? if yes where do I control it’s rotation,and polygons? for example same above the ear flat tube or cylinder one just have to reduce the the vertical lines to 4 and increase the horizontal line just like editing cylinder in max here
thank you in advance 
Hi, sorry for the delay, I just started a new job - still in the drinking from a fire hose phase. I don’t know much about panel loops other than what I saw on the zbc tutorial page a while back, so I can’t speak to the value of using panel loops over retopology. My understanding is panel loops is based on masking. If this is the case, it would be significantly more difficult to get precise placement of panel edges. Tweaking the verts on a low poly mesh is easy.
For the face, when I said panel edges I was referring to the low poly retop. By editable poly, my max background was polluting my zbrush tutorial : ) - what I meant was polymesh 3d. Same idea. The editable version of the geo, rather than the procedural preview mesh. I’m not entirely sure what you’re asking in the second half of that paragraph. Can you ask it again?
As for creating simple geometry, I would recommend using zbrush primitives if you don’t want to use Max or something else. I wouldn’t be surprised at all if there was a brush that would give the result you’re looking for, but it might not be a straight forward as building the shape from a primitive.
With a tool as complex and powerful as zbrush, there are many ways to get the same result. I encourage you to experiment, and be aggressive about learning new techniques - thanks for being tenacious with your question, and please rephrase this question:
my understanding is you retopologize whole organic part of the model and via mask hid the other parts of the original tool or model and then did all the sculpting on the original model and projected that on the low poly version you did earlier am I right?
I am happy to answer this and any follow up questions you may have.
Thanks!
no problem, I’m also from 3ds max background and I love it practiced maya for an year and half,didn’t liked it,it lacked precision, in maya you’ve to do a lot of eye balling.when they released graphite tool set in max.I completely stopped working in maya may be it’s good for animation, I don’t know.
my hearty congratulation to you on your new job most of the times my comments wait for moderation for months on some other sites so I posted it here, sorry for double post.come to think of it I just checked at your website and it still says awaiting for moderation  anyway thank you so much for your replay and taking time to explain me
winter is coming…oh! I mean a very long post I hope I won’t turn in to white walker
coming to the topic I got a bit confused with terms like ‘edges’ panel edges’ these can be technical terms in the software ( I’m fairly new to zbrush and deeply rooted in max so) or you might be reffreng to the non-organic geometry around her face.so assued your talking about all those non-organic geometry so I thoght,
1.first you did the base model in zbruzh
I used the original face as the scaffolding, paying close attention to where I wanted the panel edges to go
“my understanding is you retopologize whole organic part of the model”
using retopology tools you re-did the model with proper geoflow except where you don’t want the organic part of the face (or like you said where you wanted panel edges to go)
Using as little geo as possible makes it easy to move these points around once you make it into editable polygons
while retopologizing you used as few polygons as possible after that you said making it into editable polygons which makes it easy to move points’ now there could be 2 possibilities
a.you mean ‘polymesh 3d’ when you said ‘editable polygons’. in that case; as far as know we don’t need to do that, once you used retopology tool and click on the original model(or tool in zbrush) it automatically creates a nice mesh on which one can do further editing so why should I click on ‘poly mesh 3d’?
b.you actually mean editable polygons and moving vertices in max in that case you might have said that in reference to the 'posing in max" part later you explained
In this case, I needed to mask off the edges and reproject the sculpting from the organic part of the original sculpt. I continued refining it as the sculpt went on.
“and via mask hid the other parts of the original tool or model and then did all the sculpting on the original model and projected that on to the low poly version you did earlier”
you masked-off all the non essential part(in your words edges)in your original mesh and did all the sculpting on it then,reprojected those on to to your retoped or final model.
these were my takeaway from those sentence and I’m just wondering if I’m right? or did I missed something?
I haven’t met a lot of zbrush veterans but mostly when a rookie ask these kind of questions people just put those in ‘silly questions’ jar and we have figure it out by trial and error method which consumes a lot of time and sometime test our patience. you one the other hand gone through my post and answered I’m so grateful to you thank you
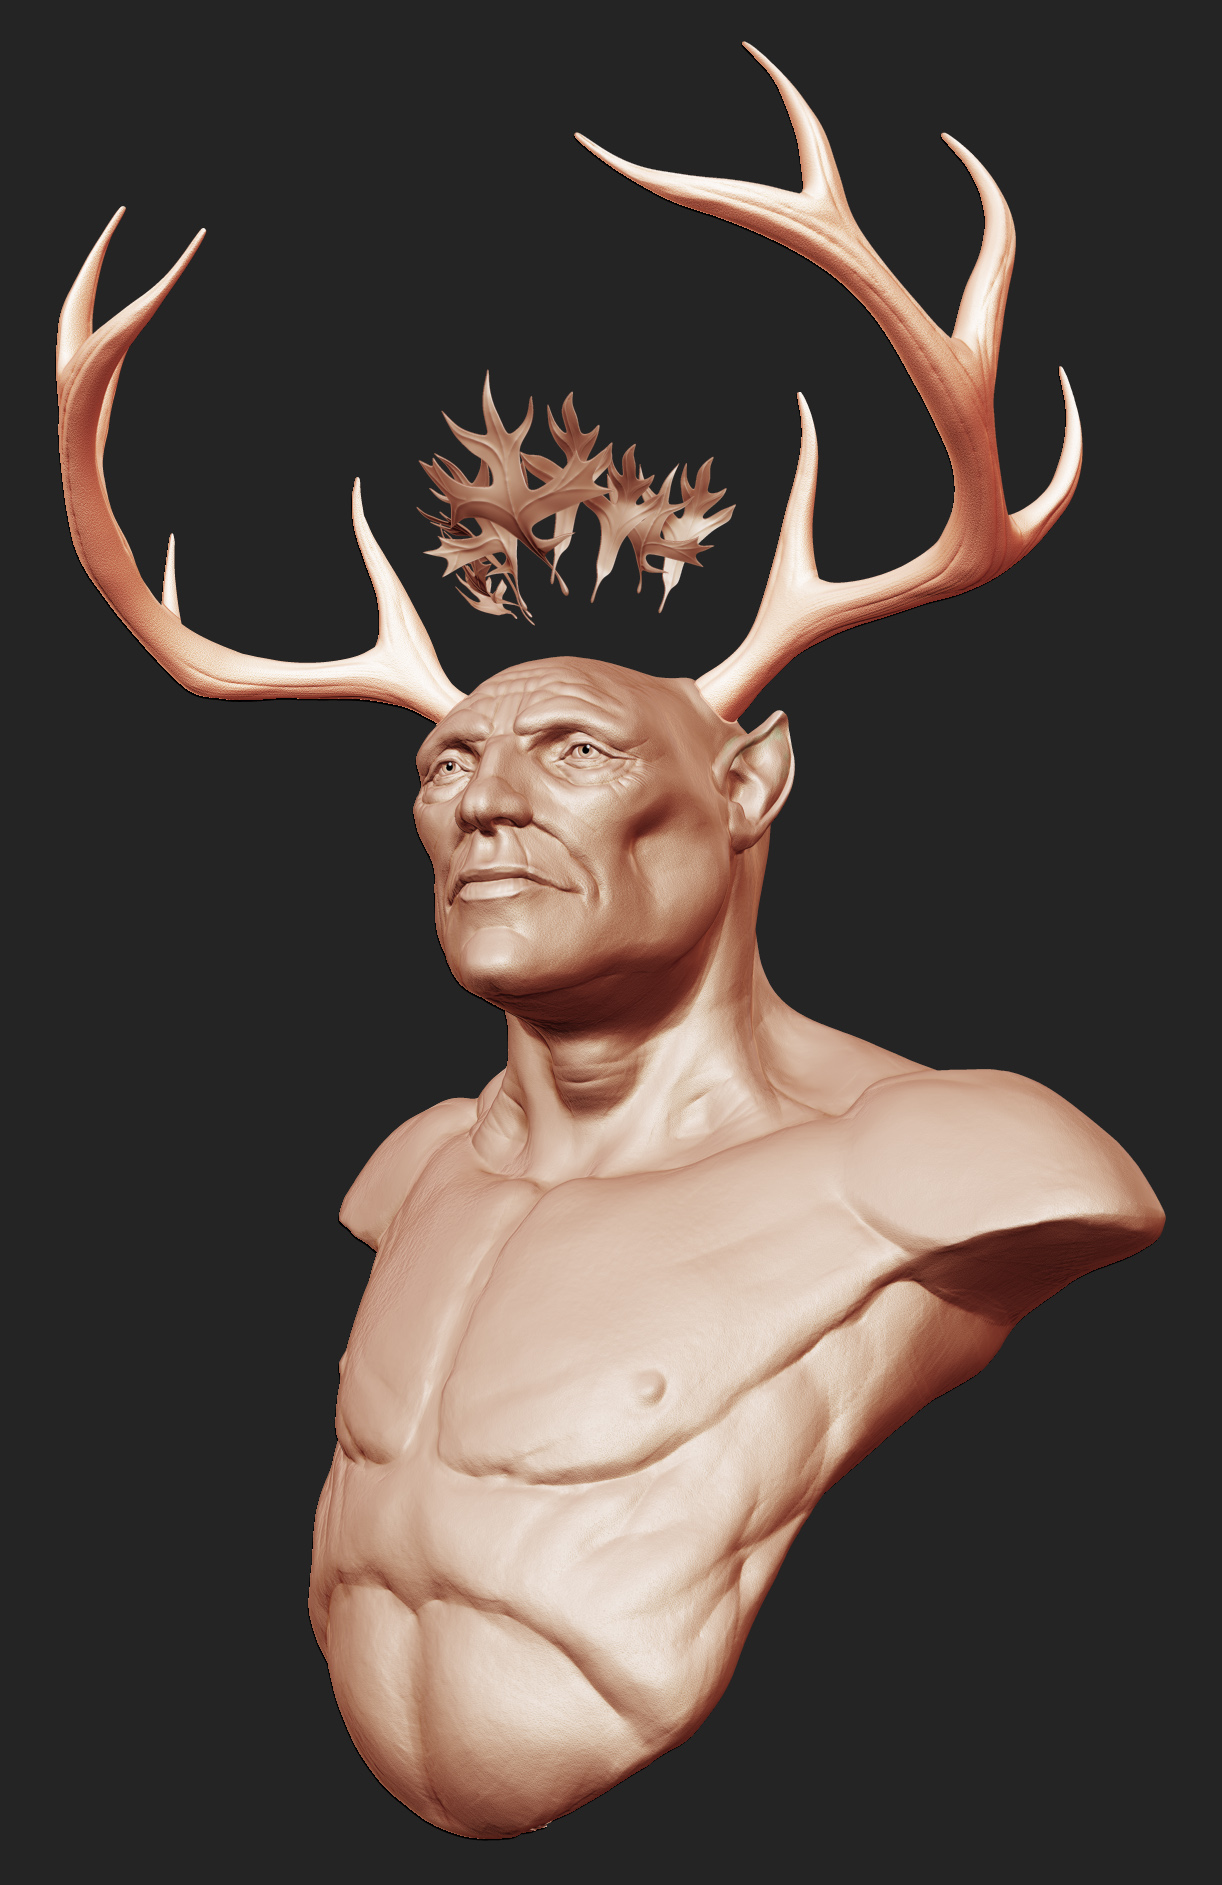
The sculpt. Started from zspheres, blocked in the main form, and zremeshed. I have had mxed success with zremesher in the past, but in this case it did a great job and saved me a bunch of time. Nothing fancy with the sculpt - move, dam_standard, flatten, etc.
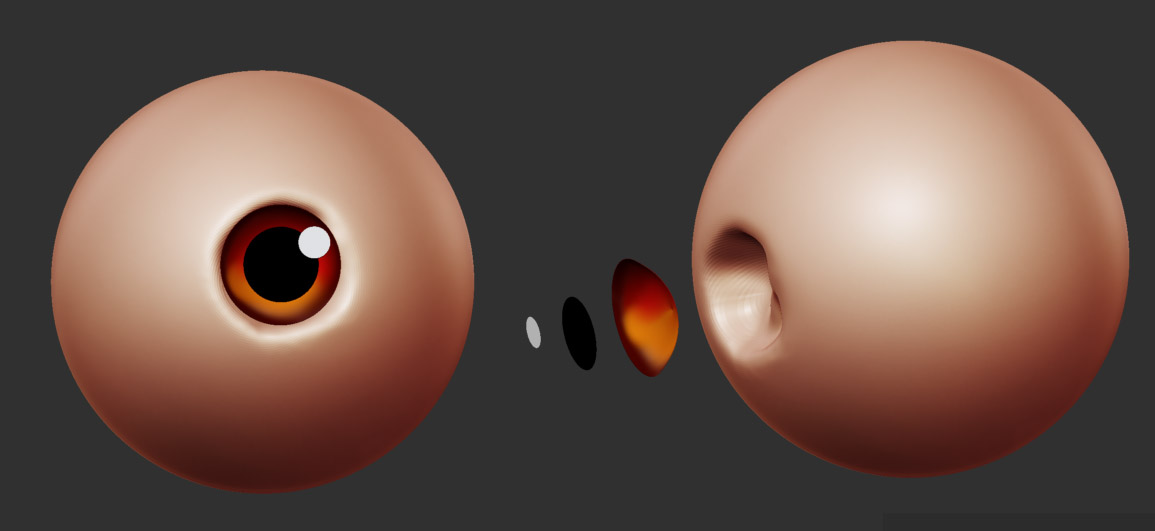
This is how I build eyes if I don’t plan on painting them in photoshop. This is a pretty sloppy example, but it looks ok in the final render. The pupil and highlight are just primitive circles. I float the highlight off the surface a bit to give the impression its sitting on a slightly bulging lens. The iris is just a polysphere with the front 2/3rds removed and the normals flipped. I also poly painted it.
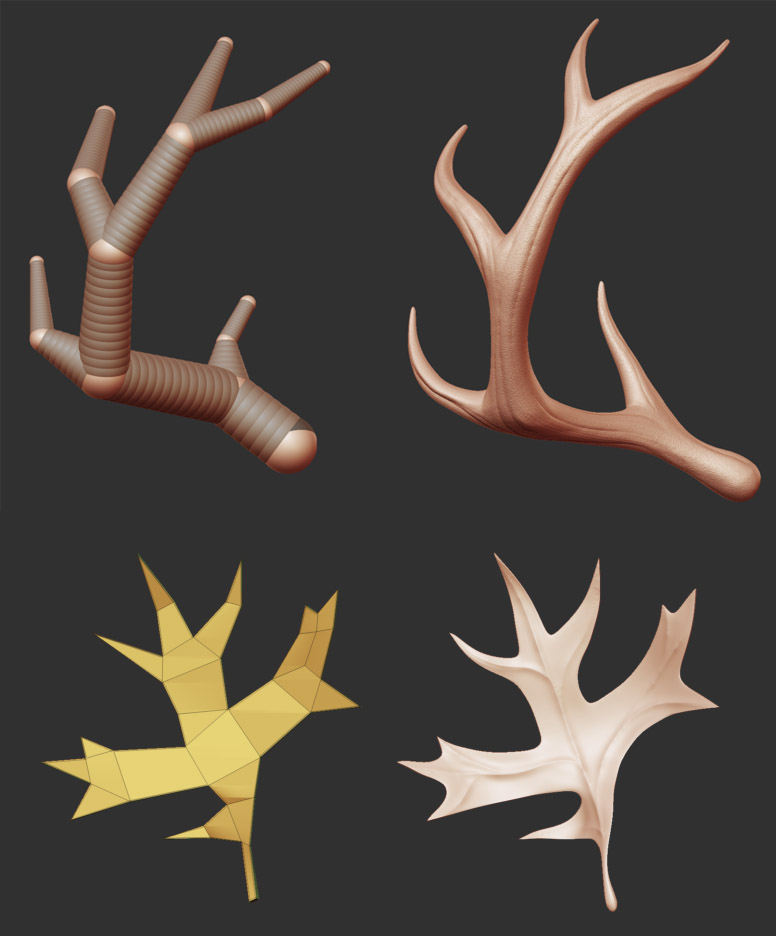
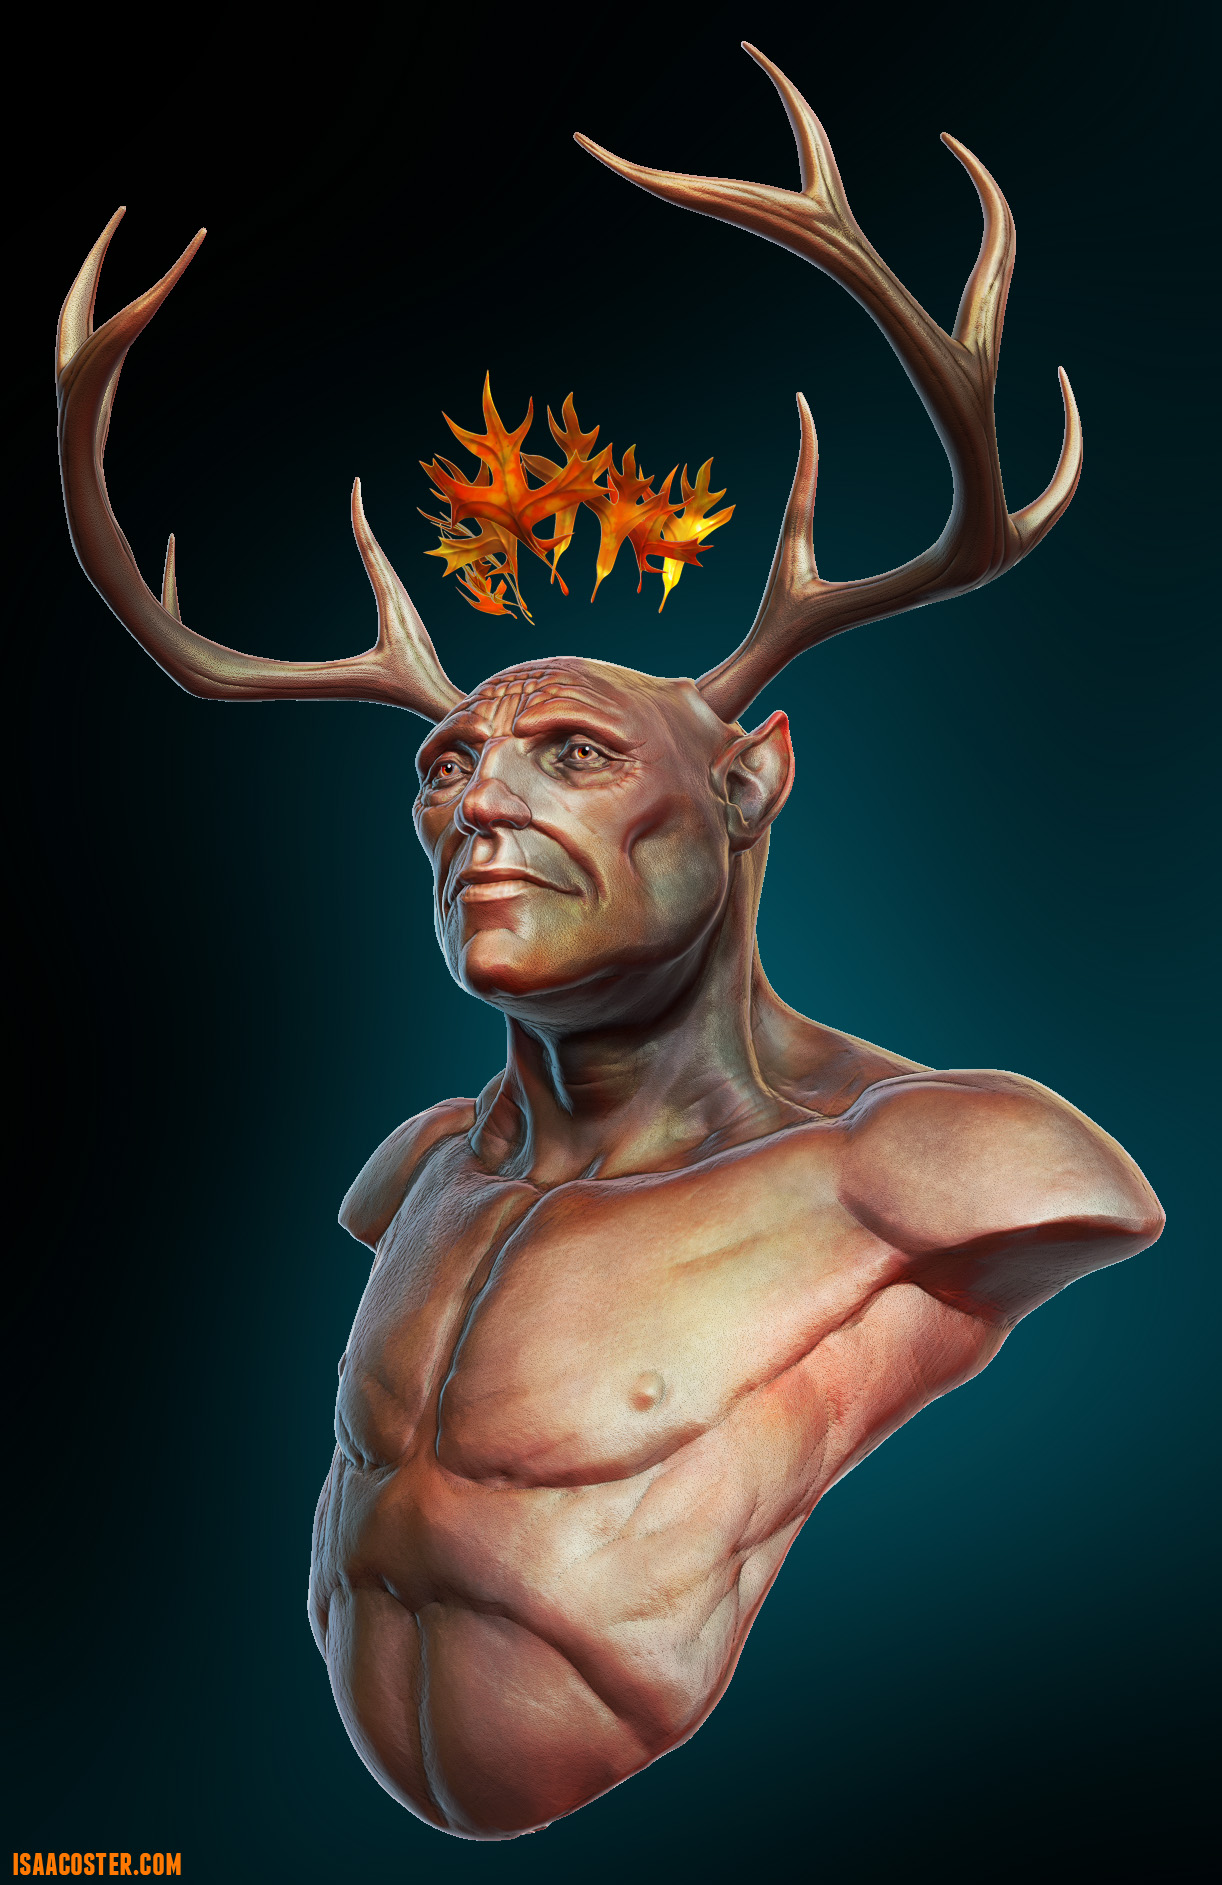
I retoped the leaves directly on the torso which created a nice random curvature, then continued sculpting. There are two versions. The antlers started off as zspheres too.
I found this on google - its a pretty good tiling skin texture. Applied to the model via Surface after a quick pass through UV Master. The only thing I really cared about with the UVs was the seam not go through the face of the model. You should save this texture : )
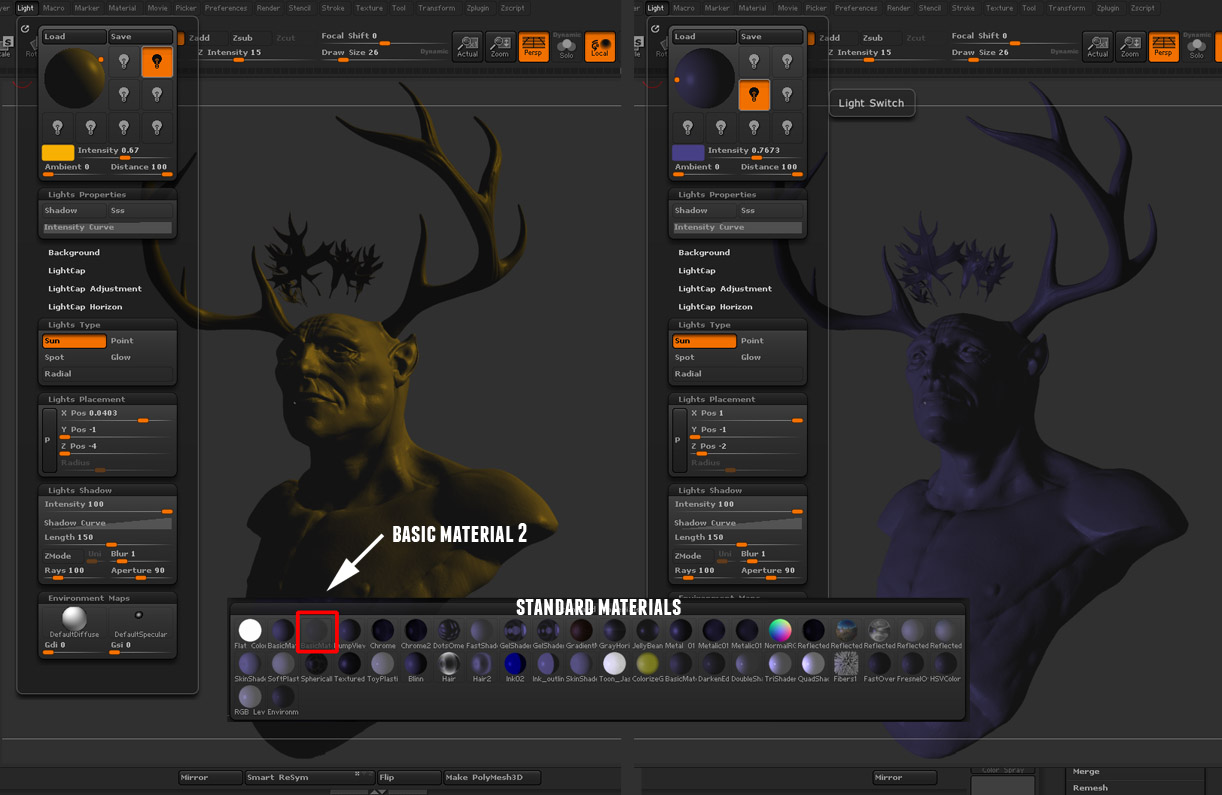
I haven’t actually done this before but I really liked the results. I wanted to give the impression of warm and cool lights on either side of the model, simulating sun and shadow. If you apply a standard material, you can create interesting lighting scenarios for use in photoshop. Matcaps generally look more interesting, but ignore the light color. In this case, all you want is the light, not the polypainting, so you have to turn off colorize in the polypaint menu for each subtool. This doesn’t delete the polypainting, it just hides it. You need to get your polypaint render out too - I recommend getting that one before turning the polypaint off on all the subtools. If you’re positive you won’t want to go back to the polypainting, you can always just fill all subtools with white at once using the subtool master Fill tool. You can also easily save two versions of the same file, one with polypainting, and one without.
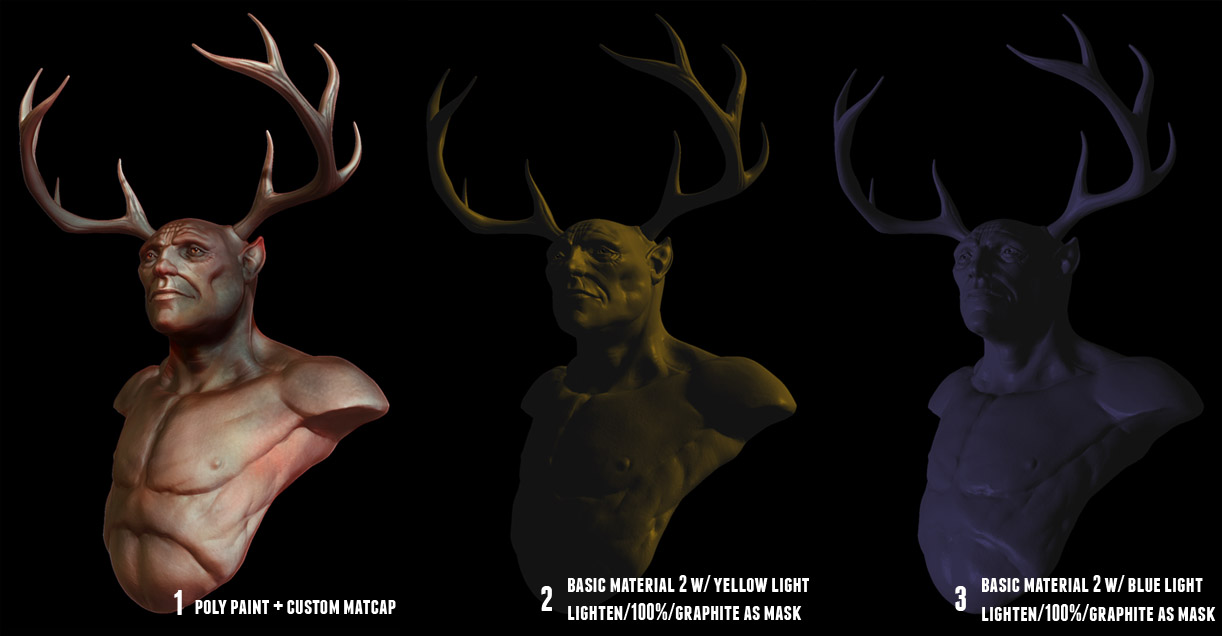
The next three images are all the different materials I used for the final render and where they came from. They are all BPR renders with softer, lighter shadows (turn down the GStrength, turn up the blur). The only one you probably can’t find is the custom matcap. I got it from a paid gig, and I don’t know where they got it from, so I’m not going to post it online. Sorry about that. The rest of these are either included with zbrush or available from pixologic or badking.
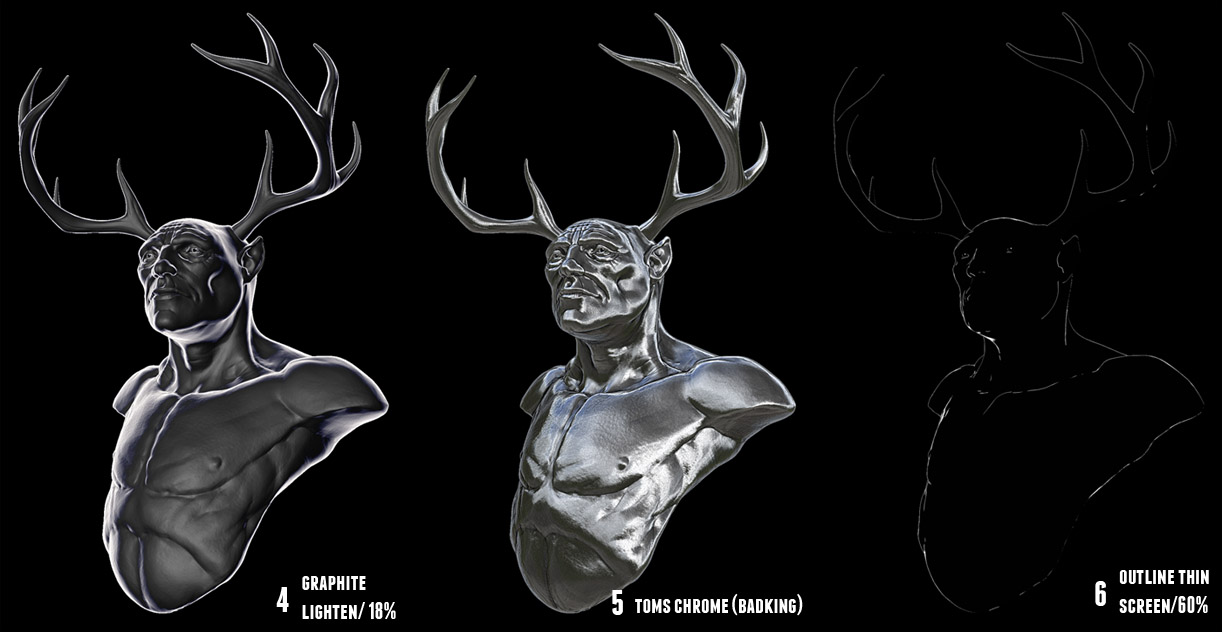
I use graphite a lot for rim lighting. I also used it as a mask for the light bakes from the previous image. The way to do this is to copy the image to an alpha channel. Then go to select -> load selection and pick the alpha from the channel drop down. Then click the layer alpha button at the bottom of the layers menu (gray square with white circle).
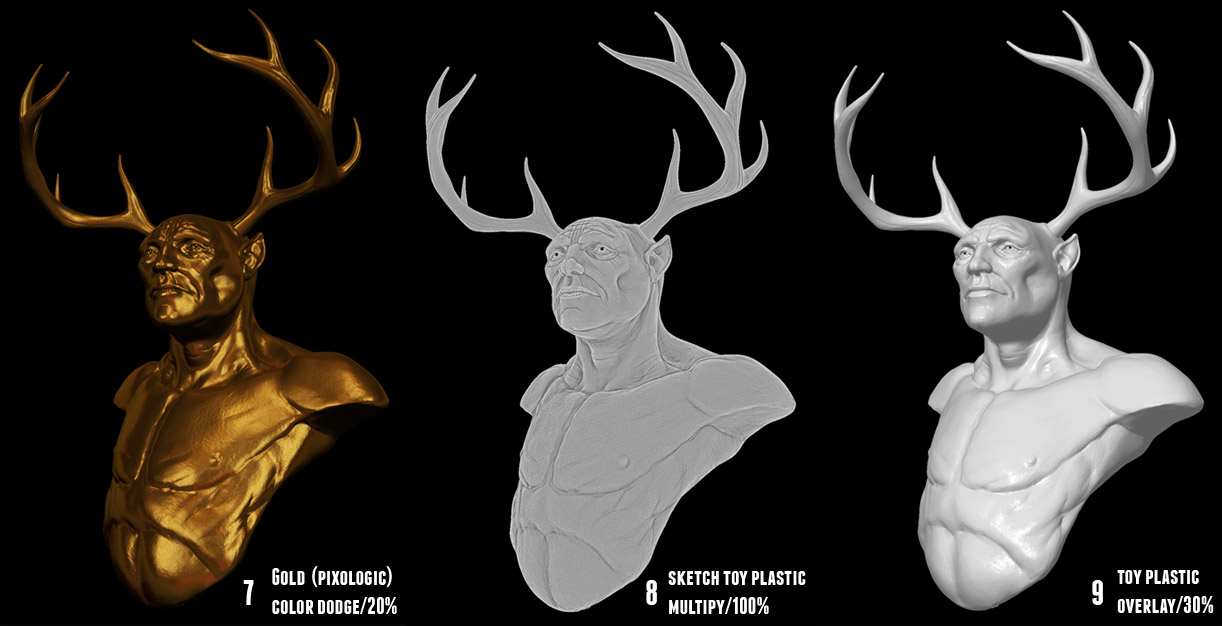
The gold added a nice sunny warmth, as well as a slightly magical element to the skin. Had to keep it subtle though. I like to use sketch toy plastic to add cavities, and the regular toy plastic to add a tight glossy highlight. Multiply filters out the brighter values, leaving only the cracks and crevices, and Overlay has the opposite effect.
Here’s an animated GIF of each layer being added.
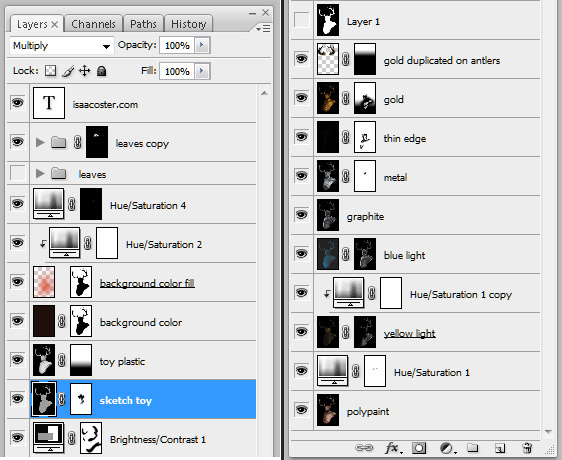
These are the layers. I mostly included it so you can see the masking. Where the masks are black, the layer is transparent. Where they’re white, the layer is opaque. I also used a few hue/saturation and brightness contrast modifiers. A couple notable examples are the thin edge layer, which is great for rim lighting. It’s calculated by comparing the normal vector of the surface to the camera. If they are almost perpendicular to each other, the surface is white. This means the effect will show up in the middle of the model, like the edge of the nose, even though it wouldn’t make sense for lighting to be there. I paint it out using masking. The other example is the yellow light. I really wanted to keep it limited to the left side of the model, so I used the mask to control where it affected the surface.
Hope this was useful - I’ll do my very best to answer questions (sorry Zrag2!!! - I’ll try to get to your question this weekend!)
no worries! and no need to hurry,I figured out ways to bring-out those details myself  ,just a bit curious that how ‘EXACTLY’ you did it that’s all and once again great tut
Finally found the ‘make nice render’ button : )
That is one cool render! Gotta let me know where that button is 
Nice! Thank you for the process notes. They are very helpful
nice work:D
Great
More excellent stuff!
You wrote:
a render using a graphite matcap I found somewhere,
I see that the graphite matcap is pretty valuable for your workflow (with great results)… but it looks like it would be nice for some standalone stuff as well. Any idea where you got it from?
I didn’t have much luck in my searching for it.
Yeah I actually tracked it down. You can find it on pixologic’s main site here: Pixologic :: Download Center
Its in the stone section, but here’s a direct link: http://download.pixologic01.com/download.php?f=/library/matcap/erklaerbar/ok_graphite.zip
Hope this helps!
ioster Yeah I actually tracked it down. You can find it on pixologic’s main site here: Pixologic :: Download Center
Its in the stone section, but here’s a direct link: http://download.pixologic01.com/down…k_graphite.zip
Hope this helps!
Doh! I coulda sworn I looked for it there. :o
Thanx!!
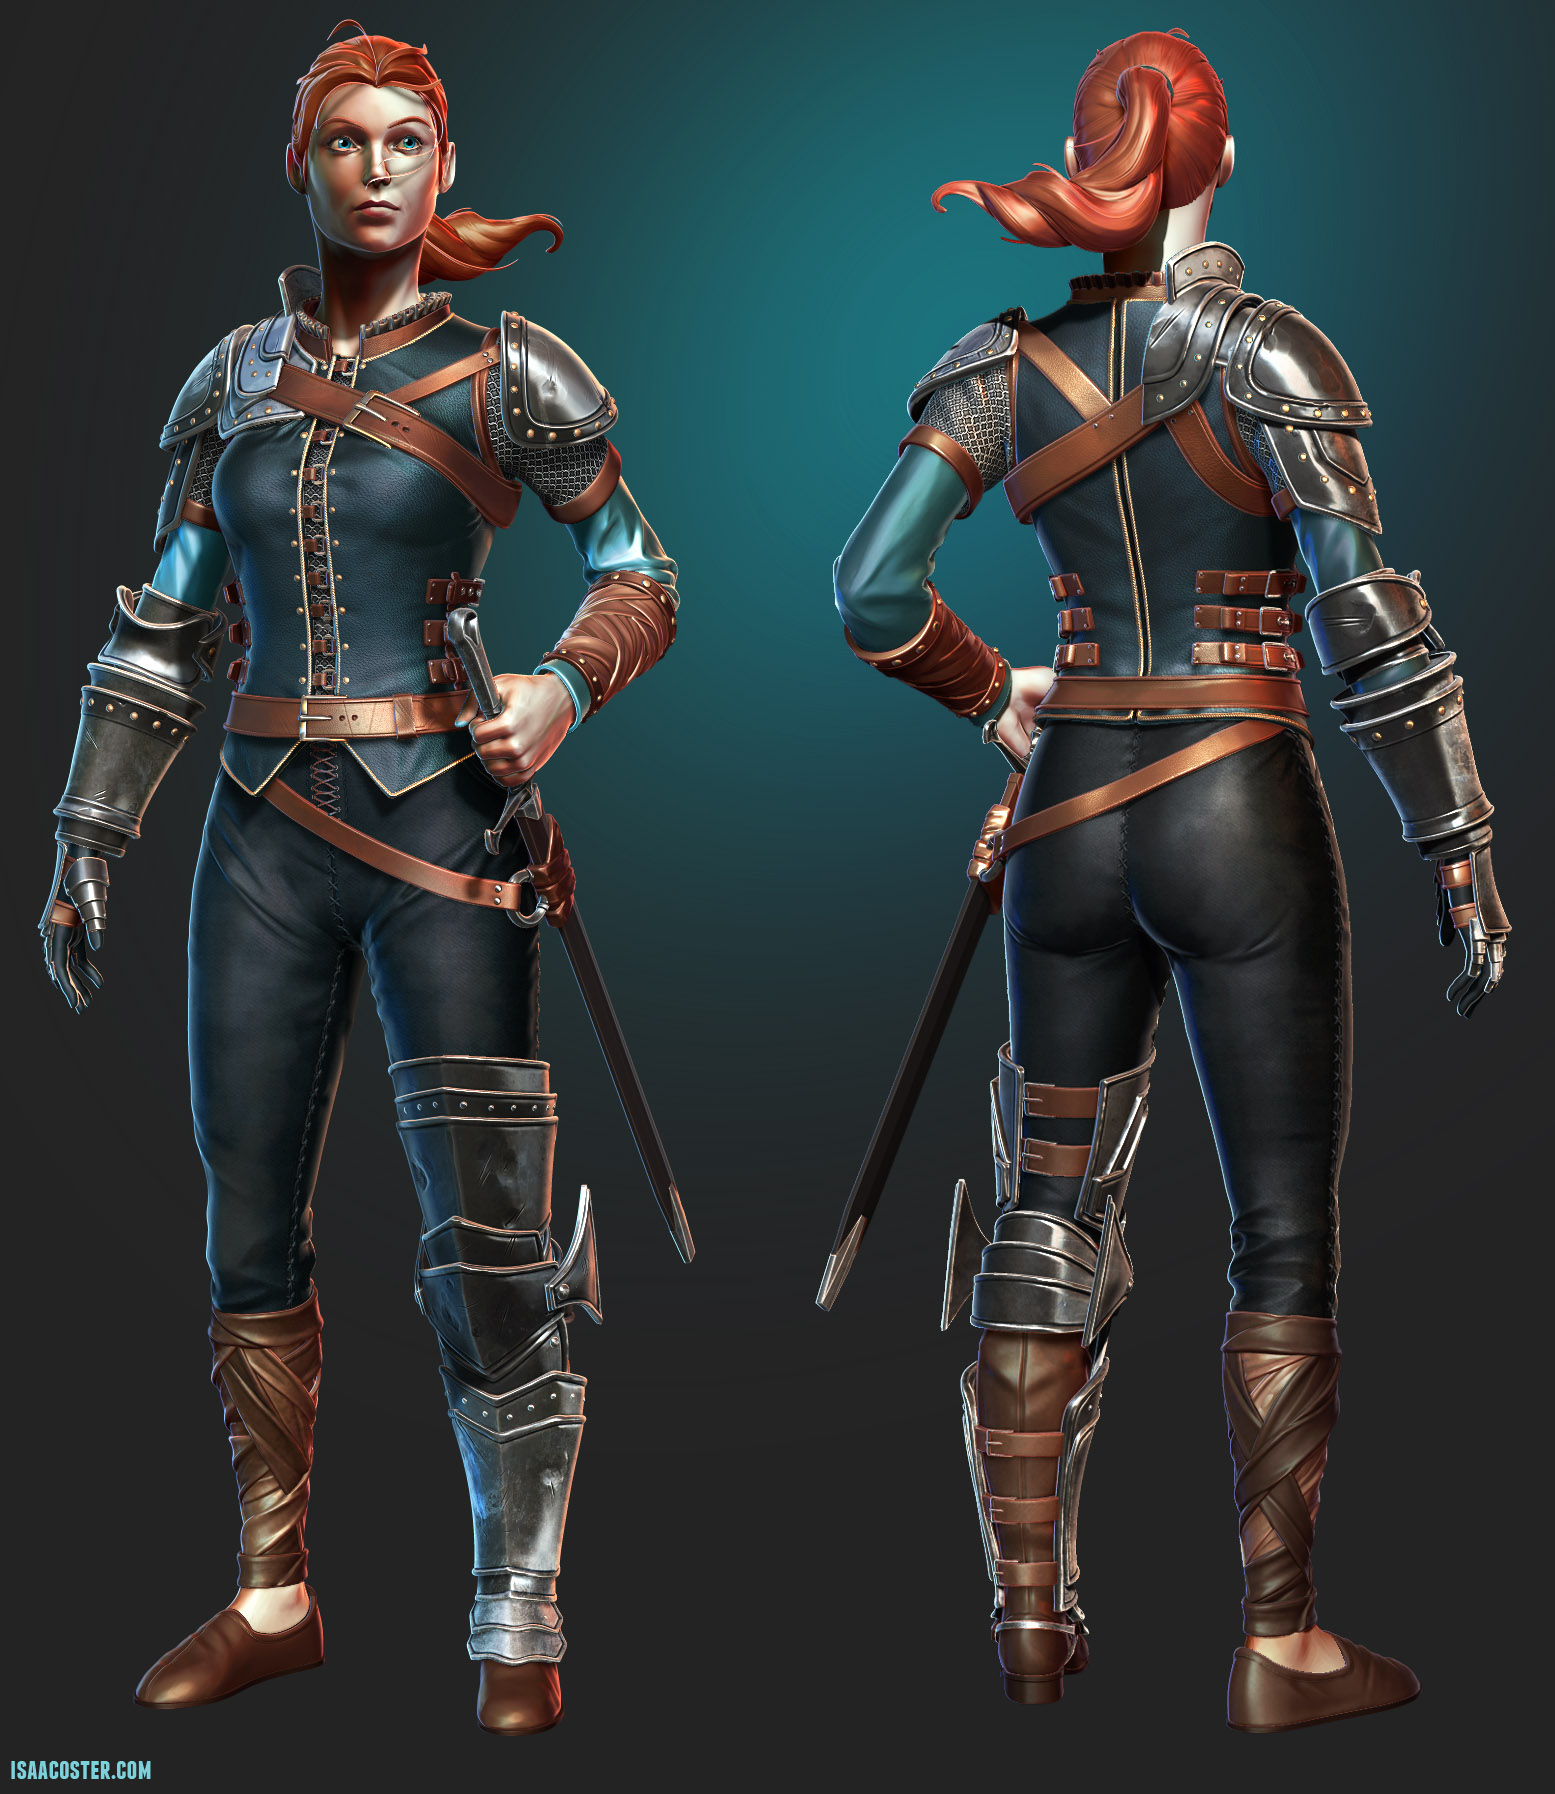
I used Zbrush and 3DS Max for the the high poly geometry, Zbrush for retopology, Max for UVs, Xnormal for bakes, and Quixel Suite for textures. I recorded and narrated the entire process and made a tutorial series. It is available here.
A Vimeo preview is available here.
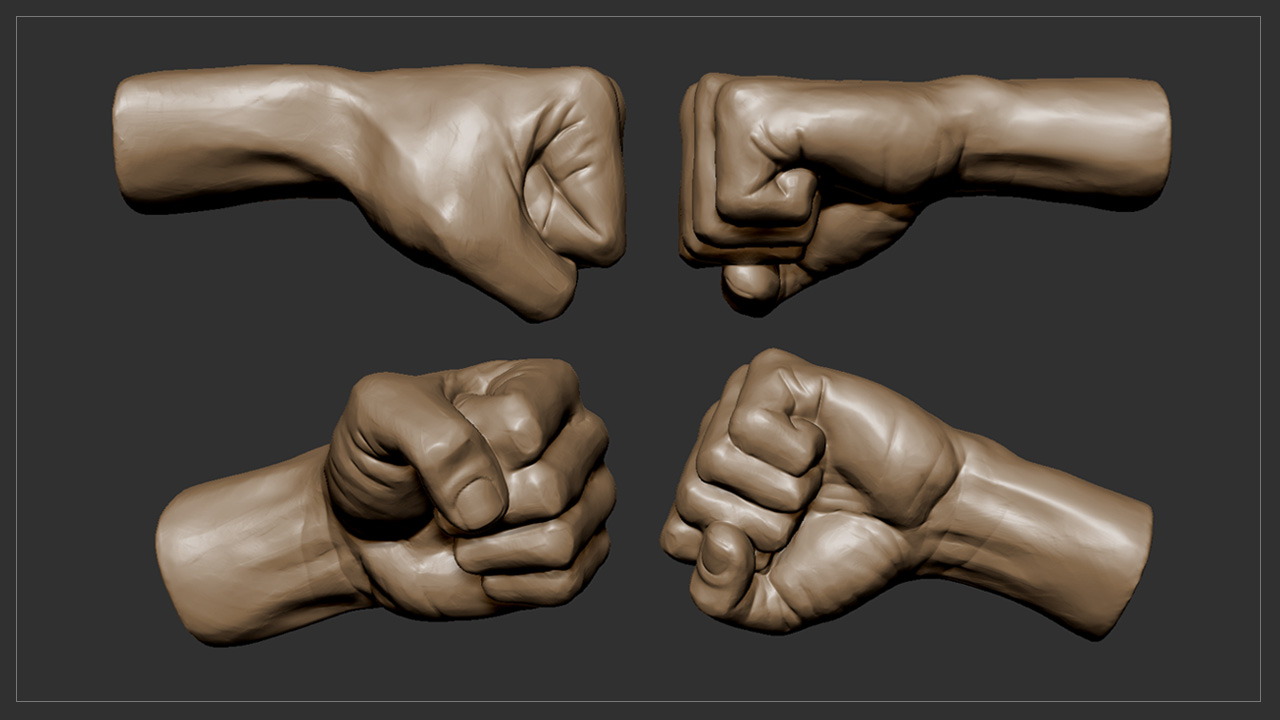
Hi folks - I put together a three part tutorial series on sculpting a fist in zbrush. For those of you just getting going with Zbrush this might be a good resource. The reference is posted on my site, with a link in the video description. Let me know if you have any comments or questions, and feel free to share this around.
Thanks!
 <iframe src="https://player.vimeo.com/video/111293155[/vv]
<iframe src="https://player.vimeo.com/video/111274667[/vv]
<iframe src="https://player.vimeo.com/video/111295982[/vv]


