I’ve started coloring her… I can already tell this parts gonna be a pain in the butt :s Heres a zbrush render of what I have so far with a slightly modified version of antropus’ clay shader…

I’ve started coloring her… I can already tell this parts gonna be a pain in the butt :s Heres a zbrush render of what I have so far with a slightly modified version of antropus’ clay shader…
Update time… I’ve been working on trying to get a decent setup in MentalRay in Max8. I’ve got to say, it’s very frusterating if you’re just starting out. Rendering followed by texturing has always been my weakest link, so this is a good excersize. I still need to figure out how to do hair, give her some eyebrows, eyelashes, and that thing that holds the eyeball in its socket securely. I also need to tweak the maps because they arent as detailed/real as I’d like when compared to all the zbrush detail :[.
For the experts at realism out there… how do you usually set up your eyes in max? I’m not really satisfied with their materials- I currently have a standard (I guess) 2 part setup with the eyeball and then a reflective, transparent outer shell. I also have 3 lights that only light the eyes… I’m not really sure how the pros set this up so any help would be appreciated. Comments and suggestions w e l c o m e d.
-chad

bump… hellllllllp
im no pro… but i think ur texture work is great! was that done in zbrush? or photoshop?
umm as far as hair… im just as lost as u… hair has stumped me for a while.
Looking good little britches. The texturing is very nicely done.
For the eyes, drop the lights lighting them and grab yourself a HDRI image (aversis.de has some nice ones) and throw it in the reflection slot on the material for the eyes and let that get the sparkle you’re looking for.
I would have the eyeball as a standard material/0 - specular highlight, and the outter glaze for the eyes as a clear/reflective material that the HDRI image goes in the reflect slot.
Eyelashes will help alot, and you might consider making a small clear reflective tear drop to put on the medial part of the eye (near the nose) to add the extra realism.
I would also like to know your technique for texture mapping that, turning out really good.
-Colin
Oh Colin you are my hero thanks for the tips 
The colormap started in photoshop and I used little pieces of Jenny’s face and copied them to my base skin color. From there I did a whole lot of color choosing from a photo of her and painted the rest. I touched up a few areas in ZApplink (like the lips to get the right positioning on the reds) Made some custom brushes here and there that scatter position and color so I can get a natural feeling on the skin.
The actual deformation was a mix of a lot of things but mostly alphas with a directional brush and drag rectangle stroke in projection master. Theres also some decobrush work. Theres a problem though, when I’m rendering this in mentalray for 3ds Max, I cant get a normal map or a simple bump map to even show up. It just wont work… I’m using a fast SSS shader and I’ve tried both a normal bump and a regular bump and neither will affect the model even when I crank them way up. Any ideas? The model you are seeing in that last picture has no bump/normal at all, its all spec and diffuse…
Hrm, I know I’ve gotten normal maps in MR before, let me dig through some junk. brb
if I’m correct, should just be a “normal bump” in the bump slot on the MR shader, with your channels flipped (red<–>green) I believe.
Small crit on the face is to drop down 1-2 levels or so and sculpt in a little more “extra skin”, you can check this thread http://www.zbrushcentral.com/zbc/showthread.php?t=37583
for a quick example of what I’m talking about. Check the 2nd render and look how the skin tufts under the lip on the sides of the mouth and the bulging on the sides of the nose, these subtle hints of extra skin help show the underlying skeleton better.
also add the creases of the skin that are on the top of the nostrils and define that shape just a bit more.
-Colin
keep the good work my friend,
i’ve learn a lot through your progress…
will keep checking on you!
A quick update… havent had much free time these last few days. Got the normal map working and added hdri reflections to the eyes as well as reshaping the lips.

Great work! This is a really beautiful sculpt, keep it up.
(the corner of the eye is usually called the tear duct or Lacrymal gland) 
excellent update LB. Take a look at the corners of the mouth very carefully.
small update, still not having much time to work on this. Did some work on the eyes. Still need eyelashes and Hair :S

Hi guys, been some time since I’ve gotten to work on my “jenny project” but I’ve finally got an update. Ive begun to work on the hair using Max 9’s built-in hair effects and I must say, it is by far the most frusteraing thing I’ve worked with in Max, and I can’t seem to find any halfway decent tutorials online so I’m winging it as I go. Anyway, I doubt anyone will find this of interest anymore since Zbrush3 came out recently, but here’s where I am at. C&C welcome.
-Chad

Well, I havent worked on this project in ages, but I picked it up again tonight and worked on Jenny’s hair some more. Comments and crits more than welcome…
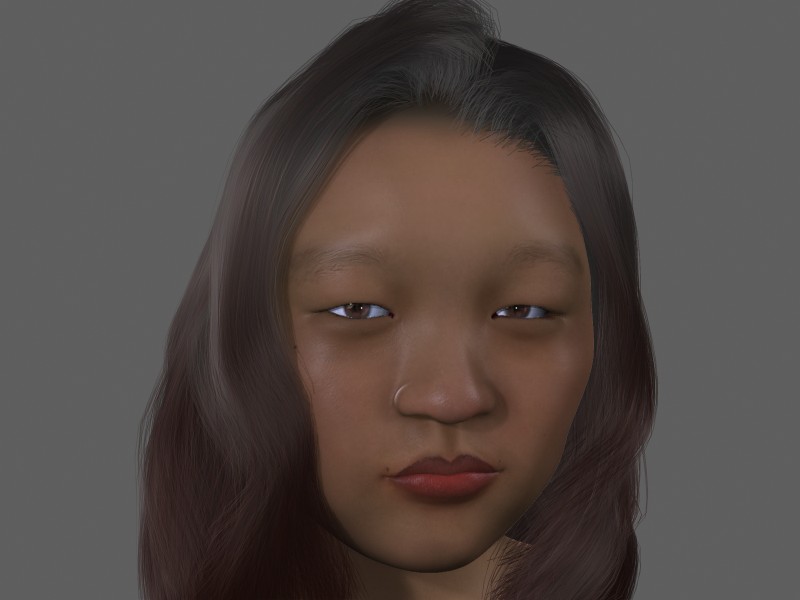
update… starting to get the hang of this crazy hair

Hey! another Chad. lol. Awesome work! keep updatin’, bro. This has alot of potential. Looks like you’re doing better than me in Max. I haven’t even dove into hair yet.
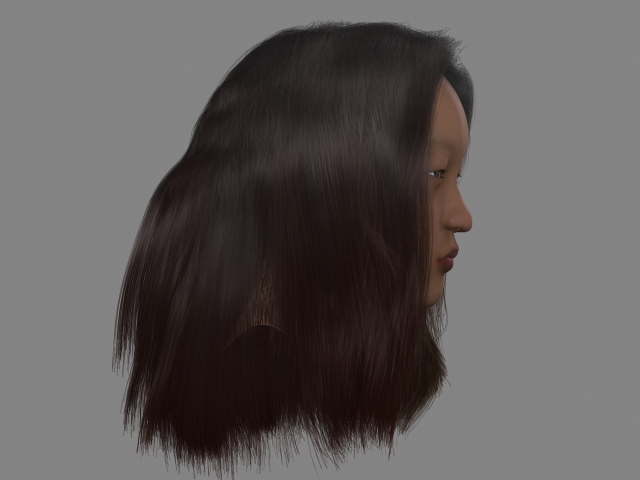
Well it’s finally time that I think I’m ready to wrap up my “jenny project.” I appreciate the comments people took the time to write- I found them quite useful. I learned a lot throughout the course of this project and I feel I’ve improved in a lot of areas. I hope those of you looking enjoy this and any future work I do 
-chad
[attach=69303]jenny_final.jpg[/attach]

oh and for those interested, heres some other shots/wires

Looking great so far keep up the awesome work 