Really beautiful female model  Just love the texture you put on her
OK Fatkid,
It seems you’ve been sucked into the ZBrush addiction. I expect to see you in some sleazy backroom laying on a cot with you Wacom tablet and blurry bloodshot eyes feebly pushing polys aimlessly around.
Looking on both of your human characters what is needed is some sparkle in their eyes, and in the case of your female model a little moisture on the lips. I don’t know if you’ve told us, but what are you rendering in? Probably the fastest way to achieving a little sparkle in the eyes would be post in a paint package and some fake SSS in the ears. If your rendering in a 3D package you can define the regions and then add specularity and perhaps a little SSS. The models are really Great, so I would take the extra time to push them a wee bit further then I think they would be Top Row candidates! You’ve got my vote  .
.
Hey, great work, the bug head looks really fantastic!
best regards, Selwy
Hey, thanks for the thoughts on my work guys. Much appreciated.
Hyper 1 - I definitely agree with you about the renderings. I’ve just been rendering in ZBrush, or in the case of my low poly characters, just a basic scanline in Max. I’m planning on getting into Mental Ray and the SSS setup here pretty soon. It’s slowly getting higher on my list of things to do, as I think it would definitely help push my work to the next level.
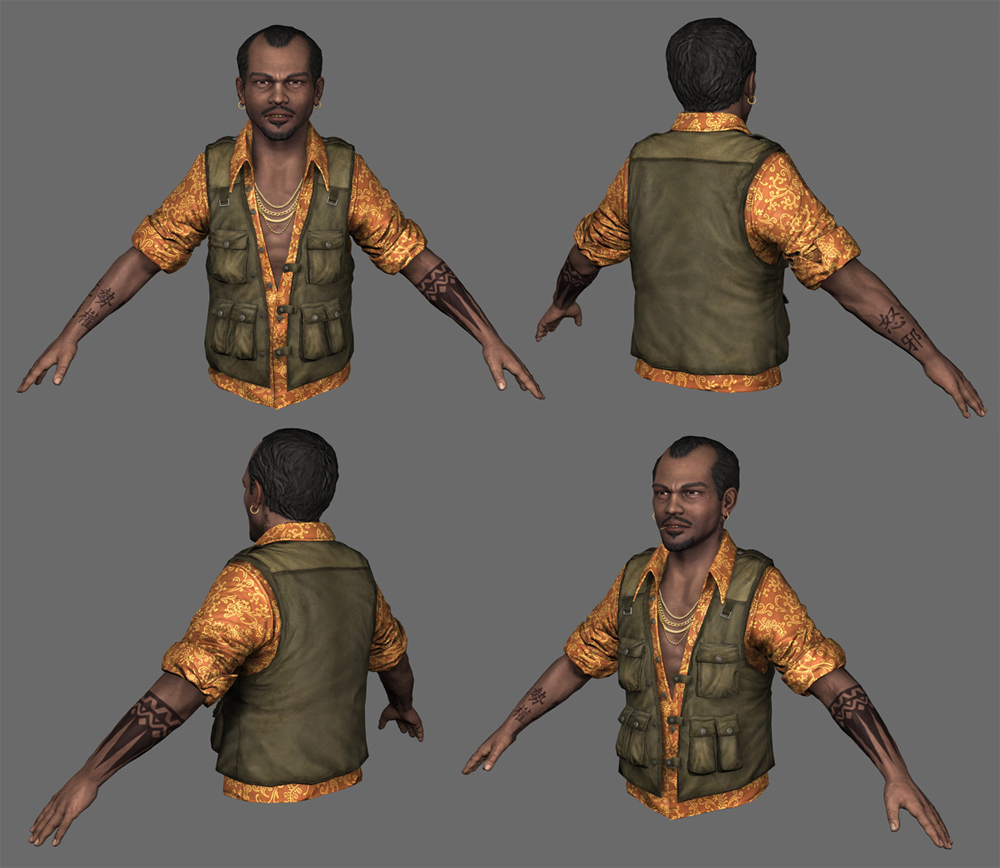
This piece was an art test for Naughty Dog where I had to recreate the character Eddy Raja, from their game Uncharted: Drake’s Fortune. He’s a modern day Indonesian pirate and all around rapscallion. I took some creative and artistic liberties with my version of the character here, which was encouraged in the test guidelines.
Here’s a render…
Attachments

hey…very nice works man…
keep them coming…
Thanka kindly ivar_sn
Here’s a piece inspired by the late, great, blues legend John Lee Hooker.It’s not really a portrait of him, more so just a study based off pics of JLH as reference and inspiration.

Great sculpt, would love to see it textured.
Such amazing skill! Wonderful I love the head and the shirt model a lot
I love your work, could you please explain how do you transfer hi rez sculpt details to lo rez mesh. What is your workflow ?
… is fantastic. There is something slightly different that you have captured on this one that makes it stand out, it is more alive. I really like it. Congrats.
Keridan
pixolClay - thanks pixolClay, ask and ye shall recieve
SolidSnakexxx - hey, thanks. Congratulations on your Mantis Man character by the way. Wonderful work. I spent some time studying insects for my previous alien character, so I can really appreciate what you did.
montyband - thanks for comments. As for the workflow, here’s an excellent tutorial by Marcus Dublin that is basically the same workflow I use, except better…
http://www.marcusdublin.com/TutorialsselectionPage.html
A few workflow pointers:
Step 1) ZBrush hi res sculpt, (based off of a generic, all quad base mesh). I put all my fine details on layers for better control. Also, for the hi res export, I sometimes increase the intensity/value of the fine details so they show up better in the bakes. You can always tone down the details later in Photoshop if need be. (You can see I did that on the cheekbone area). Also, I usually export the mesh in pieces. So I’ll hide sections, then export the visible sections, bringing the mesh into Max in smaller chunks, as opposed to one big mesh that is gonna choke out my machine. As well, if you need to do a rebake of an area, you can just rebake the part, as opposed to the whole mesh. Also, a lot of fine detail work can be done in Photoshop, using the NVidia filter. For example, I could have painted the stubble in Photoshop, and then run it through the NVidia filter, and then overlayed it onto my normal map. Not a bad idea for finer details like fabric, dirt/mud etc. The benefit of this being you won’t need as dense/hi res a mesh in ZBrush for the finer details, which Max and your computer will appreciate.
Step 2) Retopologize and build low res mesh. I begin by painting edge loops on the hires mesh. I find this to be a quick and easy way to get started. It’s much easier to scribble and erase your edge loops than to figure them out modeling. Once I’ve got the edge flow drawn on, I begin retop in ZBrush. This isn’t usually the final, set in stone topology, but I usually get it about 80% of the way there in ZBrush. I also tend not to worry about the finer modelling, like lips, nostrils, ears etc. I’ll do a basic block in of those areas and then finish them in Max. The final 20% retop and refinement I do in Max. I’ll usually import a middle res mesh (subD level 3 or 4) from ZBrush to model over in max. I use Roadkill for UV layouts, which is free and pretty quick and easy.
Step 3) Bakes. I use 3D Studio Max for the baking, and Marcus’ tutorial covers this part pretty well, so I won’t elaborate too much. I tend to not use the cage, instead opting for the offset. I’ll bake each piece separately (if necessary) and then put all the maps together in Photoshop. As for Antialiasing & Super Sampling settings in the Render dialog, I find Mitchell - Natravelli and Hammersley to be nice and clean, although they’ll take a while with the lightmaps in particular. At some point I think it would be wise to look into XNormal for baking normal and lightmaps, but I haven’t gotten around to it yet.
I suppose that’s about it I guess. I think between Marcus’ tutorial above and my ramblings here, you should be good to go. If you have any questions, feel free to ask or PM me. Also, bear in mind, I’m not a professional character artist (yet), so there are probably much better/smarter/cooler/sexier ways to do this stuff than I’ve outlined here 
keridan - hey, thanks a lot. As an artist (or at least aspiring artist), that’s a great thing to hear.
So, here’s a collage of the Blues Man with the final low res textured mesh…

man, this is awesome!
thank you very much for the workflow-description.
wethand - Thanks for stopping by. Hope my 2 bits are helpful.
Been a while since my last post, but I haven’t given up yet…
This is a character that I was envisioning living in the Star Wars universe as I was sculpting it. Kind of a pradatory, killer goat type creature. I’m in the proces of texturing it and hopefully rendering with SSS and all that fancy stuff.

hey really nice images. Especially the textures. Just personal preference I would like to see the goat things neck a bit thicker specifically closer to the head, I think it will give it more of the predatory feel that you described being after. Excellent work
whoua !
sincerely ! awesome details
can’t wait to see it textured !
Just been through your whole thread and you got some great stuff going on here! Nice job on Eddy and the blues guy. The killer goat looks awesome too! Thanks for sharing your workflow tips!!
Great thread !
The last sculpt is really nice !
Wow, great sculpts and amazing detail.
awesome thread! You’ve improved alot since page 1. Really like your latest goat thingy. If it’s supposed to have kind of traditional quadruped anatomy the shoulder (atleast I think it’s a shoulder?) placement confuses me a bit, but you might have it all worked out in your head.
Great work anyways
Hi fattkid, had a great time looking through your whole thread and seeing your works evolve! I love the John Lee Hooker sculpt and the killer goat! ! Keep goin’!