Great sculpt and render! The anatomy is on point, could you possibly tell us light and render set up plz? Thanks
Congrats - I could tell that Top Row was an ultimate home for this fine model on ZBC from the onset, but especially when you covered the genitalia, lol.
Would love to see the step by step of the VRayDisplacementMod if you have time.
Thanks for sharing an awesome sculpt!
Ye, I’d also like to know who you went about rendering it in max, as I’m finding displacment maps a nightmare.
for all the things which don’t get censored, especially with regard to ideology on this forum.
Its a shame to have anatomy censored.
Either way congrats on top row 
Yea …to censor this art is a bit sad really
The great masters of art werent censored and i dont really see why our modern day art should be either.
So freaking cool, the legs are badass, everything just feels so heavy like the guy weighs two ton.
so cool!!!
Fantastic.
Great artwork!!
Amazing sculpting and anatomy.
Congraturation TopRow.
I like your monster.
5stars.
 WOW… Ju… Ju… Just… WOW!
AWSOME JOB!
made me open up zbrush and keep on practicing, Thanks 
wow…gr8 details…Cool !! Congrats… 
great ! inspirative !
aWesome work !!! i like it !!small_orange_diamondsmall_orange_diamond
top quality sculpting dude. Always so impressive.
Reminds me of some guys in our gym
For a sculpt your not too happy with you sure are getting a lot of attention from it ;). Awesome work Alex. Congrats for the top row
Nothing to say.
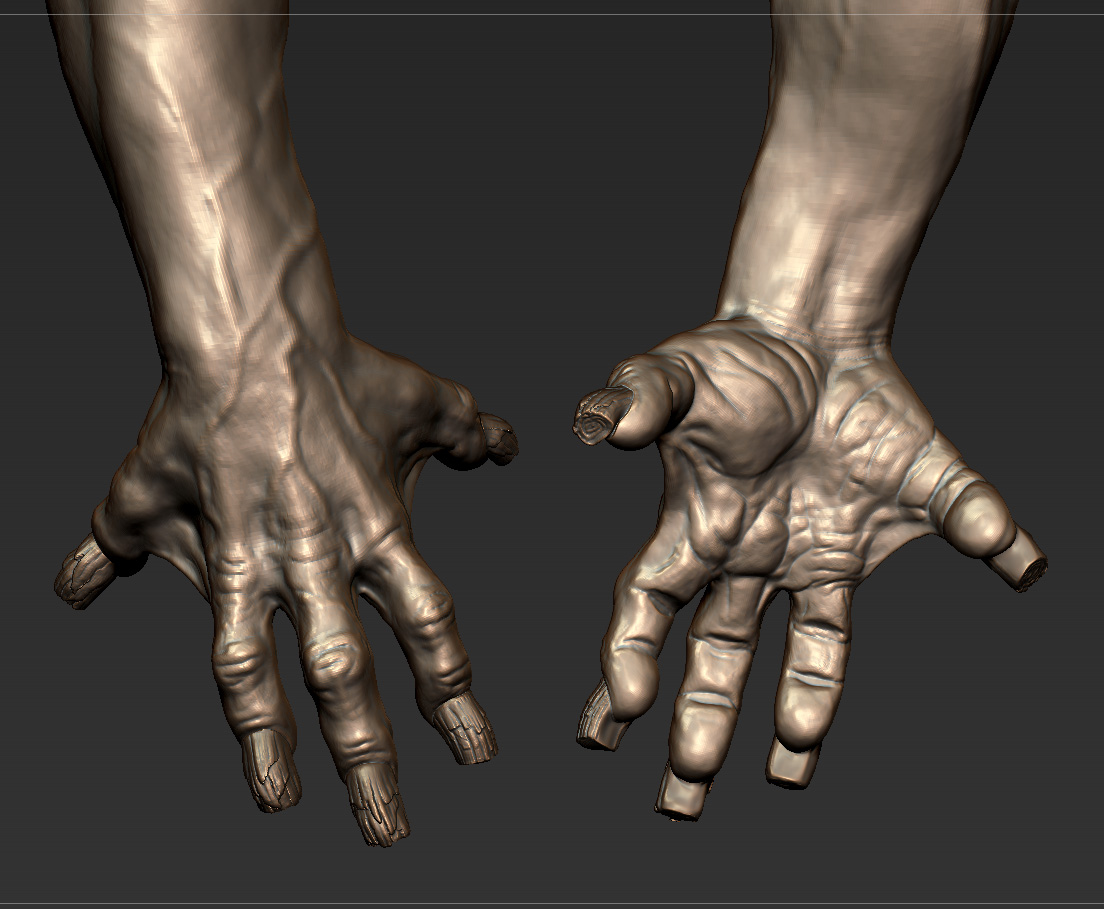
I really like how you push certain features in the sculpt to really give it life. The finger nails for example, can be seen at a distance, and close up still look believable. Great job!
Hey alex!! great to see you here … Excellent sculpt and solid character. I love the material.
Intervain is right, needs a manicure jojoo… Well deserved top row.
I hope to see you soon in London.
Justi.
WOW… this sculpt is just sick man! Really great stuff - definitely deserves the top row! Thanks for sharing! I have to agree with Greg, the hands are definitely one of my favorite parts of the sculpt… but it is amazing overall as well!
Very inspirational!
Stunning work. Totally awsome sculpt from concept to anatomy.
Great render too. love it.
Would You mind to show/tell the light/render setup. This light is awesome and catches all details perfectly.
Many thanks and congrats for highly deserved top row.
wow, thanks everyone for the nice comments, and thanks for the top row!
sdmolyne how´r u doing man? I guess i´ll see u 2morrow!
for the ones who were commenting on the hands, here are a couple of screenshots on them.
[]
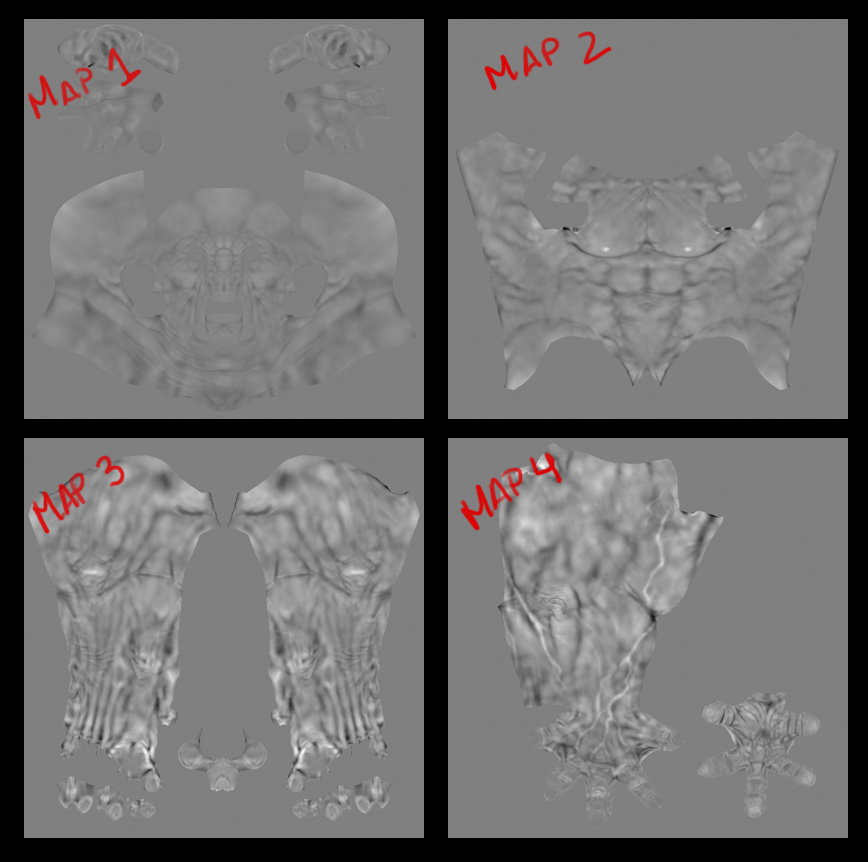
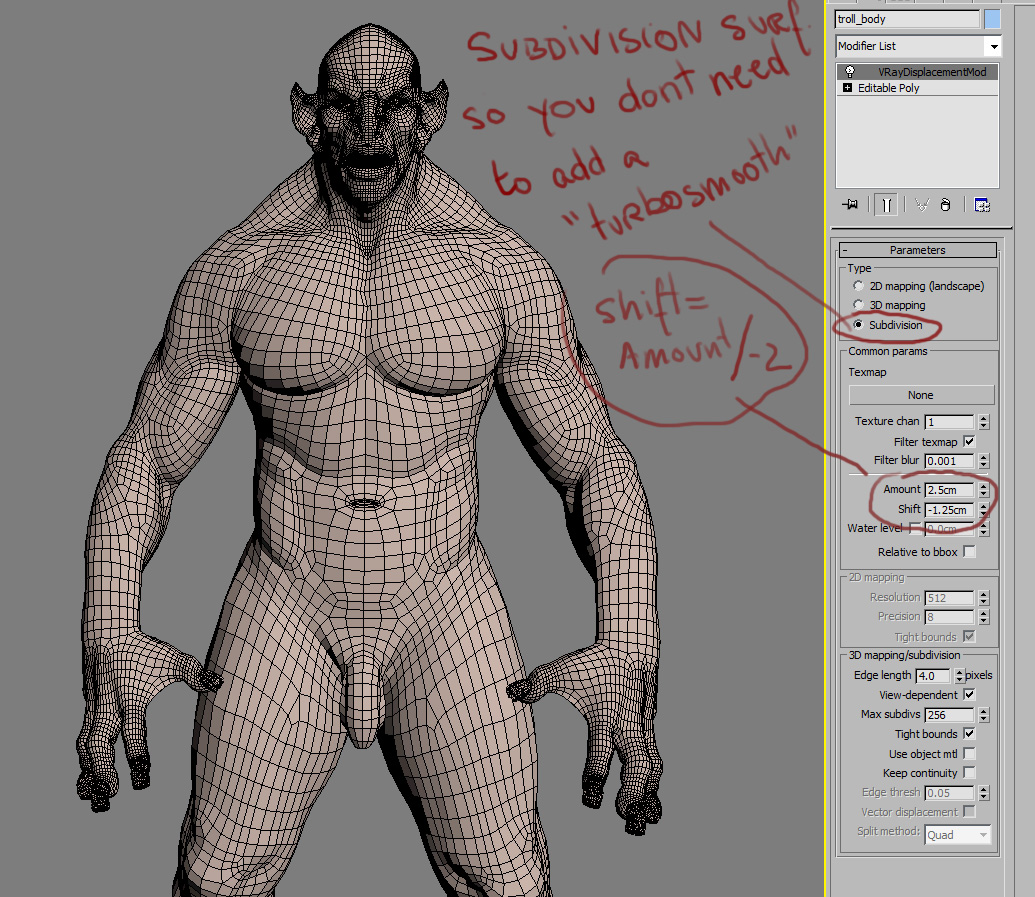
and here is a little explanation on how the displacement maps are added to the model. The model has got 4 uv sets, each of them with 1 disp map, plugged through a composite map, and specifying in each map what uv space they must use. then THAT composite map with the maps on it is what we use for the vrayDisp modifier. Remember that the shift value on the modifier should be the negative half of the ammount ( ie: ammount 4, **** = -2… ) the vrayDisp modifier is set to subdiv. so we don´t need to add a turbosmooth, cos the model gets divided at rendertime. have a look to the attached images for a better understanding!
Also have in mind that in this case where i didn´t use more than 6 milion poligons for the whole sculpt you wouldn´t really need 4 different displacement maps, and the decision to chose 1 single uv shell or different uv shells is up to you depending on what your needs are ( not just for the disp but also for the color, bump etc…)
thanks for watching!
uv´s:
[]

sample of the 4 disp. maps generated in zbrush.
[]
vrayDisp modifier applied to model.
[]
composite map with all the maps loaded on it.
[]

each map needs to have the blur at the minimum value ( 0,01 ) and tile “off” also you need to specify with uv region the map is going to be used ( see image 01 with the uv´s )
[]

then you need to drag the composite map to the vrayDisp map slot ( as instance)
[]

and that´s it really, you can just play with the ammount value to get the desired displacement. ( what i tend to do is a little expresion in the shift so it changes automatically when the ammount is changed… )
and here is an screenshot for the light setup…
[]
[
]