ZBrushCentral

Anthro fox (was - n00b: So how do I do this stuff exactly?)

I’m not sure what you mean. That’s the lowest resolution I can get for the hands and the feet without ending up with having two fingers or toes attached to the same polygon. Other than lowering the resolution I don’t see what you mean by “bringing down the detail”.

  • Kef

Hmm, unfortunately for me, the one on the human figure starts with a model in Maya, and I can’t take that approach as I don’t have Maya. I’d prefer to learn how to construct a human figure starting from ZSpheres, since with a real human figure you can’t dodge issues like requiring higher intersection resolution for hands by simply removing a finger or two.

  • Kef

Furry Kef,

If you wish to master the ZSphere contruction of Anthropomorphics, there is no better thread to digest than Jason Belec’s “A Little Challenge …” It is usually on the first page of active threads in the ZBrush Main Forum and is currently about 28 pages. I recommend going through it from the beginning. There is excellent information for you there. Regards.

~S.~

Thanks. I won’t check it out right this minute, but I’ll keep it in mind :slight_smile:

I looked over the thread and, while there’s certainly some interesting stuff there, I haven’t found anything that really handled the issue of consistent polygon size. In fact, it looks like people just ignore it! Maybe I just shouldn’t worry too much about it?

  • Kef

Uniform poly size in your low res skin is less of an issue than in the high res version that will ultimately align your uv’s and allow for successful mapping of textures and topology with minimal stretching. The important thing in the low res mesh is that it be organized around areas of movement. This is particularly important for those objects or characters that are to be animated. If you take a look at the last few pages of Jason’s thread and study the meshes you will see a sense of order about how the polys are laid out. That thread contains many examples of models that may be downloaded for study as well as some ZScripts that you can play in your program and follow along ‘live’ with the process.

~S.~

I see. Thanks. Well, I guess I better finally get back to this model and end up with more questions to ask… :wink:

Well, after a few minor changes, I decided to commit my model to a polygon mesh for now. I’m still not certain if I did the best job I could with the ZSpheres, but hey, that’s what backups are for. I don’t mind redoing the polygon work if I decide to change the ZSpheres, since I’m doing this for practice as much as I am for getting a model I can use. I’m just dinkin’ around. :slight_smile:

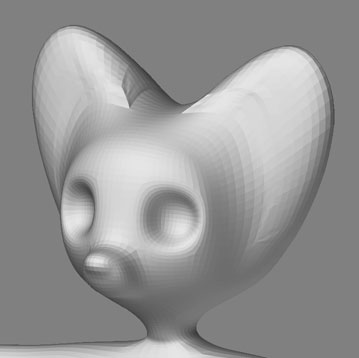
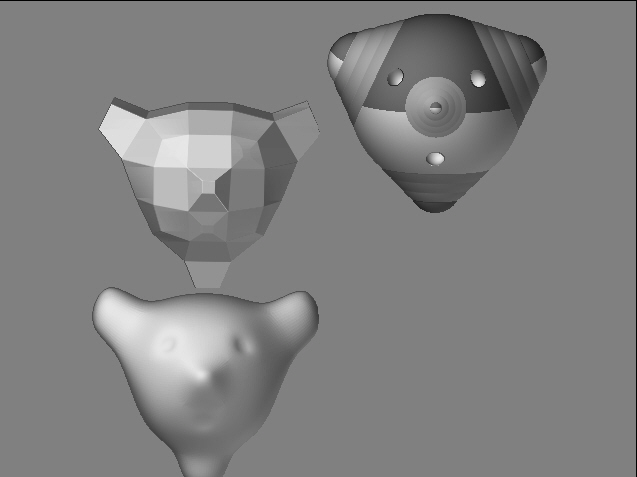
I’m trying to figure out how to do the ears. I want to be able to rig the ears so I can pose them a little, so I’m trying to figure out how to get a good topology for that. I tried edge-looping where I wanted the ears to go and them pulling them out, but I eventually had success doing it the other way around: pulling out the ears, edge-looping at subdiv 1, then moving points around. Only, well, I reshaped part of the ear and I ended up with a big problem, the same sort of problem that happened when I did the edge loop first.

[attach=32076]ears1.jpg[/attach]

[attach=32077]ears2.jpg[/attach]

Obviously, that edge loop isn’t looking really good. It especially gets screwed up at the corners (same thing happens on the back side). Moving the points around doesn’t really help.

I’m currently thinking maybe I don’t even need edge loops for the ears here… I think I’m going to just try it again without edge loops and see how it comes out.

  • Kef

(BTW, I notice my original post was changed so the image is attached as a JPEG instead of linked to my website as a PNG. Am I not supposed to link to my webspace, or does a script do this automatically, or what?)

Attachments

ears1.jpg

ears2.jpg

One thing I found was that its not a good idear to sub devide area while some parts are hidden. It creates tringles that mess up the mesh.

Its best to get the basic shape and devisions from the zsphears to so can check the preview before making the adaptive skin.

[attach=32078]head5js.jpg[/attach]

Attachments

head5js.jpg

I know; I didn’t do any partial mesh subdivisions in that model. I think one time I did get it to work without creating triangles, but I don’t think I remember how. I could be mistaken.

As for ZSpheres, I couldn’t model the ears using ZSpheres with the way I have the rest of the head set up. I pretty much needed a 3/3/3 sphere in order to get the eyes and muzzle positioned in approximately the right regions (and to get a nice round head shape), but if I try to attach the ears to such a sphere, they’re way too small (you’ll notice I do HUGE fox ears :)). To get them the right size I’d need to attach them to two faces, not one, which I believe is impossible with ZSpheres. Of course, I could just do it anyway and move points around, but then I end up with scrunching up polygons near the ears, which may be problematic.

  • Kef

Augh! This topology thing is driving me nuts! I guess I still have to decide if I want to spring for Silo (after learning how to use it) or just wait for ZBrush 2.5…

  • Kef

Is there a particular reason you have you have to do it a certail way? I mean its not for animation right, you just want a clean model with no bad deformations?

Using edge loops are normaly enougth to create any size ear. That pic I put up wasnt to show the size of the ear that can be sorted by moving the polys bigger in sub lev 1, it was to show at higher sub levels there are no triangles or bad deformations. If I spent 10min on it the ear will be perfect even to anatomic standard if needed. If animation was intended then ther edge can be moved to a folding area for animating the ears. If I wanted bigger ears id just make the zsphear bigger to create more geomatry.

I can already get the ears looking great at any subdivision level as it is. It’s when I try to force the topology that it looks like crap. :o

I want to be able to control the topology so it will look right when (if) I color it (maybe not needed for the ears, but it will be for doing her markings), and also to make sure it doesn’t “shear” or crease if I try to pose the ears.

  • Kef

I must have missed somthink topology? you using silo or somthink? Maybe your after somthink thats out of my understanding or knowledge. Please explain your process you mentiond markings?

No… trying to do all within ZBrush, but it seems I won’t be able to if I want to be able to rig or color the model.

  • Kef

Iv riged my modle with no problem and coloured within zbrush fine. The texture will go over any geomatry thats down to having a Large enougth texture and at that point your poly could will be quite high as you wont texture untill all detail has been added.

I work 100% within zbrush and learnt how to rig in max. just make sure the edges are placed at where you want to bend and edge loops are clean. Facial animation can be more tricky from a mesh made in zbrush. I have to say though my meshes are getting more and more cleaner as I use zbrush more.

You will find most people make meshes in max, maya, xsi and so on for animation in mind. I went back and read you fist post again and you said you didnt want to animate it just pose for reference! this should be no problem and can be done all in zbrush.

Of corse no reposing can be done in zbrush as such yet apart from the pose to pose but that can only be done before making a adaptive skin.

Well, that’s my particular goal, but I’m also trying to learn, too. I’d like to learn about stuff like animation while I’m at it.

  • Kef

I feel really silly now, because it took me a long time to figure out just why ZBrush has to change the surrounding polygons when you subdivide. It’s because the surrounding quads share vertices, so you can’t add a vertex to one quad (to subdivide it) without adding it to the neighboring quad. So that neighboring quad would have to become a pentagon. (And between a pentagon and triangles, the triangles are less evil.) So obviously I was mistaken to think it’s possible to partially subdivide without causing triangles :slight_smile:

The particular reason I’m bothered by the quad size thing and partial subdivision is that my character isn’t getting enough polygons where they’re needed and she’s getting too many in some places where they’re not needed. For example, I try to sculpt breasts and it takes a lot of subdivisions before I get enough geometry there. But if I subdivide the entire figure, I see the breasts smoothing out while the rest of the figure remains largely the same (because it already has enough detail at this stage). The hands and the feet in particular really wouldn’t need more geometry. I’m kind of aiming for a reasonably small polygon count so I can pose multiple figures in another program. And yet if I partially subdivide the chest area, I end up with triangles and probably artifacts.

I suppose I have four options:

  1. Sculpt the base mesh in another program so I can better distribute the geometry (and topology!). This would be a shame, since the ease of using ZSpheres attracted me to ZBrush in the first place.

  2. Partially subdivide at a low subdivision level and just live with the funky way those triangles subdivide.

  3. Partially subdivide at a high subdivision level so the triangles have minimum impact, but then I forfeit the ability to flip to a lower subdivision level. Losing lower subdivision levels isn’t very attractive to me, since I love being able to flip between the levels, all the way down to level 1, and again I’d like to be able to export low-poly versions for use in other programs.

  4. Just forget the whole thing and live with giving her a low-poly chest :wink:

    I’m actually trying to learn how to use Blender to see if I can do #1, but it’s not coming along easily, especially since I’ve never done box modeling before (ZBrush is the first 3D program I’ve really been able to do anything in – which is why I bought it). I see the relationship between using ZSpheres and box modeling, which provides nice insight into both processes, but of course they’re still two different ways of looking at things and two different methods.

    • Kef

Please examine Joe_Sieg’s (Joe Siegenthaler’s) thread “MELANIN”.

http://www.zbrushcentral.com/zbc/showthread.php?t=29749&page=1&pp=15

This is an extraordinarily adept use of ZSphere construction on the way to a Maya animation that demonstrates the hopes of all 3D practitioners: ‘Film Making’.

~S.~