did i say that i really like a lot the legs? my compliments!!!
its getting really impressive creature, the only thing i would comment is the feet, for such an agressive creature and such destructive are kind of funny those bumpy feets, the rest is wow.
Hey, thanks for the comments.
pinkarman, I’m not sure if you did or not, but I think it’s worth repeating. 

DarK ZanatoS, Thanks. I’m sure they seem kinda weird looking, but I like them. I was gonna give him big, tree-trunk like feet, but that seemed a little too “anime-esque” for me.
I’m finding it hard to find a tutorial on low-poly modeling for normal maps that’s any good. I find all kinds of tut’s that are about modeling a sphere, or box, or some other generic model, but no tutorials that deal with “REAL” charcters. If they do have characters, they’re so basic as to be non-informative. I need to figure out some of the more intermediate stuff about low-poly modeling for normal maps… It’s getting a little frustrating, cause I wanna finish this guy so I can put him in my demo reel, and get on to the next model.
Can anyone help me out with my search for a decent tutorial? Thanks
nice mesh, though if you’re putting it on a demo reel i suggest you try and get rid of some of those TRIs and try to make them into QUADs
is it rigged?
Thanks Neurotic, getting him this far has been a total bitch, but I’m learning how to do low-poly stuff better.
He’s not rigged, he’s not done being modeled, and his uv’s aren’t done either. It might be a while before he’s done… I did finally bight the bullet, and put him into PolygonCruncher. He’s now a little over 4000 poly’s, and he’s not looking too bad. Hopefully the normal map will look good enough to bring those details back. I still have to add surface details to the high-res mesh as well as run the test I originally set out to do with this thing. Lot’s of work, lot’s of work.
Honestly I’m not too worried about tri’s, as it’s low poly and every one that I’ve ever seen has tri’s all over it. PolygonCruncher also triangulates the mesh before it loads it, so now there’s even more tri’s.
The only thing I can think of is to maybe simplify the weapons. I think the model itself is more important than the weapons that could probably get by on less poly’s thereby keeping you within budget.
The best you could do is just fake it on the weapon detail with bump maps and texture. You also might have a hard time finding any tuts on doing low-poly for gaming, at least those that would be considered useful. A long time ago I was going to create assets for Battlefield 1942, but had a hard time finding anythng that told me what I wanted to know.
You’re on the right track anyway and I think you know what to do. I guess it’s just a matter of what you’re willing to sacrifice.
I think you’re right, -WOODY-. I always have been, and always will be, a high-res modeler at heart, so I don’t wanna sacrifice ANYTHING from my low-poly stuff. If I could have a 10,000 poly budget, I would be a very happy man, but that engine isn’t around yet. 
I guess I’ll just grimace, and mutilate my mesh as needed. Speaking of which, here’s a render of him after PolygonCruncher sank it’s teeth in. I think I’m gonna have to toss his back pack if I wanna keep the poly count low, but I’m ok with that.
Anyway, I’d love to hear some suggestions on the low-poly aspect of game character modeling. If you have ideas, or suggestions I’d love to hear them. Thanks.
simplify simplify, if there are places where you could use a bump or a texture like woody said, simplify it so you can conserve polys, if anything try and keep everything as simple as possible that can be define later with a bump.
Yeah, Neurotic, you’re right on that. Here’s another phrasing of the question I’ve been needing an answer to for a while, IS there a real difference between modeling regular low-poly models, and low-poly models for normal maps? If there’s not, I’m stressing out over nothing… :o
There’s 2 things that run around in my head all the time, while I’m doing a low-poly model. Well, 3, actually. 1: Is this part of the mesh going to be necessary for the normal map to do it’s job right? 2: Will this animate ok? and 3: Man I wish I had a higher polycount…
Since I’m not sure about what exactly the normal map can do on my models, I always get nervous about removing the wrong edgeloop, or poly, or whatever it may be. So far, I’ve had other people do the normal maps, and I haven’t had any complaints about them, or about the model animating right. I guess I just lack the confidence in myself. I’m hoping this model will change all that.
I’m currently working on the uv’s, so I guess I don’t have as much work ahead of me as I thought. I just really wanna get this right.
-
no, not really, as long as the model is crisp and has all the necessary parts modeled as in the head and where the eye are gonna go and so on.
-
if it has the necessary edge loops where the need to be it should be ok, but your model is gonna be a bitch to skin…oh yeah.
-
we all do nods
WOW ! I see lots of “Mech” in him now ! Nice job on the legs
The lowpoly model looks good too:D
Oh, I think I understand what you’re asking now. You have to keep in mind that ( and I know that you know ), normal maps only give the appearance of detail, but doesn’t dissplace the surface normal.
I know that the game Far Cry and I think the newest Doom games use dissplacement maps to give greater detail to simple meshes. With Far Cry I think they start out with a model that’s like 20 or 30 thousand poly’s then create a dissplacement map from that and use it for the same model at around 15 thousand poly’s ( trying to remember ). I remember reading about how their game engine worked a long time ago, but I’m having trouble remembering exactly how they did it, but that’s the basics.
In your case then, if you’re only going to use normal maps, then yes you have to model your mesh differently. You have to retain the basic mesh’s geometry because normal maps wont change that and it is limited to what it can do.In other words, if you reduce your poly count to a point where you lose detail in his nose ( appears rounded and undefined ), then normal maps wont help much in that area. It may help in shading a little, but it would still be very rounded off and undefined.
I guess the only solution ( and best ) is to begin you model in ZBrush and keep the low-poly version. Divide the mesh to a point that’s still within budget, then subdivide the mesh further for the purpose of creating a normal and/or dissplacement map. After that you could export the low-poly version of your model.
I have a bad feeling that trying to go back now and clean up your mesh by hand to make it more defined at a lower poly count would be so much work that starting over would be faster.
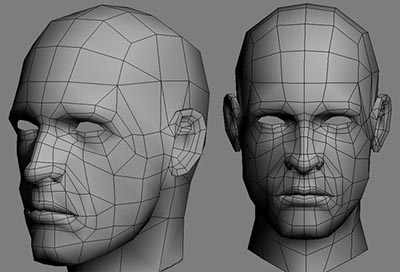
Here’s an example of what I’m talking about. In the image below, this would be a typical model that you would find for most games. Even though it’s low-poly, it’s still well defined and a normal map in this case would add to the detail. I guess in short, no, there’s really no difference in modeling a low-poly model for a game with or without a normal map. I guess it all depends as well on the particular game engine that you’re creating the assets for.
From my experience, poly crunching programs are usually indescriminate in how it reduces the poly-count. Normaly those programs can really mess up your mesh, but as long as you end up with something clean like the image below, you’ll be ok.
[attach=18181]low_poly.jpg[/attach]
Attachments
Thanks for the help guys. I’m really hoping I don’t have to start over, but I guess if I have to, then I will. It’s looking like I’ll have to at least remodel the fleshy bits, but I’m not worried about that at all. It won’t take long, and I’d be able to correct some mistakes.
Neurotic, you seem to feel my low-poly mesh has some problems, how so? If you’ve got suggestions on how to make a better low-poly mesh, I’m all ears. I’m pretty willing to try just about anything to get this model back on track. If you don’t feel that way, well, sorry. 
-WOODY-, thanks, that’s a lot of info. I know that normal maps don’t change the mesh itself, but are more like a bump map on steroids. My problem is, I haven’t been doing low-poly modeling enough to have the experience necessary to know exactly what they can and can’t do to help my models look better. I can do decent low-poly work, but not great low-poly work.
And as far as the polygon reduction stuff, yeah, they really don’t treat models well. I think it did pretty good on the mechanical bits, but it kinda destroyed the fleshy parts.
It looks like I’m gonna remodel the fleshy bits, and try again. I just don’t wanna give up on this thing. Once again, thanks a lot for the help everyone, I know I could use it.
[EDIT] Update! now this is pretty funny, after all the low-poly modeling I did to get this guy looking good, and trying to keep him really low-poly, the fleshy bits of the level 1 subdiv from ZB was lower than I what I came up with in Max, it has better low-poly topology, and it’s almost all quads. I have to laugh at myself for this one…
[EDIT 2] After about 10 minutes work, I’ve already got the polycount down to 5866, with an easier choice on what to remove to get it even lower. And to top off all that other junk, I remembered I had already done the uv’s for the model I brought into ZB, so I don’t have to do those again… And now I’m laughing at myself even harder :lol:
I did a quick normal map test just to see what was going to happen with the current low-poly model, and besides the regular Max normal map rendering errors, I was pretty surprised by how good it looked. I’ve still got some poly’s to drop on the fleshy bits, but that won’t be too hard. I think I might be getting the hang of this stuff.
Back again! :evil: :evil:
I’ve got him down to a reasonable polycount, a little over 5k which is what one of the monsters on Gears of War has. I’m running into trouble with the Max normal mapping stuff. As you can see in this pic, there’s a lot of errors in the rendering of the normal map. I still can’t figure out why the wireframe is popping through on the torso, and in the mechanical stuff, all I get is blotches of good normal mapping surrounded by black.
But I guess this isn’t the place to talk about Max’s normal mapping behaviour.
Once I get the normal maps done, I’ll start on texturing him. After that he should be done, and ready for my demo reel.
I’m guessing that you are using 3ds max R7 and that you have over lapping UV elements. Perhaps you are trying to mirror UVs in order to conserve texture space? There is a bug in Render To Texture in R7 in which where ever you have overlapping UVs, the wireframe is rendered into the map. There are a couple of fixes:
1.) Upgrade to 7.1, or 7.5
2.) Take your one of your mirrored UV elements and offset them in UV space by 1 UV “tile” (The “Relative” button down by the spinners in the Unwrap UVW Edit window is great for this.)
Thanks for the suggestions, alannoon. I am using 7.5, and the uv’s are not mirrored or overlapped, and that’s what’s confusing me. I’ve done mirrored uv’s before, and the wireframe popped up. I got rid of the mirroring, and it went away. Now it’s not mirrored, but I’m still getting it.
The thing that’s bothering me the most is, the blank blotches of the mechanical stuff. Here’s the normal map that I get with Max for the mech bits. Any ideas on what I should do to fix this?
Whoa. That’s one ugly normal map, if you don’t mind me saying so!!! 
It should probably be that nice purpley-blue color you usually see. I’m guessing you are not using tangent space normal maps? You probably should be. (Why the 3dsmax tutorials specify World Space, I’ll never know.) Even so, I’m not convinced that is the root of your problem. There are 100 ways for normal map generation to go wrong. Some suggestions, off the top of my head:
Are you using the cage to generate your normal map? A lot of people have trouble with the cage, especially on complex objects like you have there. Do your high and low res objects share the same UV layout? If so, you may want to try “UV Match” instead of the cage.
Try adjusting your ray depth. Your rays might be stopping short before they hit the mesh.
You may want to break your model up into several different elements, or objects. A number of guys in our shop do that and then composite the map back together later. (This can be tedious, but some models just seem to require it.)
…and always make sure your XForms are reset!
Hehe, I don’t mind you saying that at all, cause I think the same thing…
I’m using local space, that seems to be what Doom3 uses. I could try tangent, but I thought tangent was for stuff that’s not gonna deform. I am using the cage, while my high-res flesh model has uv’s, I had to rearrange them to make better use of the uv space, and the mech stuff was done entirely in Max, and I didn’t bother doing the high res mech uv’s.
How do you adjust the ray depth? I don’t have a lot of experience with Max’s normal mapping stuff, so (obviously) there’s a lot I don’t know yet. I’ll read about it, and give it a shot.
I was thinking about breaking it up, and pasting the maps back together in PS later. I’ll give that a try if the ray depth thing won’t work.
As far as xforms go, how exactly is that supposed to help? I’ve done some normal maps (that for whatever reason went really smoothly), and NEVER touched the xforms. In fact, I’ve done a grand total of 2 reset xforms in my entire life. I’m really curious about that.
Thanks for the help, I appreciate it.
You should use tangent space normal maps for virtually any normal map creation. I don’t recommend using the cage in Max’s render to texture. I just adjust the ray depth until the rays are long enough to “catch” the mesh (until you no longer have red areas when using ray-miss check).