ZBrushCentral

ZBrush 4R2 Betatesting By: Marco Menco

@abe_Tamazir: thanks bro, for now I’ll post few short videos on specific features. I just gotta find some time to do that.

@darklopium: thank you! I’m glad to hear you enjoyed the presentation, I was hoping to hear some feedback after Siggraph since it was my first time in front of a such an audience :slight_smile:

Hi Marco! Awesome work on facial animation, thank you for sharing your workflow.

@macro. : well you did a good job dude, i’m a student @vfs and seeing your presentation was really interesting, especially on how to maintain a good volume on the chicks and others part during the blendshape process.
don’t hesitate to share more ! :cool:

Very cool! thanks for the breakdown.

Would love to see how many Layers you had to create. Must be allot for all those emotions?

Thanks so much guys I’m glad you like it :slight_smile:

I’m just moving the images they don’t get lost in the forum and the discussion has a flow.

As I promised I’m also adding a short video on how sculpted the shapes :slight_smile:
I hope it helps.

//youtu.be/I9y9QfbWzbY

@INFINITE: Lee, the layers were quite a bit but not as many as they should have been for an actual VFX shot. I had about 20 shapes. Usually it goes up to 40-45 if the creature doesn’t talk. In this case I also optimized as mush as I could to avoid shapes in between. The topography of the head is fairly flat and bi-dimensional which allows me to sculpt avoiding crashes with things like teeth. If it was a wolf muzzle for instance I would have had to sculpt more shapes to achieve the same expressions.

So first of all you duplicate the model in its neutral pose and you give it a different color (red) so that you can always spot immediately where you have a loss of volumes. Then you make sure the duplicate mesh is in your subtool list. I figured out this whole process to keep the production of all this shapes as artistic as it can be (and especially entertaining for the artist who’s going to spend quite a bit a of time on those). You can sculpt with freedom and the only thing you have to consider is the fall off of the movement of the skin. Keep the wire visible so you can see how much the uvs are sliding and if the movement make sense (to make sense the movement has to happen on the length of a muscle). The only non-artistic part (which can still be artistic depending on how you play with it) is to re-project all the lost volumes in the bony areas using the gray mask and the duplicate mesh.
The duplicate mesh and the shape you just sculpted cant be at the highest subdivision because you dont want to reproject the skin details. You only fill the lost volumes. Those skin details need to stretch and compress with the UVs so you dont touch them unless it makes sense to do so (for instance to add a wrinkle or a smoother area). Hope this helps!

Thanks for the info Marco! …and don’t hesitate to give more intel if you feel like it! I’m sure to read it :slight_smile:

Amazing portrait dude, really expressive !!!
Love the animated blend shapes!!
Keep rocking!

thanks so much! Hopefully I get to finish the animation soon…

cant wait to look at it and get my handds on this shader of your s :wink:

Wow Marco, this is awesome, awesome stuff!!! Watching the creature come to life with the blendshapes is so cool (& extremely well sculpted) thanks for sharing so much of your workflow and the vids :sunglasses:small_orange_diamond:+1:!

:slight_smile:

hey guys thanks so much!
Geert, I’m a big fan of your work, thank you!
I’m holding on the rendered video…sorry I got a bit busy these days… I really wanna finish this :slight_smile:

Very impressive and inspiring work, Marco… thanks very much for sharing!

thank you for your kind comment :slight_smile:

Hello, I have a question about how you generate the displacement maps.
In my experience the maps will only work reliably if I store a morph target of the basemesh immediately after importing it into Zbrush and before subdividing it. That’s because of how the level 1 basemesh gets shrinked right after you press Divide.
I will have to recall this morph target after the sculpting and before generating the maps. With any other approach, the resulting map will create artifacts, bad displacements etc. at rendering time.

This meant that when I tried to create displacements on top of blendshapes, I had to do a lot of trickery with wrap deformers in Maya to create a version of the basemesh that I was then able to use for generating the displacements.

So, what do you do to generate your maps? I see in the video that you subdivide the shapes, do you just switch to level 1 and generat your maps? This should create bad displacement maps, too… or do you have some trick for that?

hi LY, the method is reallly simple actually. What I found to get me the best results, was always to use the mesh that I sculpted on, no morph targets. I know that when you subdivide the mesh shrinks. That’s the same that would happen if you would render the very same mesh as a subd in maya. In few words if you are a maya user and you press 3 to smooth the model in maya, that’s the same thing zbrush would do when you subdivide.
Since you are sculpting on this mesh, you are also changing the orientation of the normals of the base mesh from where you will bake your displacement map. That means that you have to apply the displacement map to the same base mesh that you use to bake your map to get the same result you have at your higher subdivision. You’d get the best result is by exporting your sculpted base mesh to maya; apply the displacement map that you baked in zbrush (without switching the morph target) and render. A good test you could do is to use GoZ to pass both mesh and map to maya and let GoZ to set the shader for you. You’ll see that you’ll find yourself working with the sculpted mesh from zbrush and the displacement map generated from that same mesh. Hope this helps.

That is not true in our experiences, we did extensive testing back in 2004 when we started to use Zbrush 2.
I’ve even exchanged some emails with the Pixologic staff and it was their recommendation to use the morph target method.

This is an image I’ve made back then:
cw_head.jpg
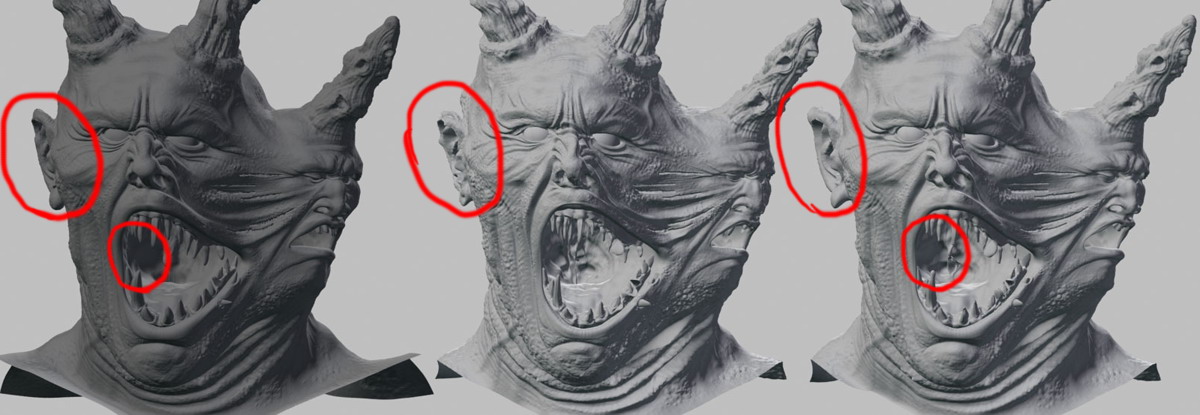
Left one is the geometry straight out of Zbrush, the other two were using displacements generated with either the standard level 1 basemesh, or the level 1 basemesh + the Cage button.
I think the artifacting is obvious; it was a relatively low poly model so the problems were more extreme. We’ve had a lot of problem with sword edges and tips too, just look at this guy’s teeth to see what we had going on with the weapons.
But it’s the same with anything else. Just try it with a simple plane, the border edges are shrinked in Zbrush and stay where they should in Maya.

Also, Mudbox can work in the standard way, without ruining the level 1 basemesh, so it’s clearly something specific to Zbrush and has nothing to do with how you subdivide in Maya.

Yeah I remember I used to have this kind of issues back then when using 16 or 8 bit maps. But now when I bake my 32bit maps out of the Multi Map Exporter I get the best results just by using the sculpted mesh.
Something to be said is that I never use a mesh that is too low even if I believe that with a 32bit map you’re still gonna be pretty close to what you sculpted.
Are you using 32 bit maps? That was a really cool model by the way :slight_smile:

Another thing. For props and hard surface models I still use the morph target for the reason I said before, the normal orientation. In that case I want the map to be baked out of the original mesh. But that’s because I use ZBrush on hard surface models only for the high frequency details. The thing is that ZBrush doesn’t bake vector displacement maps. So you have to make sure that your details are being displaced along the normals. That’s another reason why you get that crazy pinch in the throat and artifacts.
For organic models I found that the sculpted is the best geometry to be used, because you do sculpt more than just high frequency details and you want to make sure that the volumes (so the normals direction) you have in the highest subdivision are more or less reflected in your base mesh or when you render it will be required too much effort to reach what you had in zbrush.