ZBrushCentral

WIP - Tribute to Blizzard

Hi Hosch,

Really like the detail and power in your character. However, I feel the 1 area that detracts from this overall is the wrist. It’s hard to describe but I feel like it looks limp compared to the forward energy portrayed in the rest of Rexxar.

I’ve included a rough drawover showing you what I mean:

[[attach=196238]Rexxar_Progress_arm.jpg[/attach]]Rexxar_Progress_arm.jpg

I struggled to find some good reference but these sort of put across what I mean:

http://www.istockphoto.com/file_thumbview_approve/1635751/2/istockphoto_1635751-hand-holding-ice-axe-isolated.jpg

http://image.shutterstock.com/display_pic_with_logo/401527/401527,1252300720,5/stock-photo-man-holding-axe-36614683.jpg

http://image.shutterstock.com/display_pic_with_logo/702/702,1204139017,2/stock-photo-hand-holding-axe-isolated-on-white-background-9840589.jpg

I’m no expert but thought I’d leave a crit. My bad if you’ve already tended to these areas.

Best of luck with the sculpt and Siggraph :).<img id=“greasedLightboxImage”>

Greased Lightbox→[url=""]←[url=""]+[url=""]-[url=""]↻

<img src=“http://www.zbrushcentral.com/pixo/atn.gif”>Loading image

Click anywhere to cancel

Image unavailable

<img id=“greasedLightboxPreload”><img id=“greasedLightboxPrefetch”>

@MozzUK - thanks much for the feedback - since I am not exactly what you mean I will post more images of the wrist from various angles so you can have a better look at it - I really appreciate the critique and want to get the most out of it:).

I am about to get back into the subtool creation and i will flesh out the wrist guards (minus the fur that will be sticking out of each end in the final renders) and post various angles for review.

Thanks much for the reference as well.


Also, it might be helpful to know what the final image is going to be from my plan - scene:

  1. Rexxar and Misha are in that jungle zone just below Desolace - forget the name
  2. On a hill cliff where the hill giants are roaming Rexxar has just been kneeling to skin a kill with Misha as lookout
  3. A hill giant rises up at cliff level and takes them by surprise
  4. Misha will be lunging and Rexxar is turning and raising from his skinning (which is why the skinning knife is out - one axe is always out as stand by weapon)

I ran though this pose and had someone photo me from a number of angles which is how I came up with this pose - a pose that is too off-balance to hold and is intended to show motion. I thought I captured the proper hand angle, but if it looks odd I should revisit it so will post more image angles in a couple of hours.

@MossUK - I finished the wrist armor (minus the fur at both ends that will be added). Below are a various angles so you can see it better. Please let me know in a bit more detail what you meant about the wrist area so I can address it. Thanks so much.

Wrist armor - this is intended to look like the inside of tanned hide with the fur left on the inner side which will be protruding from each ends and around the laces in the final render from 3ds Max - I might explore the ZB fur as well later. The crossed leather pieces are meant to be rhino hide and the ends will be tucked into the fur so I did not model a termination for them. The body, glove, etc. are obvoiusly still most definitely WIP.

Rexxar_Progress_41a.jpg

Attachments

Rexxar_Progress_41b.jpg

Rexxar_Progress_41c.jpg

Rexxar_Progress_41d.jpg

Rexxar_Progress_41e.jpg

Rexxar_Progress_41f.jpg

Rexxar_Progress_41g.jpg

Rexxar_Progress_41h.jpg

Rexxar_Progress_41i.jpg

Amazing, thanks for sharing your progress with us…
Can I ask a question, how you got the position of your Character, after that you made your symmetric base mesh? In Max with Bones structure? Or Directly in ZB ?

I created the base mesh in Max using symmetry with a weld threshold of .001. Imported into ZB and sculpted the blocked in character to level 4 subdivisions. Posed character using Transpose. Touched up areas where followup sculpting was required. Let symmetry and have not been back to it. Sculpted the character a bit more to loose any symmetry and then started working on the subtools.

I am saving my character and weapon sculpting/painting until the very end since I am still learning the tool and want those parts to reflect the best of my skill at this point:).

There are many things I will do differently on my next project, but for this one, I hope that helps.

I have had a few people request that I share how I achieved the hammered metal look on the buckle as well as the welds around the skull and other areas. Here is how i achieved these looks:

Hammered Metal (bronze or copper):
I wish I could tell you there was an easier way to do this than the way I did it, but so far I have only found the old fashion hand sculpting to achieve the look you see. I used nothing more than the HPolish (100% intensity) and Smooth brushes for this - took a few minutes to say the least - which is why I chose for it to be “accents” and trim only, lol.

Welded Metal:
This was much easier. I experimented with a few brushes and found this to work best - MalletFast brush with Colorspray with one minor/major change - set it to ZAdd rather than its default ZSub - it is one of the few brushes that has a ZSub default. Then alternate with this brush and immediately smoothing small areas - /rinse - repeat until you get the desired look. Very simple actually. The only “key” to this is getting the angle of the brush right, but once you get it you will fly through your “welds”.

Happy sculpting.

Great work on the character. The texturing and pose are nice. I like all of the accessories you have designed for him. I can’t wait to see more.

@AR-Man - thank you. I noticed on your site that you sometimes use VRay. Have you mastered the ZB > VRay displacement process? So far my experiments are less than desireable.

@antisymmetry - thanks much. I posted a few additional images (right wrist armor) in the thread with the left arm - hope you like:).

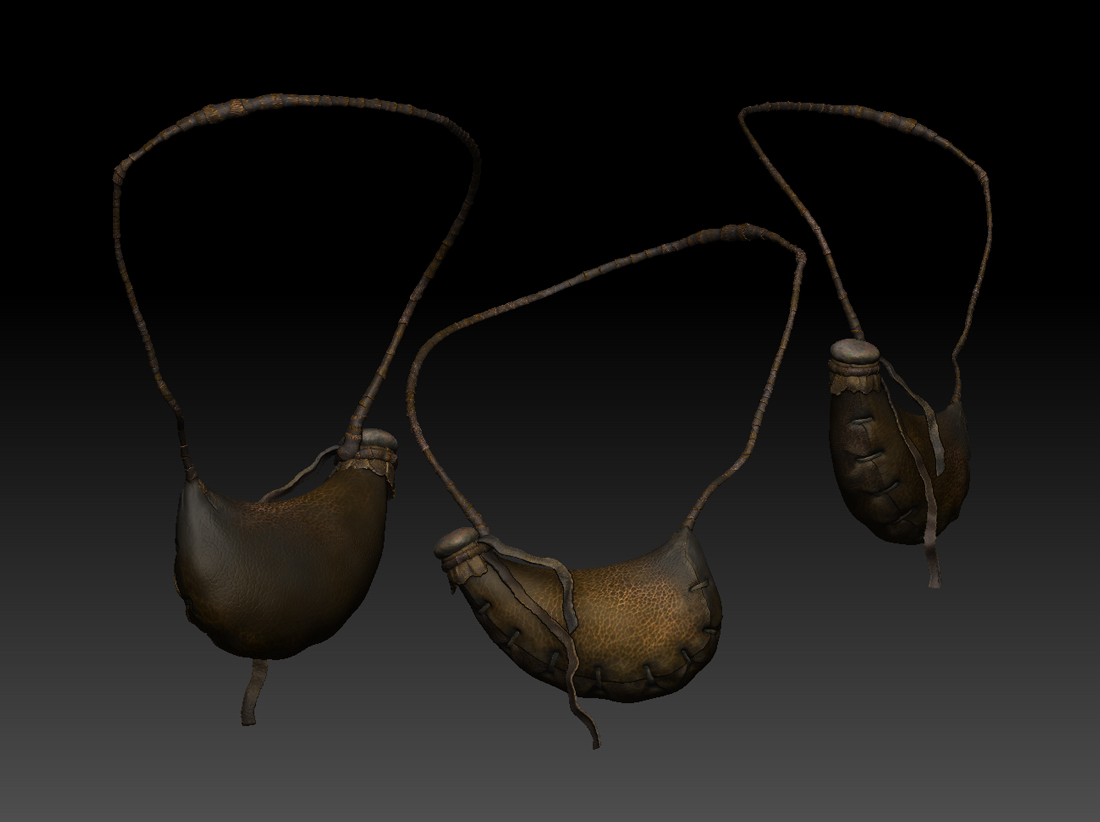
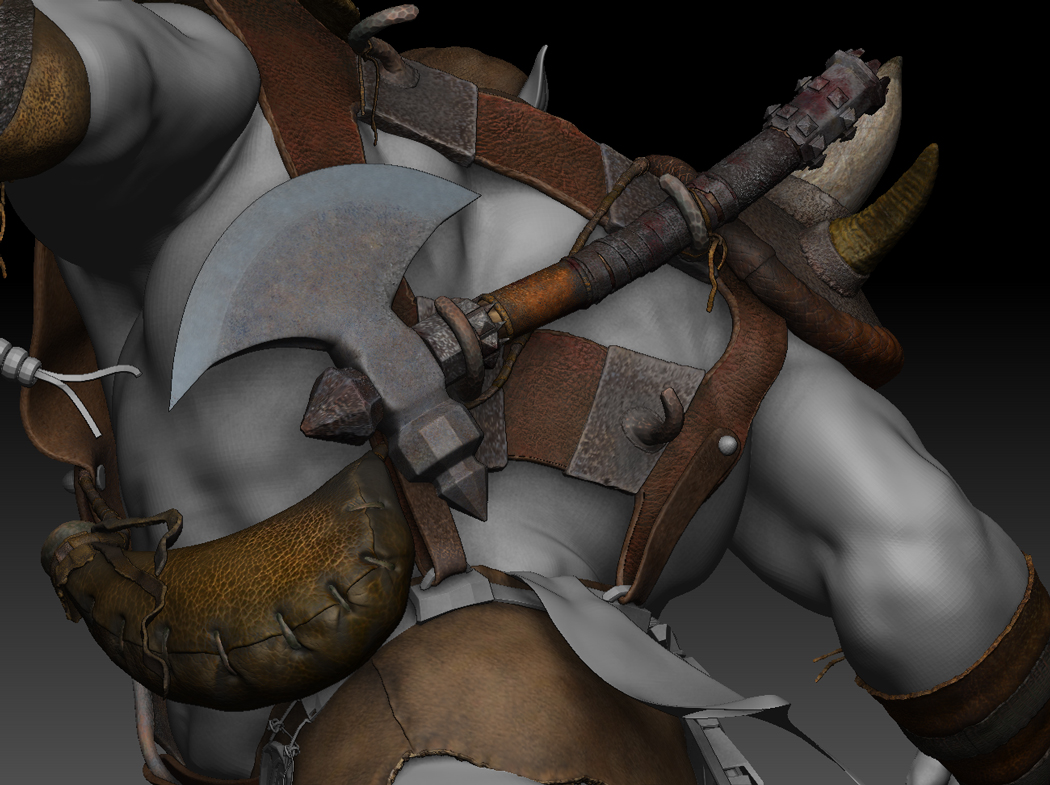
Well, I am almost finished with all of the subtools. Here is a quick glance at the waterskin - new and improved since the old one was corrupted. I am starting to get comfortable with the ZB texturing tools and I am thinking that I have barely scratched the surface. It is amazing what can be done in such a short time.

The next image should be sometime tomorrow and will be the entire character completed minus his skin - that is if I can avoid inturruptions, lol.

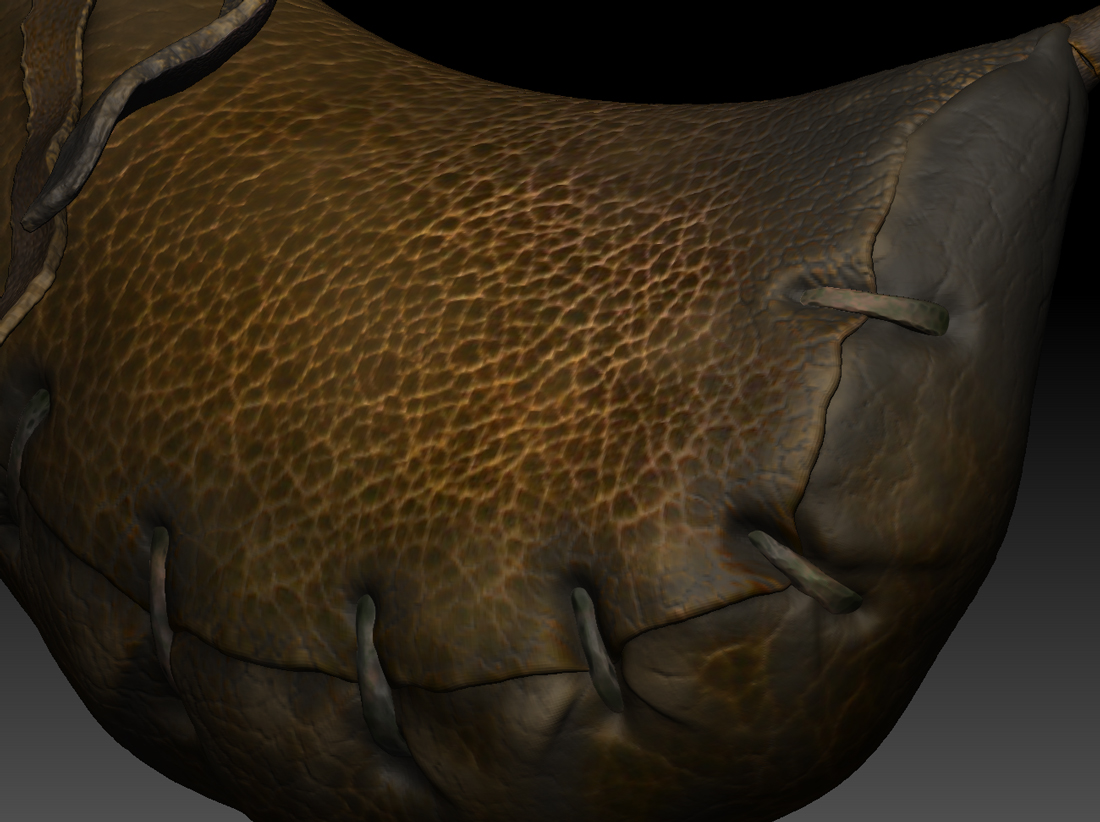
I reduced the details on this significantly and still feel it carries its weight well enough for the camera angles I have planned. One thing I have found useful is to create the polypaint at a high level then reduce the geometry and the “essence” of the higher level is retained which is what I did for each of these subtools in this item. Some items I created at 8 - 10 subdivisions and then reduced them 2 and sometimes 4 levels down and deleted higher divisions. The painting came easier and the essence is still retained in the final from the distance from the camera used.

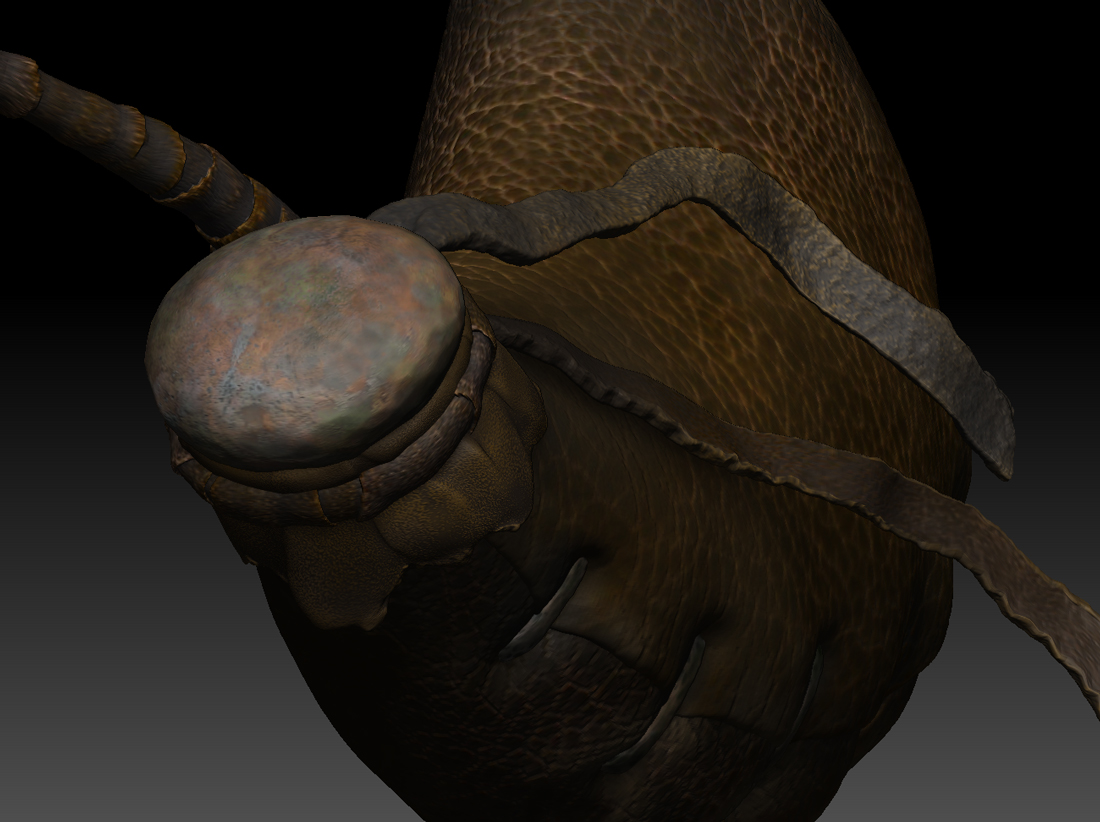
The copper aging took a bit of experimenting since it is mostly all polypaint with only a bit of photo texturing as a base, but I am fairly pleased with it and think that once it is in shader mode under VRay lights it should really pop.

NOTE: Previously, I said this was a waterskin and referred to the inner “bladder” being an actual seal’s bladder. After doing further research, I am finding this would not be accurate. An animal organ such as a bladder has two major drawbacks for this type of waterskin - 1st, it would be fairly fragile if it ever dried out at all - even brittle unless kept constantly wet - 2nd, it does not breath like tanned leather so the water would become brackish very fast and bladders were only used for very short periods of storage since they are more like a natural balloon than a canteen. This was built to reflect a tanned hide inner core with a thicker outer covering to protect the inner “bag”.

Rexxar_Progress_42a.jpg

Attachments

Rexxar_Progress_42b.jpg

Rexxar_Progress_42c.jpg

Rexxar_Progress_42d.jpg

Rexxar_Progress_42e.jpg

I want to see How look the complit char with all the subtools now :slight_smile:

Hosch…No crits from me…I’m learning alot by just seeing this piece progress
BEAUTIFUL WORK…:+1: To my eye anyway…:slight_smile:
CHEERS :+1:

Thanks for the comments.

Believe it or not, I am actually getting quite snappy with this process, but it seems that the faster I get the more that life gets in the way, heh.

Seems I forgot that today is the birthday for a very special person in my life so likely not much work to get done today so I am posting what I have wrapped up so far and everything that has not been addressed is in the flat drab color.

Here is what I have left to do for this colorization:

  1. Add the teeth to the skull I promised
  2. Texture the buckle, skull, side plates of belt armor, fabrick of crotchcloth, knife and sheath, killmaim axe, weather the serathil blade and then do a final pass of grunge where needed and possiblly redo two of the horns that I am not caring for on the right shoulder armor
  3. Finally I will wrap up the detailed sculpting of the body and his skin texture - oh and his eyes and inner mouth

Not sure when I can get to this, but hopefully by midweek.

C/C always welcome:).

Rexxar_Progress_43a.jpg

Attachments

Rexxar_Progress_43b.jpg

Rexxar_Progress_43c.jpg

Rexxar_Progress_43d.jpg

Rexxar_Progress_43e.jpg

Rexxar_Progress_43f.jpg

Rexxar_Progress_43g.jpg

Thanks for your answer, and Your Work’s getting really great my friend :+1:

Hey Hosch,

The sculpt is looking awesome and the wrist is looking a lot better. I was going to suggest assuming the pose of the character and thinking about his next step/action. Also, the texturing is looking beautiful.

I tried searching for reference for you but, again, wasn’t able to find any really decent stuff. These are the only ones that looked remotely suitable:

http://www.wisconsinscottish.org/images/all_about/battle_axe_throw.jpg
http://image10.webshots.com/10/2/55/77/179125577rTGhMS_fs.jpg
http://www.flatheadbeacon.com/images/uploads/WRloggingsprotsA.jpg
http://www.hurstwic.org/history/articles/manufacturing/pix/axe_seq6d.jpg
http://www.hurstwic.org/history/articles/manufacturing/pix/lh_axe_seq1a.jpg
http://www.hurstwic.org/history/articles/manufacturing/pix/axe_seq1a.jpg

Looking forward to updates :)<img id=“greasedLightboxImage”>

Greased Lightbox→[url=""]←[url=""]+[url=""]-[url=""]↻

<img src=“http://www.zbrushcentral.com/pixo/atn.gif”>Loading image

Click anywhere to cancel

Image unavailable

<img id=“greasedLightboxPreload”><img id=“greasedLightboxPrefetch”>

@MozzUK - I am honored by your attention to my work and really appreciate the references. Here is an update - all items in drab are not touched yet and have sculpting and color to go obviously.

One note about the pose - the final scene will have him moving up a few feet uphill to the edge of a cliff to prepare to lunge (pet bear already in lunge) so the “off-balance” feel to the pose should dissipate once in the final scene - will post sketches once I do them - right now it is just in my head.

My “plan” is to take 2 or 3 hours tomorrow and (hopefully) the same amount of time on Thursday and wrap this up by Thursday evening.

Rexxar_Progress_44a.jpg

Attachments

Rexxar_Progress_44b.jpg

Rexxar_Progress_44c.jpg

Rexxar_Progress_44d.jpg

Rexxar_Progress_44e.jpg

I have had a number of people PM/email me about certain methods I used when approaching certain areas of this project. While I did post a couple of brush combinations a few days ago, I am holding off on further postings on “how-to’s” until I have done a bit more research on things before I go spreading my methodology since this is really my first project to do all the way through using ZB.

Really want to make it clear that i am no authority on ZB yet and I want to make sure I am giving out efficient information.

Once I am done with this research, I will indeed be posting some step-by-steps with screens and everything - thank you that have asked for being patient - feel free to keep asking and I will get there eventually :).

hey bro,amazing work man.The thing i like abt this work of urs is,it actuly speaks a lot abt ur self…u r patience and love for art…and each peice realted to the sculpt shows how much effort u have put on the whole work.
I would surely want to have that quality.
i like everthing abt this thing but i think u would try adding sum fur or sumkind of cloth beneath his shoes u know which is visible on top like those blizard guys do…it would be nice i gues…
anyways mazing work…w8ing for updates.

@neozerahan - thanks for the compliments. About the fur - I plan to use fur on the following parts:

  1. Top of boots
  2. Left armguard (both ends)
  3. Axe handles (various parts)
  4. While not fur, I am using Max fur to create the feathers on the end of the leather straps on Killmaim
  5. Considering adding a cape of sorts - not to totally cover all of his things in the back, but maybe something like an animal skin wrapped and tied - not exactly sure about that though

The bear will be the opposite - huge amount of fur with a few decorative elements. If I go too heavy with the fur on my character he will be lost in the scene of fur, lol, but I definitely enjoy using Max fur so will be adding accents to Rexxar.

Thanks for the suggestion:).

Shrek is looking pretty damn scary these days. :slight_smile:

Here is the updated belt buckle with the requested teeth:).

Couple of notes about this item:

  1. The skull is meant to look like some sort of necro/vamp mage that had an enlarged forehead
  2. The slight “fleshy” feel to the skull is on purpose (especially around the teeth) where I think the bronze would “pool” when it was dipped - an actual skull would be much more crisp edged if it was dried out and not coated in a metal
  3. This is not meant to be human, but rather something that was once human many ages ago - not sure what would fit this category in WoW, but I suppose I am taking a bit of license here, heh
  4. The gash over the mouth where the teeth are missing would have knocked out those teeth which is why I did not place them - where the other two teeth are missing /shrug - I don’t know - maybe he just had bad hygene or they were knocked out after the buckle was made

Couple of notes about the buckle:

  1. I am going for an iron plate center with beaten bronze trim and accents
  2. The raised area around items is meant to be a sort of weld - I realize this is not how ancient welding looked, but I think it “sells” what I am trying to sell for how it is connected from the camera distance

On track to wrap this up tomorrow it looks like - wish me luck:).

Rexxar_Progress_45a.jpg

Attachments

Rexxar_Progress_45c.jpg

Rexxar_Progress_45d.jpg