ZBrushCentral

TUTORIAL: Projection Painting

Hi Brian, What’s happening is that you’re getting some pixels around the edge between black and color that are being antialiased by Photoshop. This results in pixels that are very close to – but not pure – black. As a result, they are visible.

I don’t have Photoshop in front of me at the moment to be able to tell you the settings you need to use to avoid this, but now that you’re aware of what the problem is you should probably be able to avoid it on your own.

Aurick,

Thanks for your quick reply. I figured it probably had to do with Photoshop’s anti-aliasing, however, I’ve searched everything I can in Photolshop’s help files and can’t find a way to keep it from anti-aliasing. It insists on creating those intermediate shades which of course leaves the non pure-black pixels.

I usually select the background with the wand and use the bucket tool, making sure any gradient or anti-aliasing or soft edge options are off and just use pure black and pour away. Sometimes you have to do it a time or two to get rid of the unwanted grays. if you create another layer underneath thats white and reduce visibility of the layer you are working on you can see if you need to pour again or if you took care of it.

Aminuts,

Your technique works great. I found the white layer underneath and reduced opacity especially helpful.

Thanks.

Brian

Hi Aurick,
I have recently tried your method but I think I am doing it wrongly, I cant figure out what I am doing wrong.
I am working on a human face model.
help.jpg

  1. I have inserted a black layer under the layer of the photo to represent the transparancy in photoshop and have saved the image as a psd.
  2. As you can see there are no black edge lines
  3. The model on which the texture will be painted.
  4. I used projection master with the rectangle tool and Zadd was set to zero.I have clicked on the transparent button in the texture pallete as requested in your tutorial. The texture for some reason has some black edge lines.
  5. After placing the texture on the model the way I want it and picking up the colour with projection master, the black lines are still there.

Please help

Aven though your background layer is black, that doesn’t change the fact that the edges of your photo are blurred. This then combines with the black background in the final PSD to create various shades of black. Even a shade that’s 1 point of difference from pure black is enough to keep it from being transparent.

In short, your original cut-out can have NO blurring. If you’re using the selection lasso to cut it out, that means that there can be no antialiasing or feathering. The slightest bit of transparency to the layer will blend with the background and create problems.

thanks for the reply. I did what you said and it worked, however I am having another problem. Is there a way to solve this?

help1.jpg

  1. I have used this texture in projection master to texture the front of the face.
  2. Used this texture for the side. 9this texture however was maped before the front texture.
  3. As you can see, the front texture is leaving that ugly seam.
    4.front view with the textures mapped.

Please, is there a way to fix this…
Thanks a lot.

Carlsden,

You might want to take a look at the help screens for Projection Master and read about how each of the options you check affect the applied texture when you “pickup” the model again.

To access the help screens after you start Projection Master press the question mark.

The specific problem you are having may be that you are checking the “shaded” box which captures the color, but also captures the illumination (light settings) and the resultant shadows.

Seriously, though, the best way to proceed with Projection Master (and ZBrush in general) is to take it upon yourself to read the built-in documentation and view the excellent built-in tutorials.

After that, you should download the ZBrush 2.0 Practical Manual (a .PDF file) and refer to it - often - as you delve further into ZBrush.

Sven

You also might have used different materials by accident. If you use the flat shader and drop and paint, later another shader and drop and paint, then the same texture will yield completely different lighting results. I hope you understand my gibberish… not enough coffee…
Lemo
:rolleyes:

yep looks like shaded was on. before going into pm make sure you turn quick off, go to tool>display properties and turn dsmooth to something other than 0.

go into pm and make sure that color and faded are the only two things turned on. Once in there make sure the flat material is loaded as well. then do your thing.

Guy’s, shaded was not on when using pm, and I didn’t use two different materials. Colour and faded were the only two checked. Thanks for replying but I still cant figure out whats wrong.

This time I turned on dsmooth to something other than 0 and I also loaded the flat meterial, but the result is the same.

Svengali- I have read and done some of the built-in tutorials and documentation, maybe not enough though.

If someone could still help me though, it would be great

Stupid question, but how many photos are you using?
Reason is that the first time I used zapp link I rotated the head
and used two different ( front and side shots ) for the texture.
Had lines exactly like this.Head was lighted differently when model turned.
Like I said, stupid question, but the results were similar.

I am using thee at the moment. one for the leftside, one for the right and one for the front. i first map the left and right and then the front.

Put a subject outsides against a brick wall.
Take a photo from the front.
Subject turns to side, take second shot.

In that period of time cloud passes over , light will be different
color, features modelled differently.

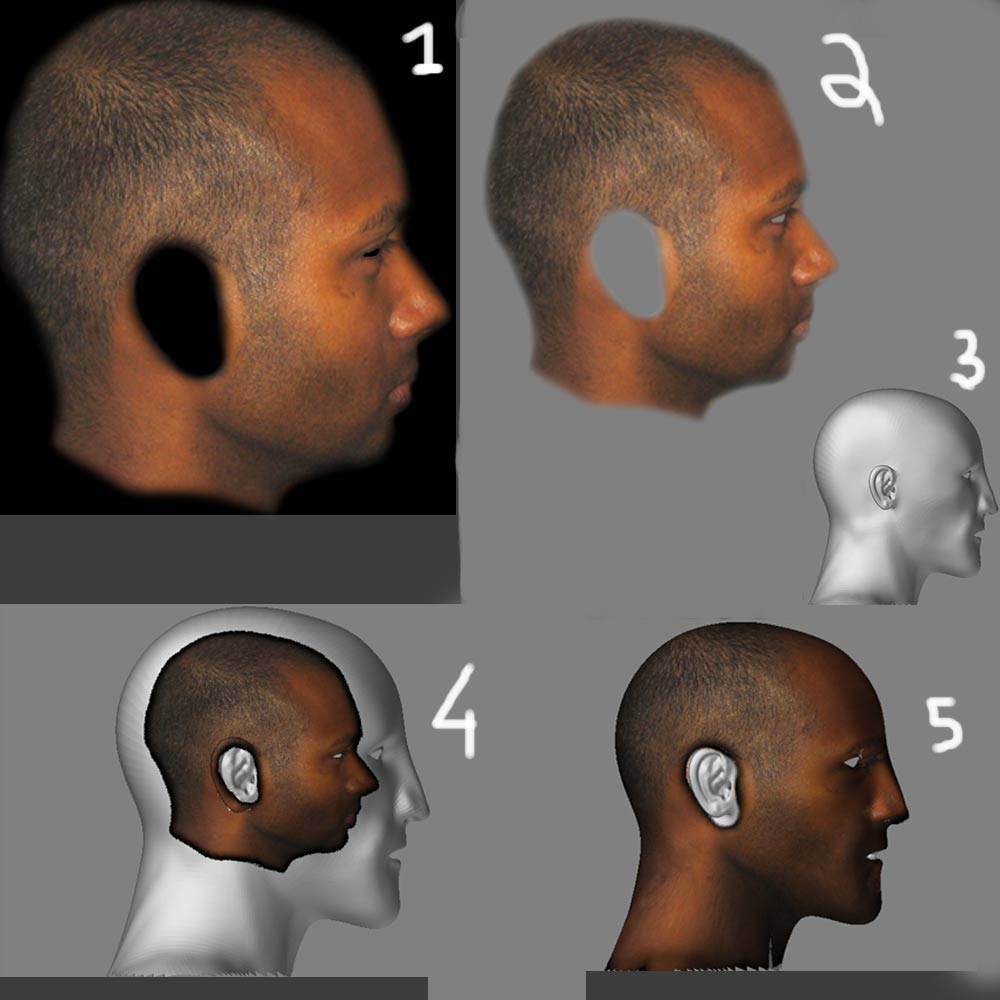
Zbrush: model faces front, you bring in frontal shot
for texture, drop it.

reposition model, bring in second shot for side drop it.

Allowing for the fact that you have aligned everything perfectly, when you
put the model back to the front with the texture on, there will be a marked
contrast between both sides of the face.
Pick the side you like, find the clone
brush and spend a peaceful few hours.
Or.
If important enough , reference phots must be taken in as much of a controlled environment as possible.
Ideal situation is take the photos with flash, upload ( while model waits)
to the computer.
If this is something for a work project,You must have an idea of what setting the model will be used for.
If your model will be posed in an outdoor environment you must take the shots or adjust for that, Otherwise composite problems result.
This is a lot more than you wanted to know, but I am too tired to delete.
Luck:lol:

Thanks a lot for that. This is actually for a project and the model will be posed outdoors.

you might find it easier to make a template from your uv’s in this case and use photoshop to place the pics on layers and fit them to the template and still have the option of blending them in together.

have you tried Antropus’ method as well…his second tutorial is in video form …see the one on top Kris Kosta. He shows another way of adding photo textures to a model they may help you get the results you desire and probably the easier method.

you could also try color correcting/blending your three textures in ps first so they will blend better using this method as well.

Suggestion, not as stupid as sounds.
Take all the reference photos at the same time.
Associate, who should know better, was taking photos to use
as reference on a project (outside)
Took selected group about 7:00 am.
At the end of the day ( about 3:00pm) remembered a vantage point
he did not do. Took the shot.
Colors totally different, matching was a bitch.
Can be corrected in Photoshop( aftereffects also) but was not
as good.
Not too bad if live model is a friend and works for free, or you
are 5 minutes from location.
Otherwise…
Best of luck

Using the images you posted, I tried a quicky color correction on the front view juxtaposed to the side view. Maybe something like that and a bit of clone-brush along the edges will get you closer to what you want?

Sven

Attachments

PSadjusted bright-contrast.jpg

Svengali and all the rest. I appreciate all the replies from you guys. Svengali, I will try the colour correction. Did you use photoshop for that. I too had tried using photoshop CS for the colour correccion but for some reason the image was as I have posted earlier. The way I did it was:
a) open the source image
b) open the image that has to be corrected
c) in the opend image that has to be corrected, click on IMAGE, ADJUSTMENTS, MATCH COLOUR and then by clicking on source select the source image.

Yours however looks much better than mine. how did you get the colours to match so close?

Carlsden,

Each view is on a seperate layer using PS6. Selecting the front view layer, I just used the Adjustment:small_orange_diamond:
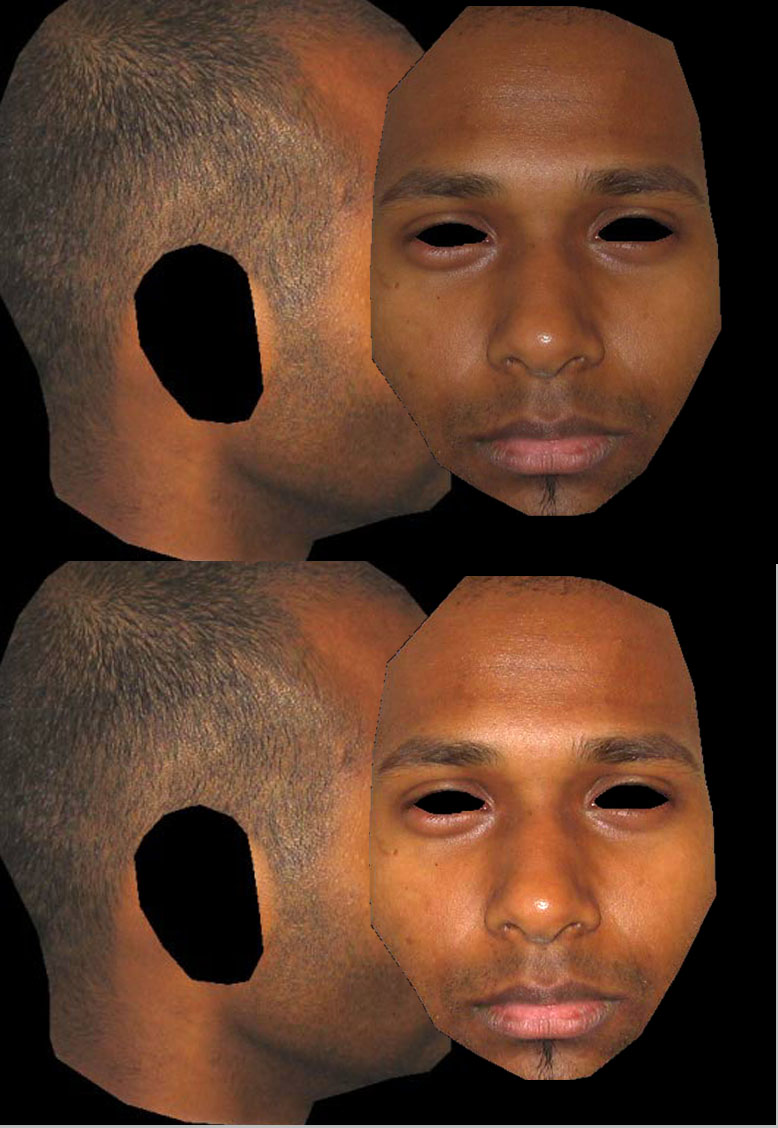
Brightness/Contrast sliders to bring the front view color values up to match the sideview levels. No hue shifts, nothing else.

Sven