very good stuff !!
:)
very good stuff !!
:)
Now on to finishing the color maps.
I’ll upload more pics. soon!
Peace,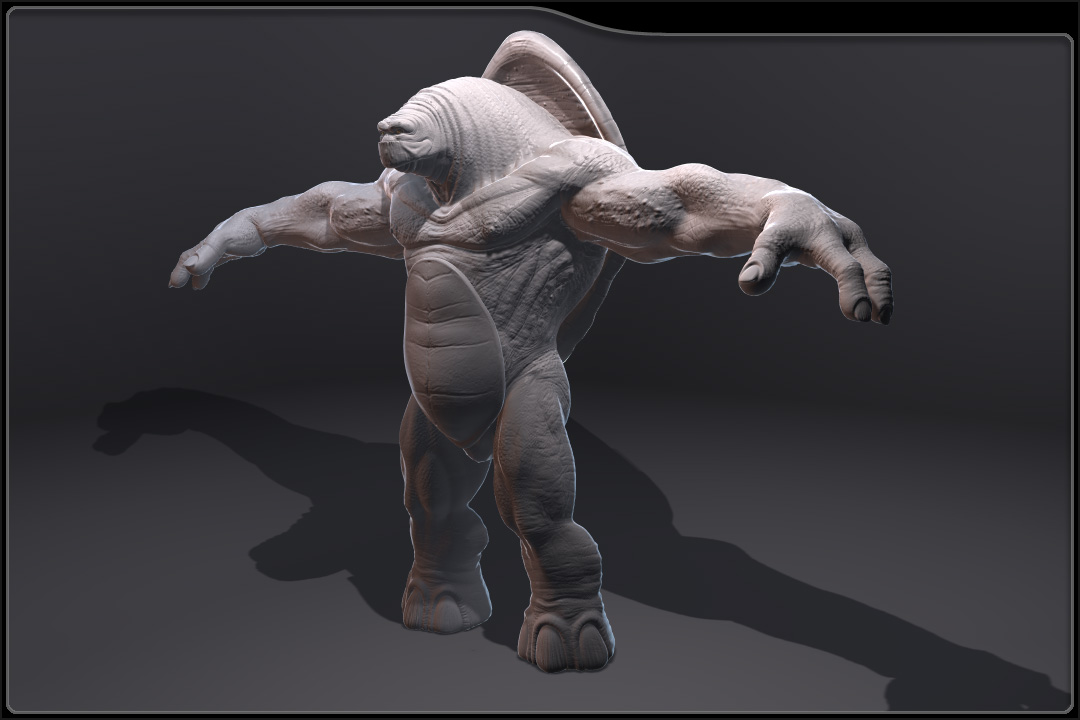
Really did well here. I can’t wait to see some colour…good work 
Excellent detailing and character concept here, Nick
Really like what you’ve achieved so far with this guy!
How’s the ‘backplate’ of his shell looking BTW? And will you be rendering some
subtle SSS effects in Maya on his shell and finger/toenails too  ?
?
Chris
lol how much is it ? 10mln polys !?!?
Mattybyng - Thanks! I’m working on the color now.
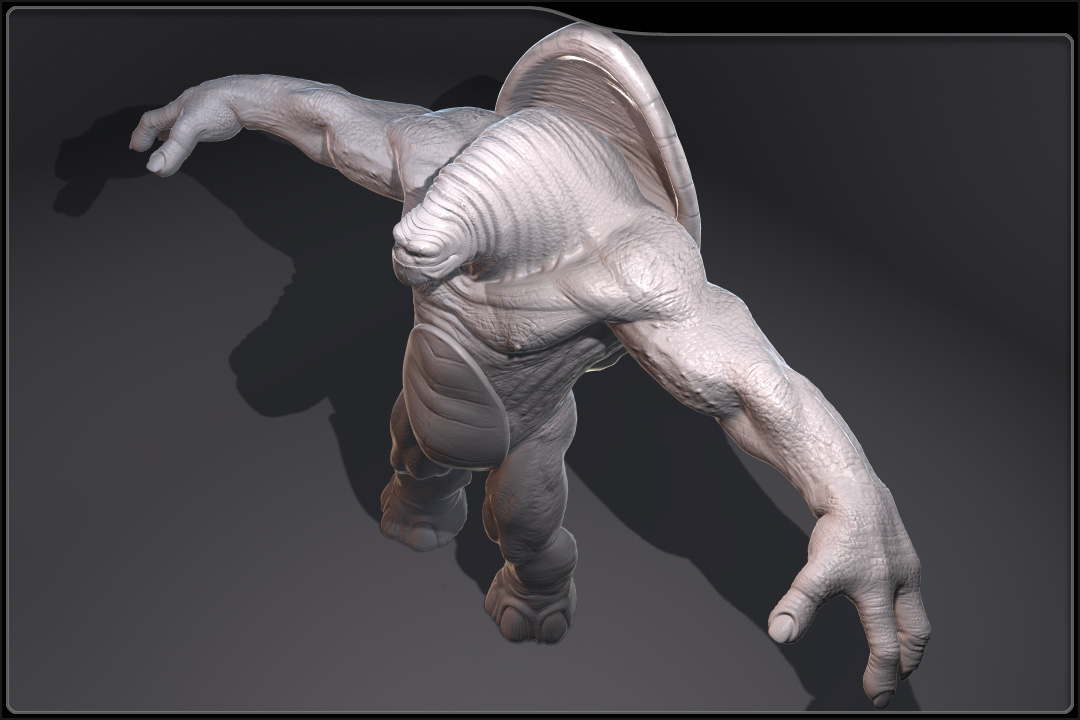
Atwooki - Thanks! I’ll post a back shot for you on the bottom of this post.
I doubt there will be SSS effects on this guy. I’m using Maya’s default rendering engine. I might be able to fake something with translucency. I haven’t tried it out yet though.
Your character is looks very cool by the way! I like the skin and the style of the character.
MattHHH - 
Slocik - He is currently 300,000 + polys. He has one 4096 X 4096 RGB map for the body and the front shell that holds in the red channel the diffuse map, green channel holds the spec map, and blue channel holds the bump map.
There is also a 2048 X 2048 RGB map for the back shell that holds in the red channel the diffuse map, green channel holds the spec map, and blue channel holds the bump map.
When I’m finished with the color maps there will be one 4096 X 4096 RGB map for the body/front shell and one 2048 X 2048 RGB map for the back shell.
“i wanna be like you when i griow up”  haha damn i being a beginner sucks
Great Job mate !
How do you create a RGB map as you’ve done?
And why creating it that way instead of creating 3 separate maps?
Another qüestion
For really high res models do you recommend using one color map for all the model? or using several? Using several may cause some problems working with zbrush, don’t you think?
Thanks! bye!
Cool work 
Pilou
how long have you been working on this?
Cool sculpt.
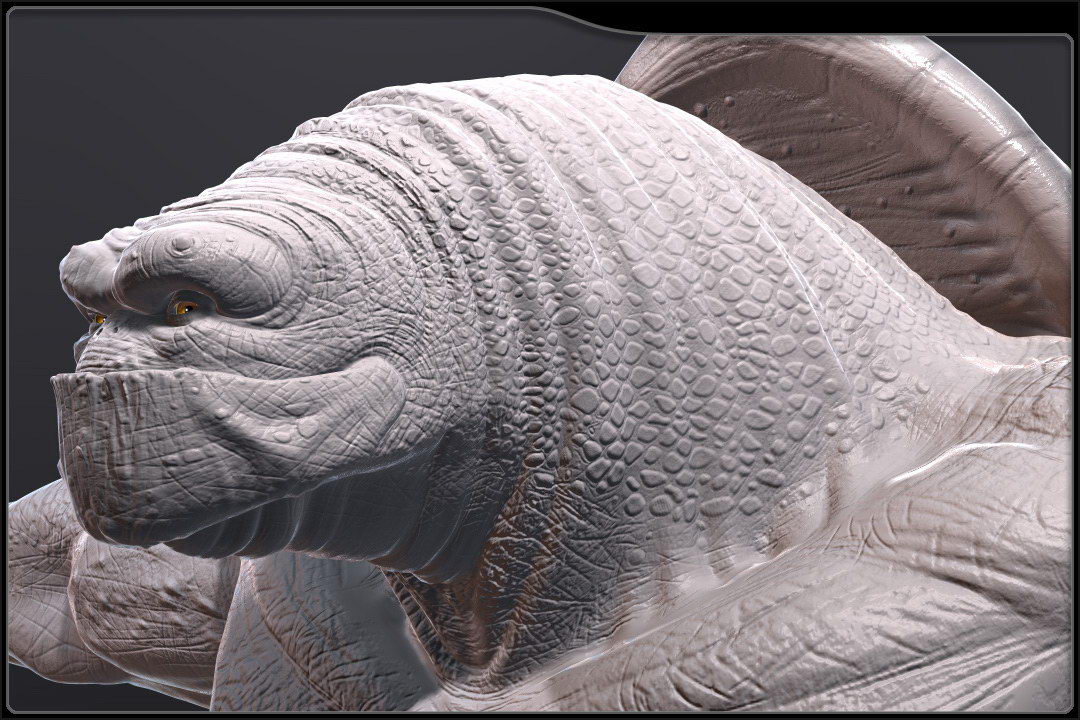
I’m being a tad picky but i think the cuticle on the thumb needs some work. The nail should seem to grow from under the cuticle not be seamless with it.
Slocik - don’t be discouraged. Everything is difficult in the beginning for most people. I’m sure there are a few lucky people out there that everything they make is perfect the first time around. For me it has just been a lot of dedication, hard work and as of late… a lot of fun. Keep going and ask a lot of questions. Do a search for skycastle. I have learned so much from his post. He was very cool and answered a lot of questions of me and many others on these forums. (Thanks for the help Dave)
Macaco - To create my RGB maps, I first paint a bump map in ZBrush using the bumpViewerMat. I export that to PhotoShop. I then dupe this map 2 times and put them into 3 layers and tweak the top 2. I turn the top map into a Duffuse map. (Mostly white and darker for cracks and whatnot where not much light would sink in.) Then I turn the middle map into the spec map. (mostly black with lighter shades of white for the scales and bumpy skin.) Then I leave the bottom map as my bump.
Now I have my 3 channels ready to copy into one map. I then make a layer on the very top stack and fill it with a 50 percent grey (this color doesn’t matter.) I rename this to DSB (DIFFUSE,SPEC,BUMP)
I then hide everything except the diffuse layer that I built. Copy this layer, show the DSB map and select it, now go into the channels select the red channel and past this map in.
I then hide everything except the spec layer that I built. Copy this layer, show the DSB map and select it, now go into the channels select the green channel and past this map in.
I then hide everything except the bump layer that I built. Copy this layer, show the DSB map and select it, now go into the channels select the blue channel and past this map in.
You should end up with a funky looking map. It will make sense only when you look at the R,G and B channels one at a time.
Now you can export/save this map as the file format of your choice. I always use TGA. They seem to give me the least trouble.
Once I bring this map into Maya I connect the individual channels into the slots I want to use them for. My shader ends up looking like this:
The reason I’m doing this is because I want only 1 Photo Shop file to deal with. (I just put everything into layer sets.) In Maya, for the body and the front shell I only have one map to deal with for the Diffuse, Bump and Spec. In the end I will have another RGB map for the color and if I want to fake any SSS type effect with translucency I will put that into the alpha of that map.
This also cuts down on the file size of my texture maps. I could separate them out into individual maps and make them all grayscale (which seems like a little more work) save them out and then load them one at a time in Maya.
There is also the issue of if these were separated into a bunch of maps, for each map I would need a 2dBump node in Maya to control the bump intensity of each map, which in my case I need them all to be the same value, because I painted them that way in ZBrush.
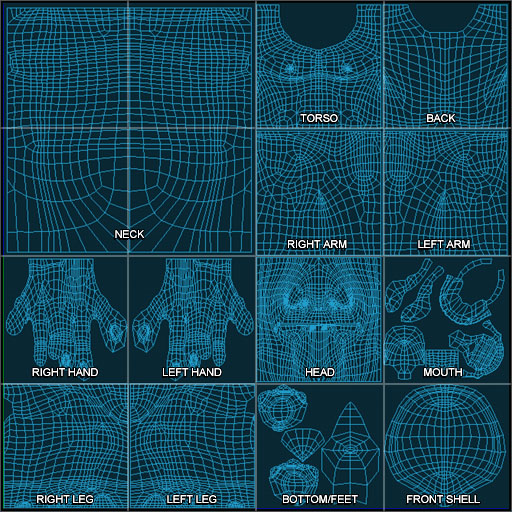
At first I was trying to do this thing (head, L arm, R arm, neck, torso, back ect.) one section at a time which was nice because of the speed factor but I was having a lot of trouble getting rid of the seams in-between the 2 pieces.
I also found out that I needed to re-layout my UV to utilize as much of my UV space as possible.
Here is my final UV layout:
This helped reduce seams. If possible I tried to make the pieces tile into another piece pixel for pixel. This helped reduce seams.
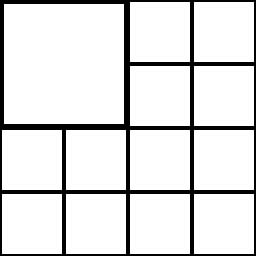
If you could blow this picture of my UV’s up to a larger size you would see that I put a buffer zone around each one of my shells. I did this by making a lower res image in PhotoSHop that looked like this:
I then used this map in Maya to put each one of my UV shell into. I turned on the “snap to pixel option” so I was able to get everything to line up pixel perfect. (this should help out with filtering of the textures.)
At first I was trying to have each UV shell bud right up to one another but it was causing the map to fight with it’s self and causing seams, very slight but they were there never the less.
So yes, YES, YES, please learn from my pain. Put everything on one map and be smart about the way that you lay your model out when you go to do your final detail.
The next creature/character I do I will be more loose in the beginning stages to get the look and proportions laid out and then I will resurface, get anal about topology layout and UV layout and then go crazy on the detail stage.
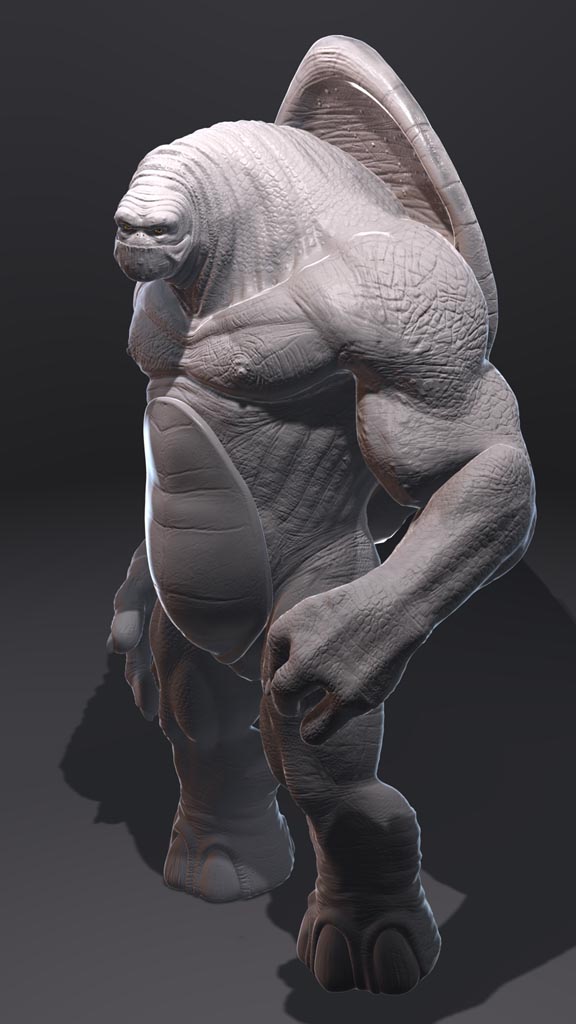
noshadowmaster- a little over 2 years now. (I’m not sure how many actual man hours I’ve spent on him. If I knew the exact amount I might cry!) Here is what it has started from.
I’ve stated in the past that, If I’m not happy with something I’ve done then I’ve gone back a redone the work. I think this is like the 3rd time I’ve done major revisions to this guy to get the look I’m going for. You know what they say…3rd times a charm. Here lately I haven’t hit too many technical snags and it has been a lot of fun just painting away. You really can get lost in the details in this package. (next project I’m going to try to hit things looking at the character as whole first ,then do a mid level pass and then go in and do the fine detail pass. It kind of felt like I painted this thing looking through a magnifying glass. We’ll have to see how that plays out!)
Thanks again for the cool comments guys and gals,
NickZ. 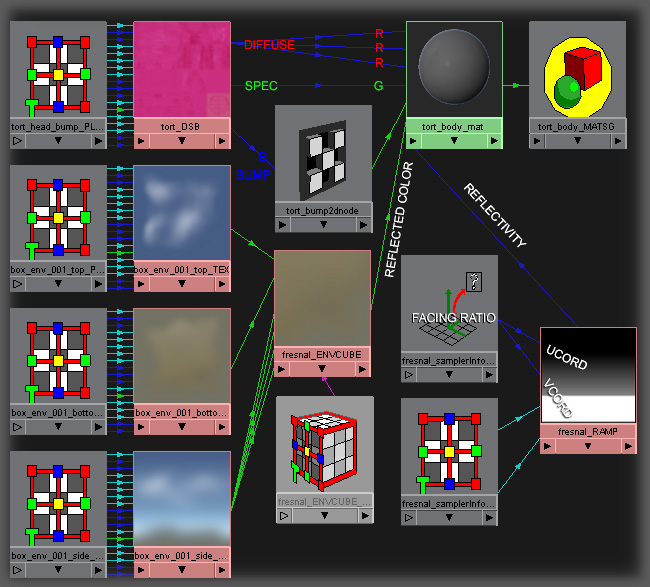
Skello - Your right… it kinda sticks out like a sore thumb. (sorry I just couldn’t resist) I’ll work on it,
Thanks for the pointer (no pun intended. I must be slap happy)
NickZ.
Who’s that DRUNK MAN who had gaved 4 stars to this work!?
That’s right.The rating is not important but this isn’t a GOOD WORK!!
For me the right rating is…5 STARS!!!
WANNA LOOK?
MattHHH

Hola Nick,
Great stuff, It’s nice to see that you’re always keeping up with your 3D skills. BTW, did you use a mask for any of those wrinkles around the head? They’re pretty nice wither way
Later dude,
MiKi_Prime
lovely job mate
Finally getting some time to start adding weighting to my model. About 50% done right now.
Still working on the lower body.
Peace,
NickZ. 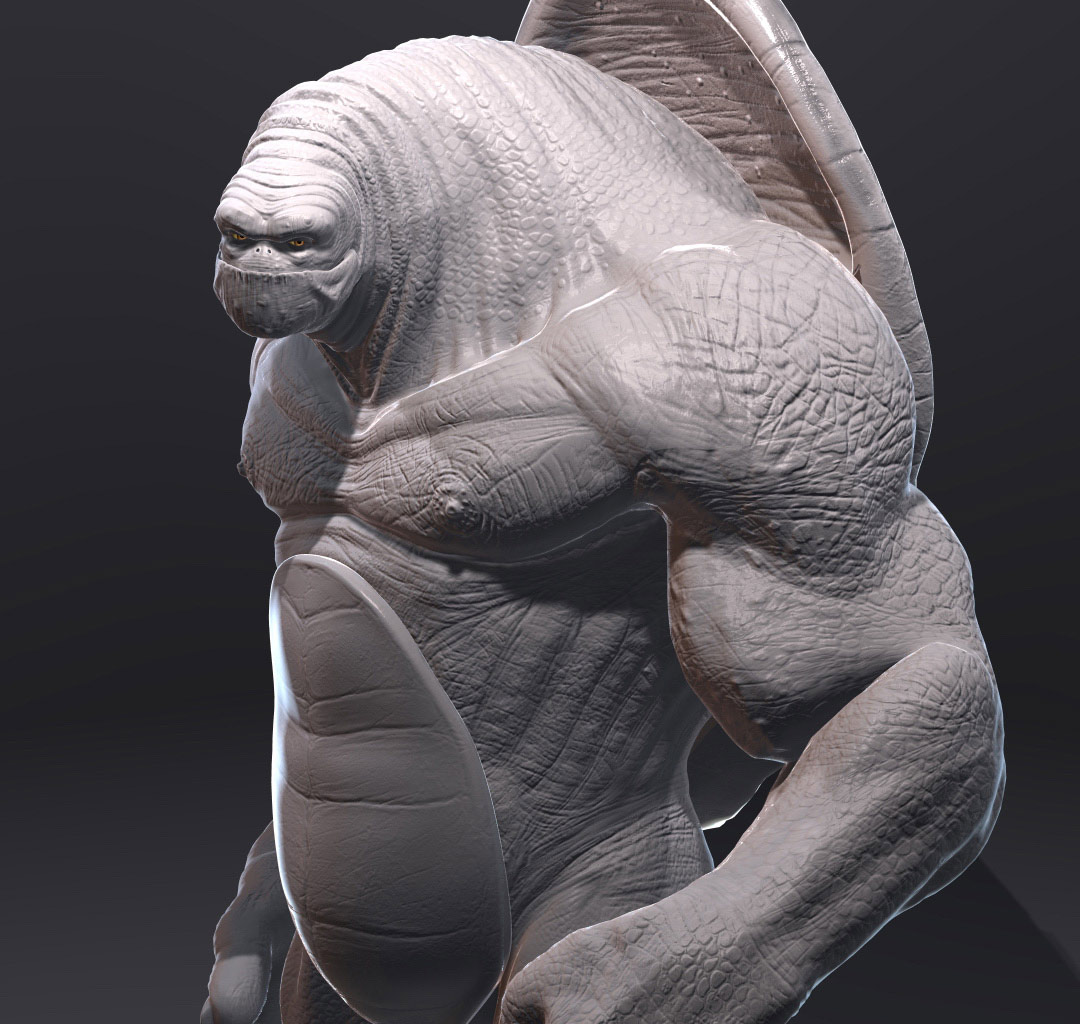
hey Nick.
Beautiful design, wonderful modeling, texture, everything!!..
please tell me how do you get that beautiful render, with that lights, etc.
what settings do you use in your render to obtain this wonderful set of lights and atmosphere??!!
Nick very nice modeling! Im feeling your style!! Good work! It would be nice to make a nice sculpture or maquette out of this character. One thing about the texture of your character, is that you can blend those textures specialy the ones from the neck with the other ones around his body.
Your work inspire me a lot, specialy me that i like to make scultures and maquette with sculpey and the way you detail helps me out the way i can detail on the sculture. Thx for sharing your work!
Javi.