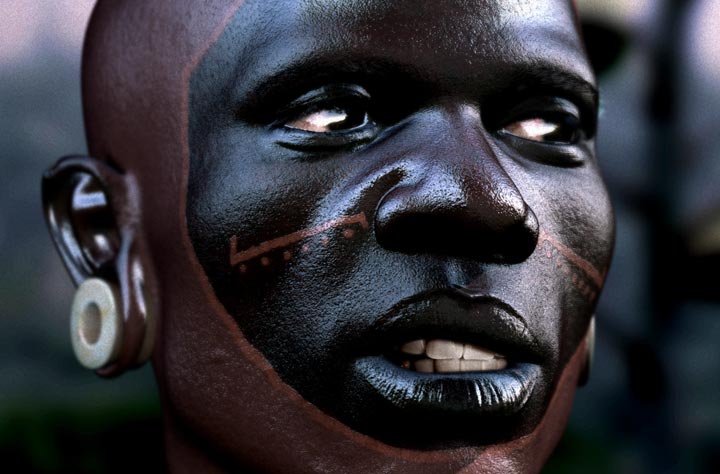
The Samburu Warrior’s and most african skin is fairly oilly especially in hot fairly humid areas.

just looked at the .mov Amazing work!
what is the key menu maker01? will you add a link?
that’s Chris’s plugin, which we will make no further mention of on this post.
Nor am I foolish enough to believe or suggest otherwise. But, since your plugin had been touted on this forum before as something that will dramatically increase one’s productivity in ZBrush, I’m sure you can understand why I (as well as plenty of other ZBrushers, I’d imagine) might be quite interested in knowing something more concrete about it instead of the vague tidbits that have been sprinkled on this forum over the past year.
Apologies to William Lambeth for not complimenting his top-notch work in my previous post, but, quite honestly, I assumed his posting was at least partly intended to rekindle some interest in your plugin (otherwise, why mention it and feature it so prominently in the screencap?), so that’s why I asked about it.
Sorry about that; didn’t mean to ruffle anyone’s feathers… But expecting people not to inquire about your plugin after one of your beta testers posts some impressive work and goes out of his way to mention how it “greatly helped” his project… That’s a bit like waving a juicy steak in front of a dog and expecting him not to chase after it, don’t you think?
this is absolutly amazing. totally photo realistic.
one of the best things I have seen on this board.
excellent all around work!
Whats that “KeyMenuMaker”?
is a shorcut customizer??
absolutely amazing work! I think the skin looks great (he is probably in the desert??? you sweat a lot there )
my only question would be: what is the “weight map bump” and “zbump” workflow? Can you mention any tutorials that might shed some light on these features? Also, are you generating 8k textures to get that level of detail, and if so, how do you do that and keep your computer from barfing (i.e. crashing) 
my only crit would be that the ear looks a little less finished. even though it’s blurred, you can tell that it’s not quite done. if you don’t want to model it further, I might knock it back a little in value.
otherwise, absolutely awesome! 5 stars all the way! You have my respect!
Mike
Nice! Very NICE:D Thanks for sharing. Very inspirational. Looking forward to your website launch.
just stunning, I’m drooling with envy at your skills. I just wish I could afford XSI 
Top Row without a doubt.
Hey, nice work.
My only crit is the micro bump needs work.
It’s causing some major noise on the skin.
The shinny quality or oiliness doesn’t bother me.
I’ve met people with extremely oily skin.
What could have been interesting is adjusting that over the makeup.
So that you had to tonalities, maybe an area a little mat vs. the entire
thing being even.
Either way, nice job.
Cheers
Cesar Dacol Jr.
Aka, The Voodoo Monkey
Nice work, Big Bucks.
And nice work with skinning the verts.
voodoo, I think the noise is on the video compression overall…background
seems to have it too.
anyhow, cheers.
rookie-z
Thank you all for the kind comments. I appreciate it!
@wombal: My idea was to control the general facial movements with Stetchy Bones and then fine tune with corrective morphs. I did spend some time with the weightmap getting the verts to move how I wanted. Sorry for the crude animation… I don’t claim to be an animator, but I like to see my models move. The render time was something like 10 minutes a frame…don’t know for sure. It was painfully slow when tweaking settings though. I will get a lowres up soon.
@Chris: I can only wish!
@jit_gohil: I went back and forth about the shiny skin. Some of my reference was this shiny while most was not. I think to push the realism I should have chose less dramatic lighting.
@solomon: Cool! have you seen any tribes?.. That would be amazing. Sorry, but I’m sick of this guy so I guess you can let me know what “haba haba!!! Aluta contunua!!!” means next time.
@crossbones: Hey thanks for the defense, but I’m sure you can see his point. It all depends on the condition of the skin and the light bouncing off it.
@mikemadruger: Basically I am using a very fine bump map 6k to diffuse my reflections (I did have some barfing issues):D. The weight map was used to control how this fine bump was applied to the model. Areas with more bump looked more dry and areas with less bump more wet (at least that was my intention).
@voodomonkey: I couldn’t agree with you more about the micro bump. This problem was not apparent until my animation tests and I never found a solution. I thought maybe a motion blur or something would fix it, but I couldn’t stand the render times. You are also right about the paint. That would help out a lot.
Thanks again for the kind words
I’m on to the next project. This one is hard to look at now for me. I’m just plain sick of it, but glad to hear the response from fresh eyes.
William
I was going to ask a question… but now my brain hurts, everything I do in XSI looks like crap… Great work, very inspiring… okay, XSI gets one more chance!
PATTON
Hey wiliams … your work looks great…
can you tell me what is “KeyMenuMaker” in your screenshot?
Thanks in advance.
Re: the skin
It also depends on what’s in the air as well to make pores react the way they do when it comes to oily skin. It was a defense for a perfect piece.
Let’s see this thing get in the gallery.
And do you happen to have a lower resolution version for the web? The resolution is larger than my monitor can handle.
Here ya go!
 insane
Much nicer! Amazing and it does deserve to be in the gallery imo. This is movie quality work, a great replacement for an actor.
Now that is through, what’s a stretchy bone?
Also I notice you had plugin for a light diffusion map. What would a map like this look like? I would think it may eliminate the need for sss, or at least not as reliant on it.
beautiful work.
Stunning work, very inspiring. Any chance of seeing a picture of the rendertree? I’ve been working on trying to get good skin and you sure seem to know what you are doing
@Womball: A stretch bone is basically what it sounds like: a bone in a rig that’s length can change. You do it in XSI by setting an expression for the length such as
:
ctr_dist ( x. , y. )
where x and y are the points that the bone is stretched between. I often put an implicit cube at each point and have them parented to an appropriate bone in the rig. So ‘x’ would be something like 'cubeA’and y would be ‘cubeB’. Then you just put a position constraint of the root and effector of the bone to the appropriate cube.
Hope that made sense.