Ok, I didn’t notice the “layer shift” zscript on first page, I’ve downloaded and tried that, and that works perfectly. Same end result! Still not sure why the tilde key doesn’t work, but at least I can get the texture to ofset using this script. Thanks Ryan for that script.
the ~-key refuses to work ;( …german keyboard here…
Same here!
Japanese keyboard.
Could we have some hotkey standardisation please?
Cheers,
R
For UK keyboards, hold down the @’ key and click’n’move your mouse or pen.
Fantastic! They like the video! (he says to himself.) 
First, the tilde key is different in different countries. Can people post what the tilde key is in their country? As Frenchy mentioned the “~” is the “=” in France. In America, I just press the “~” key. I don’t press shift with it.
Frenchy - With 11,479 posts I am sure you have far outstripped me in tutorials!  It is really cool, though, to think of how long these tools have been useful.
Plakkie - I am glad the vids work for ya. My goal is to show much more than just a tool but to provide the context in which that tool is useful to us as artists. Thanks for your kind words.
Froyd - always something to learn!
Digital Dreamer - Did you try not pressing Shift? If it still doesn’t work the script should at least give you enough functionality.
Rory_L and giZMo^fr - I am afraid that keyboard standardization is not withing Pixologic’s powers. You might have to go higher up. Bill? Are you there, Bill? In the mean time, use what the wiki gave us!
http://en.wikipedia.org/wiki/Keyboard_layout
I can’t wait to see abunch of rendered environments done in ZBrush now! 
Ryan
This thread is where many international users have contributed the key that their international keyboards use in place of the tilde.
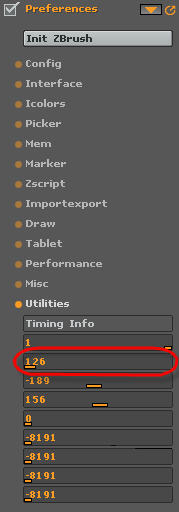
If you can’t find yours listed, you can still discover what key your keyboard uses. Open the Preferences palette and look at the second slider in the Utilities menu. Press your keyboard keys one at a time until the number 126 appears in the slider as shown. That’s the key that your keyboard uses in place of the tilde.
[ ](javascript:zb_insimg(‘31857’,‘tildeImage.jpg’,1,0))
ryan, the problem with the german keyboard in this case is that ~ is not a single keypress but [Alt Gr]+[+]…i have similar problems in xsi… ;( …in moments like this i want the good old time back where every computer in the world featured the same keyboard layout. no freakin localisations and such…sigh 
anyway, much more important than my whining: thanks for your cool tutorials! they really kick ass!
greetings, giZMo^farbrausch
Cmon, I bought a cheap US keyboard. The end of the problems…
After a while even the mental problems ease 8-))))))).
Lemo Tastatur Organist
guess how much i am interested in carrying an us-keyboard next to my inspiron
btw. thank you aurick, “ö” does the trick!
Duct Tape… 
Hey
nice tutorial - easy to follow the flow!
just at the right time…thx alot…
i am modelling in sketchup alot - probably
not the only one…i got some issues when
i tried combine sketchup and zbrush.
would be awsome to see a tut about that
subject!
thx mate
ooooooooooooh aurick!!!
you saved my life!! Finally I found the german mac keyboard tilde. It is the
>
> key down left. Now I can begin creating tilable textures and amaze the girls in the disco with that feature. ;))
a big thank!! let me call you dad, please.
muchas gracias!!!
the xbucket
Aurick, that’s pure wizardry man, how do you know such things? This thread is learning me things about Zbrush I never knew
This sounds cool. I haven’t played with sketchup yet. If you get something working I would love it if you posted a tutorial on it.
r
I haven’t brought this great tut to a good end yet. Apparently I do not understand fully the workings of the different layers. Does the order in which the layers are make a difference? Do you have to merge the layers in a specific order? Here is my problem in full:
I’m working on a brick wall (should have been a meason ;)) and I have a layer with a tilable texture (got that right), a second layer with some bricks just like in the tut, and a third layer (the last one) with some bumped grout, again just like in the tut. But when I merge the grout and brick layers, and got them covered in the color from the first layer, and try to ‘grabdoc’ the alpha, it only makes one of the bricks, so a few white bricks and for the rest all black. So the grout isn’t included in the alpha I make. Looking at the vid (with a magnifying glass) I see that Ryan gets also grout in the alpha, and I would like that too…
Anyone know what I did wrong? The winner gets his weight in bricks! (grout not included)
The order of the layers in the Layer palette does not matter. Their position in Z can. In this case, it doesn’t seem like that is the problem. One thing to keep in mind when you are merging layers is that you need to have MRGB and ZAdd selected in the shelf and have the intensity settings up to 100. This is important.
The other thing to look at is if you placed all the bricks in their own layer. Sometimes, it is easy to accidentally place them in the same layer as the texture. check the thumbnail for the texture in the layer palette and see if it shows dropped bricks there.
Another thing to do is to just go and turn the visibility off for various layers to see what is in it. Click the orange triangle at the upper left of the layer thumbnail to turn it off. Click it again to turn it back on.
Best,
Ryan
Thanks for the quick reply! I’m very new still to Zbrush, and questions arise at each action… I merged with Zadd and MRGB at 100%, but that didn’t do the
trick alas. I made some big bumps in the grout area and they did show up in the alpha-grab, so I guess my grout layer is to far away on the Z-axis to show up on the alpha? I just made that grout layer by pressing color > fill and than adding some detail. Was that the correct way?
Oh well, right now it’s 1:51 AM down here, so I’d better get some sleap and try again tomorrow. Can’t wait, happy pixeling indeed :D.
1:57 AM… maybe if I just tinkered a bit more… Made the grout layer from scratch, making sure I put in a -2 in the picker menu, placed the grout layer closer to the front of the bricks, merged the layers in the correct way, and…
bingo! Few! An alpha with bricks, grout and background. I guess my old grout layer was to far away from the brick-surface to show up. One small step for a 3D artist, but a giant leap for this Zbrush-learner.
And now, in stead of Zbrush, I’m going to ZZZZZZzzzzzzzzzzzzz…
Feeling guilty for my sour mail. I should first have said, Thankyou! for these tutorials. So many other 3D packages produce skimpy tuts and help files which seem to be Babelfish translations of machine code! I’m impressed by the comprehensive and continuing nature of the ZB help material.
The tilde discussion has given me hope, though I won’t be able to resume my hunt for its Japanese equivalent till I get back from Golden Week. I’ll let you all know what it is when I do!
Cheers,
R
Thanks Moochie, works like a charm now, I just press down the @ key and click and drag. Now I know my keyboard is not faulty.
Aurick: just like you said, the number 126 shows up when I press the @ key. Hip hip horay! Thanks everyone most helpful as always.