The bike is unreal!
Very nice hard surface work!
I need to put in more hours with shadowbox. This is just great.
Keep it up, man
Corey
The bike is unreal!
Very nice hard surface work!
I need to put in more hours with shadowbox. This is just great.
Keep it up, man
Corey
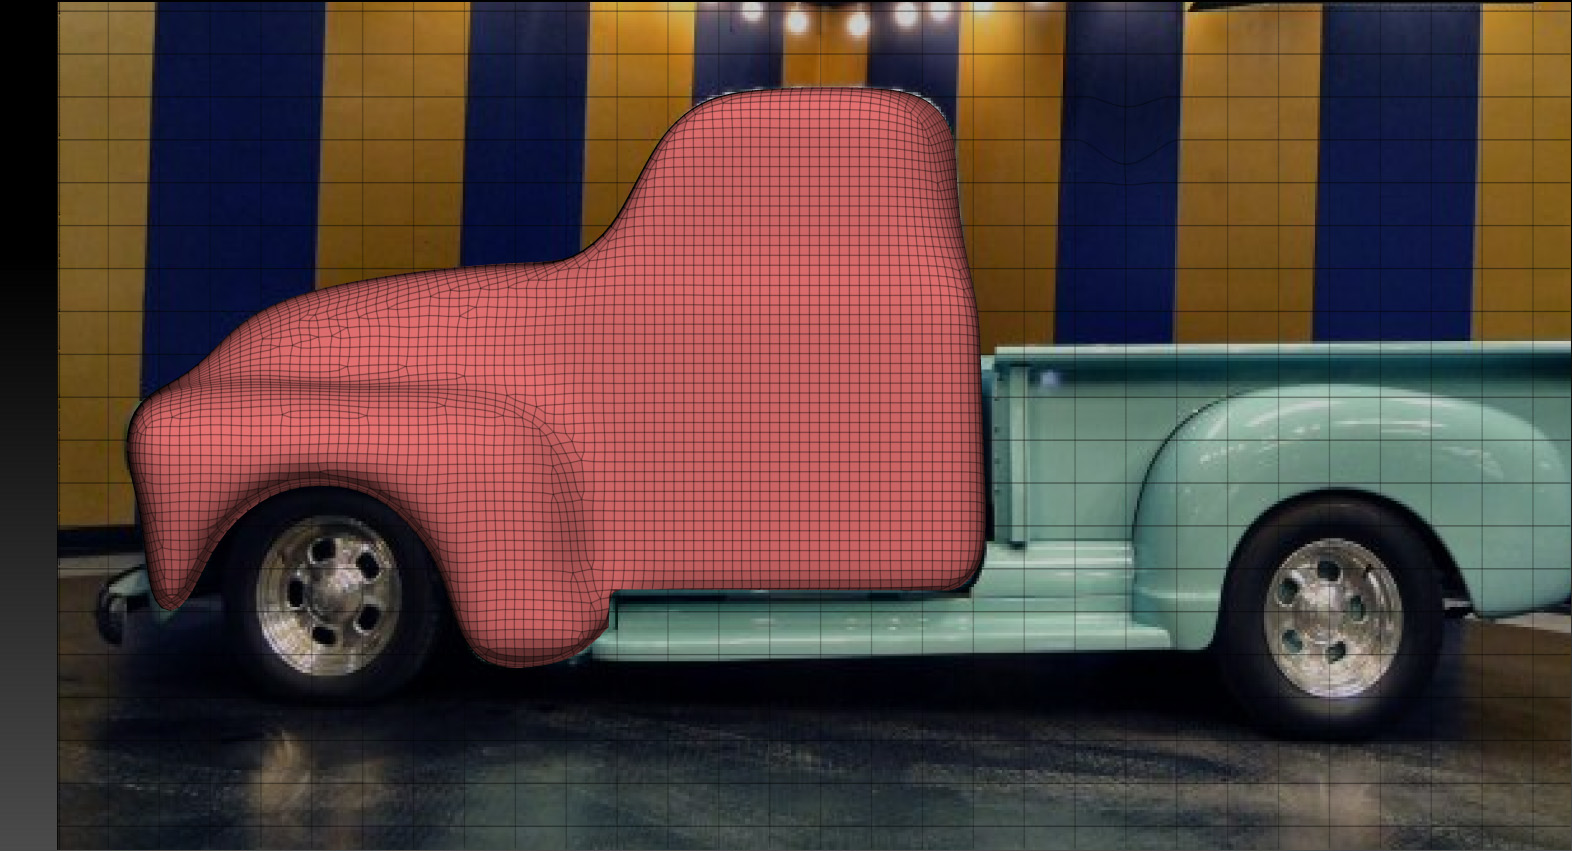
Well, I’ve been out working for the last 9 months and this is my 1st real opportunity to play with Zbrush since the 4R2 release. So I thought I’d try to build a car, well actually a 1954 Chevy, 5 window PU truck. So here’s the beginning made from an extraction off of a plane and then sculpted using mostly masking, deformation tools, Dynamesh and a small bit of smoothing so far. I know the Dynamesh is old news for you folks but, wow, what a cool new tool. Can’t wait to try some of the other new features in Z. So fun to be able to play in Z again.
I have been able to peruse the forum while I’ve been out. You people are amazing. Such a prolific group of great artists that hang out here. Real inspiration for us that aren’t really artists but do love to play with CG. Thanks for showing your work everyone.
Ezra
Hey great start on the 54 Chevy. I’m looking forward to seeing the progress.
Dave
Hi Ezra52, I am going to keep an eye on you. You seem to have this hard surface thing down. I want to see how YOUR vehicle turns out and the process you take. I have been battling mine for over a year (looking to finish it FINALLY this week). Best.
I’m curious too…
bike looks very good
hi ezra,
nice start!  do you only use side-reference?
looking forward to see it’s progress!
your bike looks awesome!
btw. do you use “my” interface? XD its a pleasure to see people using the stuff i am sharing.
best regards
jan
Hey Dragon, B2 & Wethand - thanks for looking and the compliments on the bike. Just trying to shake some of the rust off after not getting to use the program for the last 9 months and enjoying playing with some of the new 4R2 stuff. Very cool. Pixolator sure treats us well doesn’t he?
Wethand, I think that I am using your interface and loving it. Superb layout and like the coloring. Thanks for putting it out for us here in the community. I’m just using the side reference for now but I’ll find something to look at when I do the front grill etc.
Dragon, I’m anxious to see your car. I know you’ve put a lot of time, thought and effort into it.
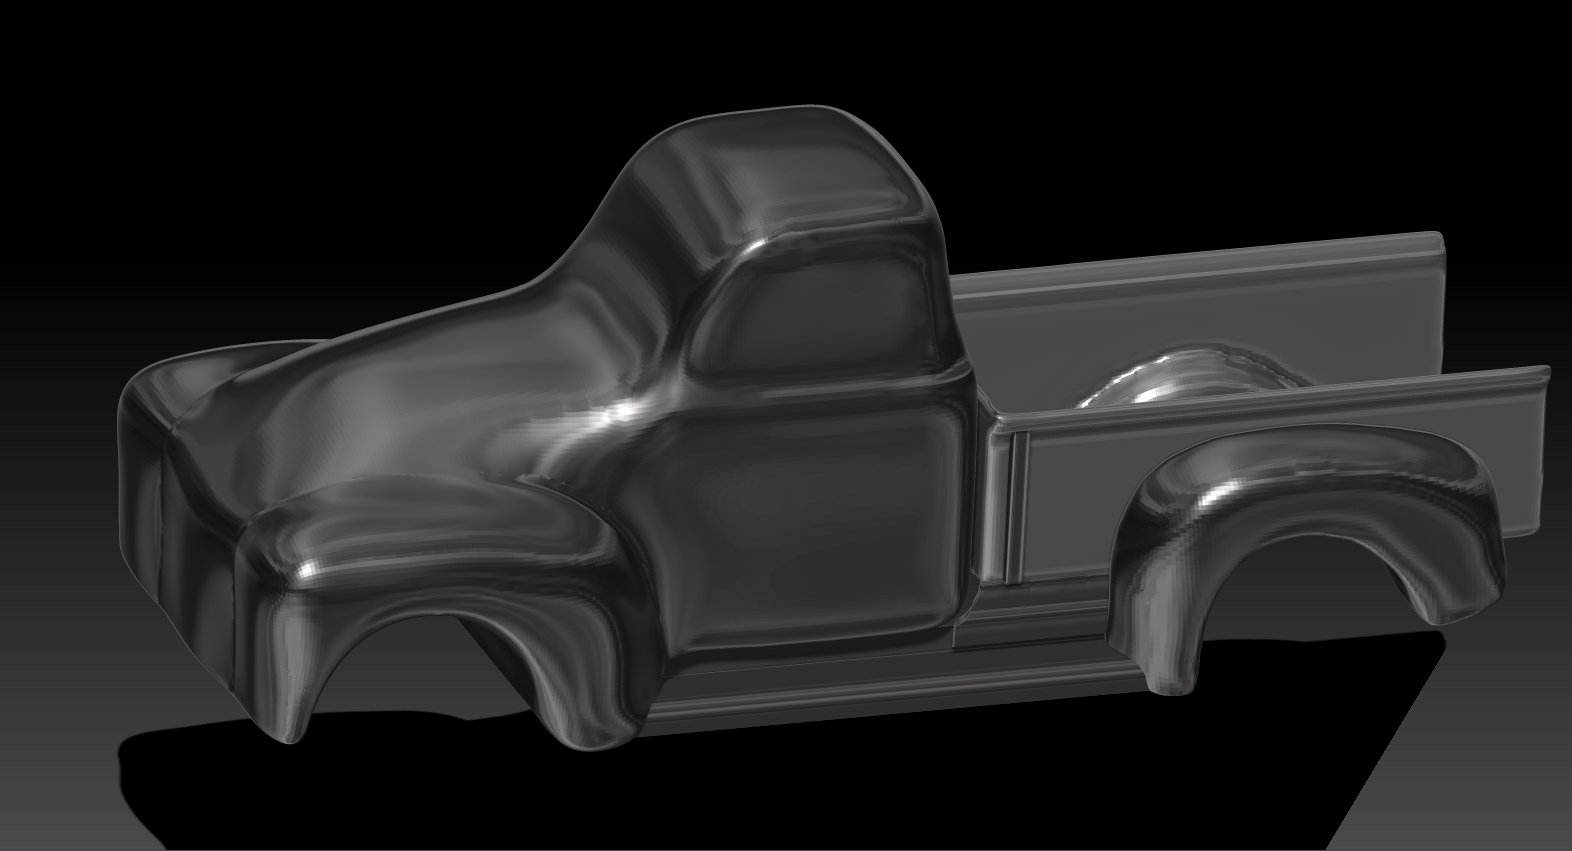
Still just blocking out the main shapes and getting the silhouette down.
Hi Ezra52, first, thanks for visiting and commenting at my post with the HotRod. I really like how quickly your moving along on your truck. It’s turning out real nice. Are you looking to HotRod it as well? Or you going for that good ol classic look? Can you elaborate on how you made the bed and running board? Or too early in the process to explain just yet (you’d rather get some more done before you get into explaining some things?) Cause they look real ‘good/sharp’ arleady at the stage you have them. Best on this cool looking truck.
 going too do wooden bed floor planks ?
Hey Dragon, when I made the bed there was some experimenting involved. I started by just clipping the inside of a simple cube out but the polies on the inside were stretched. I tried dynameshing that but it caused unacceptable deformations. I finally made the inside surface a separate polygroup and then deleted it leaving only the exterior surface (basically a plane formed in the shape of the truck bed. I then ‘masked all’ and extracted with both smooths set at 0 and the thickness set at .002, if I remember correctly. This created a really nice tool in the shape of the truck bed but with about 30,000 polies. I then added and positioned cubes for the angled top flanges, inflated the top/exterior edges and then merged down in the subtool inventory it join all. The new subtool looked right for the bed then but was poly heavy so I dynameshed it at 128, effectively dividing the poly count in half. There are probably much more elegant ways to get from A to Z but I’m still a relative beginner with Z and just feeling my way along. For the running boards I just formed a single layer ‘plane’ by bending and shaping until I was satisfied with the shape and. again, just ‘masked all’ and creating a thin extraction. I then I just duplicated and mirrored over on the Z axis from the deformation menu.
Hey Gary, haven’t planned that far ahead but maybe :).
Thanks for looking guys. Have a great day.
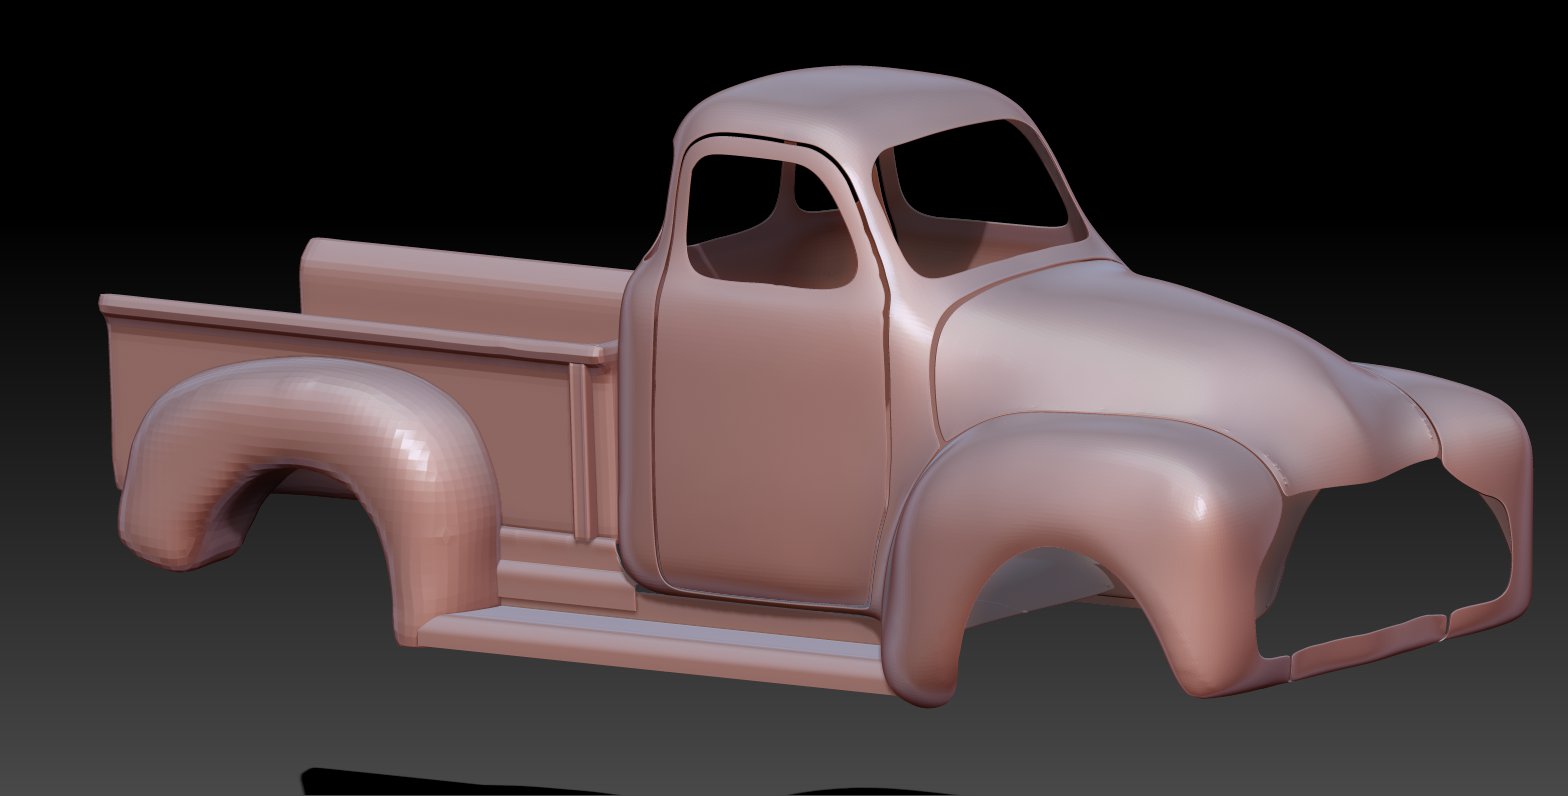
Just polygrouped the main parts of the primary body today. Would like to separate them out so, in the long run, I’ll have the ability to open the hood and doors and I can delineate the windows with a transparent texture and the frames appearing definitive. Haven’t settled yet on how I’ll go about that or what method would most effectively separate them while maintaining a nice fit when everything is closed. It is my intention to stay exclusively in Zbrush with this project though. If anyone has been through this before and has a suggestion I’m all ears. :).
Love the ‘Group Loops’ another very clever tool
Good Zbrushing all.
Ezra
The truck is coming along fantastic. How’d you get the polygroups? Did you paint them then polygroup or did you mask them then polygroup or another way?? Ya, I am still trying to learn how to polygroup (I tried doing it the other day, but things didn’t work out… I am sure I am missing a step somewhere). Will try again later, it looks like such an easy thing to do. Anywho, the truck is coming along REAL nice. Keep it up, keep it up!
Hey Dragon. I’m actually just discovering how to do much of what I do using a combination of Google searches for hints on how to best use the Z features and trail and error (many errors, LOL). For example I just went back and and redid all the poly grouping and group looping because I realized that I had done a poor job of grouping to optimize the intended attempt to create the main shell of the cab and separate subtools for each of the two doors, the hood, the fenders, the windows, the grill and the inside area of the front fenders and below the hood. When I’ve realized that it’s best to have all the polygroups you’ll eventually need prior to creating the group loops as it’s much more difficult to change the grouping around after the grouploops have been created. For instance, if you want to open a door later you cant have it grouped with the other door or they will want to move together as a single subtool. Not good. I’ve been using masking to create the polygroups, to be honest I really haven’t done any poly painting, still something I need to learn, so in this case I just used what I know, the masking.
Below is the regrouped cab. You can probably see the difference from two post up.
Good Zbrushing all.
Ezra
Ah man, please, please… when you have the time, PLEASE make a video on how you did this polygrouping. You see, if I was creating the truck, I probably would have made EACH element of the truck as a seperate subtool first. But, I can already see the benefits of using YOUR METHOD… SPEED!! Your way is so much faster to getting to the end result. So please, when you have the time, a ‘how to’ video would be out of this world. And yes, the second round on your polygrouping looks much, much better (cleaner). It looks like all the other PRO stuff I have seen up here over the years. I like how everything looks so ‘perfect’ for what it is… know what I mean? I am sure you do. OK buddy, gotta get ready for the day. Will be checking your post tonight and over the weekend. Best.
Hi Dragon,
In ZClassroom the technique you are looking for is demostrated in the Concept Car video. Basically you polypaint on the model using bright contrasting colors and then convert the polypaint to polygroups. Then you use the GroupsLoops button in the Geometry pallet to “automatically” clean up the edges defining the poly groups. Watch that video and I think it will give you what you need. One heads up: in the video they mention using the layer brush to paint, but the stoke shown in the video is the DragRec which is due to a bug in the version of ZBrush used to make the video which caused the stroke to not update when switching brushes. What you want to do is use the Layer brush with no Alpha, stroke set to Dots or Freehand, and focal shift set to -100. That should do the trick.
Dave
hey EZRA52 nice to see other people attempting vehicle modeling with zbrush… so far i like the structure and shapes you have incorporated to make the forms flow through each separation of structure, and nice use of edge loops through out would be interested to see your workflow for what you have done so far im guessing a mixture of subtools and remesh… really i hope to see more of this kind of work now that we have the features of dynamesh and clip brushes… i attempted to do something similar like this back in zbrush 3 you can see that here http://www.zbrushcentral.com/showthread.php?50515-My-Sculpts-Thread/page9 in my thread mostly used just clay and move brush to block it out… would like to really refine it with the features now in zbrush 4 especially since all the new hard surface brushes were incorporated…
but yeah looking forward to this progressing and seeing where you go with it… 
Hi gentlemen,
Dave, thanks for helping Dragon with the information on that group loop video. I agree that that should be very useful to help he and others understand how that all works. Additionally, I’ve never made a video., lol.
Thanks for the kind words and encouragement Dragon, I appreciate it.
Hi Troy, I took a look at your thread, your quite talented. I would like to try some organic stuff eventually also but I feel I need to learn some anatomy 1st, thinking about taking Ryan Kingsliens class but it may be cost prohibitive. I do have Scott Spencers ‘Zbrush Digital Sculpting Human Anatomy’ though in either cased. I’m a big animal lover too though so sculpting critters would be fun. I’m not that into monsters. I guess I’m too old. 
Well, I split up the group looped cab, after re-grouping it one more time  . I took each piece and extracted it with all smooths turned off and thickness set at .002 to just get a relatively thin shell but double sided. When you extract, the program automatically group each face (including a separate group for the edge pollies, very cool. The coders writing this program are so smart, I never ceased to be amazed.
One of my interest in doing this all in Zbrush is to try and compare the ease and speed of building a Zbrush vehicle vs building a vehicle in Blender (the only other program I have any experience with).
Thanks for checking out the thread. By all means, please let me know if you see a way to do these things that’s better/cleaner/more effective in time or effort. I realize I have tons to learn about the capabilities of this very cool program.
Ezra
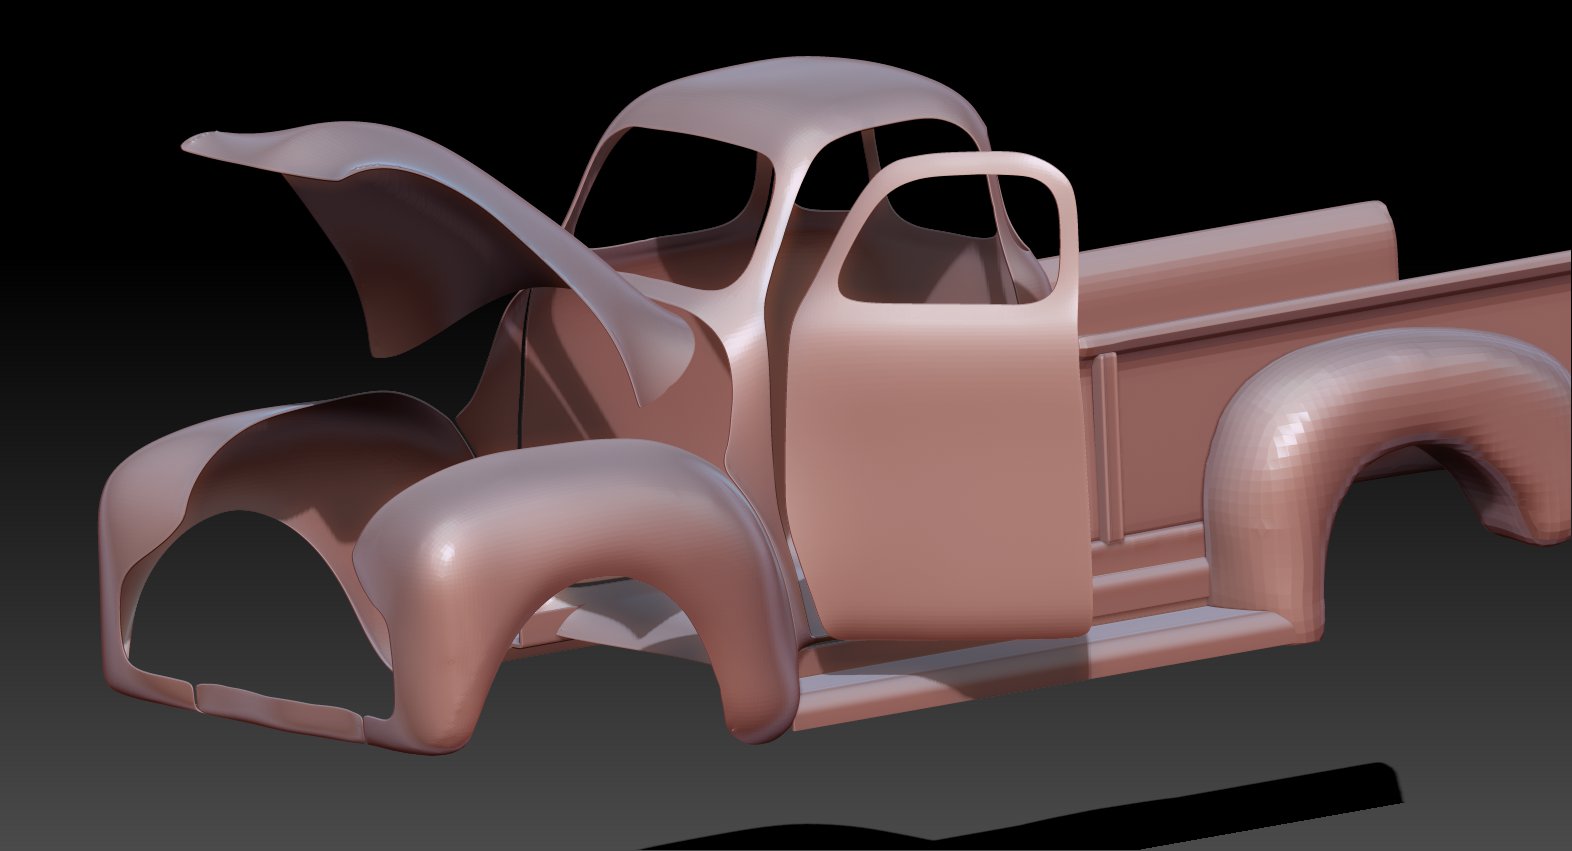
That’s looking very sharp, Ezra! I love having moving parts on a 3d model.