ZBrushCentral

Easy Retopologising models preserving the fine-detail levels (by Rastaman)

Solution for retopoing high detailed merged meshes:

Retopo-Merging detailed Meshes.jpg

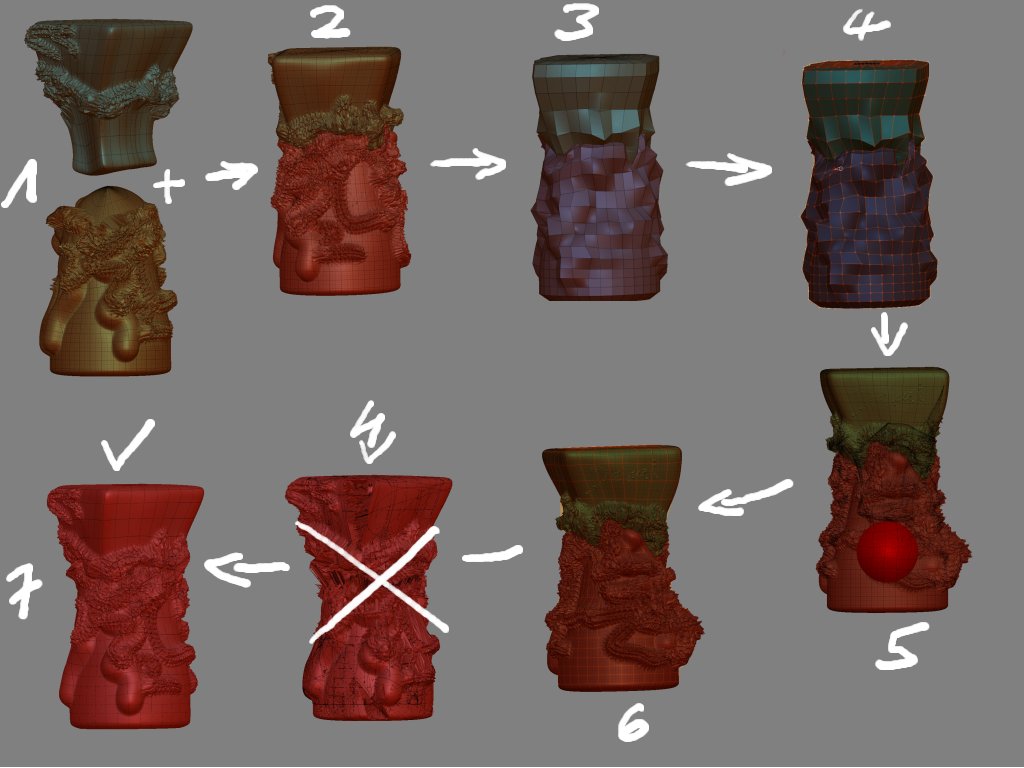
  1. You have two (or more) separate meshes with high-poly-details, whether they have lower subd-levels or not,whether they are mostly identical in their subdivision or not, this doesn’t matter.

Make one the active tool and all other parts the subtools (Tools -> Subtools -> Append) of the first and sculpt, move and scale them just as they should be in the later merged final mesh. The border where they connect should be sculpted as good as possible to already match the later outline in this area. This saves you some extra work when you later retopo.

Perform Tool -> Make PolyMesh 3D for all in their highest possible detail-level.
If you have lower subd-levels on them, do that again for all in their lowest subd-levels.

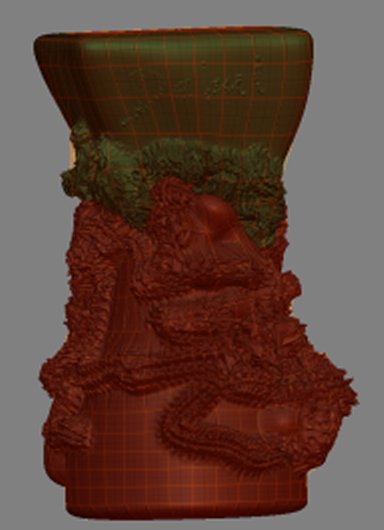
  1. Now we bring them all together into one single model ( a high-poly and if available one further low-poly-model). Therefore choose one Polymesh you just created and insert the others of the matching poly.level with the Tool -> Geometry -> Insert-mesh-command.
  2. Do that for all the high-level as well as for all the low-level Poly3D-Meshes.

Now you have one single high-poly-model and if available furthermore one low-poly-model.

  1. If you have the low-poly-model, then do the retopo-work just as I describe it in the tutorial, make Adaptive skin and

5)+6) use it for the described detail-transfer-procedure in conjunction with the high-poly-mesh.

If you have only a high-poly version, then you have to use this what means you will not be able to use the quick Shift + LMB-Drawing method but instead you must create all topo-lines by freehand onto the already high-poly-surface. But you can already use the Tool -> Rigging -> Projection function and transfer all details directly onto your new retopoed mesh.

:-1: On very complex and fine details, sometimes wired result can occur in the ‘a’-preview. In that case lower the value of the Tool -> Rigging -> Projection strength.
You can later reveal missing details with the Morph-Brush if you previously stored the morph-target in your high-level mesh before you enter the detail-tranfer-setup.

  1. If you worked according to the procedure described in my tutorial, you will have now at least 4 subd-levels with all details transferred to the new clean merged mesh. :smiley: :+1:

One further explanation:

My descriped setup for the detail transfer will always produce a new mesh with 4 subd-levels, regardless if the high-poly-mesh had lower subd’s or not. :bulb:
This is the reason why this method also works in this special case as well as with any mesh of any poly-count. When calculating the final projected mesh, ZBrush also calculates max.4 Subd-Levels downscaling from the high-poly-status if you set the slider in the Topology-Tab.
All you need is a high-detailed mesh where all parts are thrown together into one model that can be choosen in the Select-dialog of the Rigging-panel for the zsphere-setup.

The low-poly-version is not a must, it just makes the whole retopo-process much easier and quicker because you can use the quick-retopo-drawing-method along the low-poly-structure instead of doing all the work by freehand. But you definetly don’t need it to transfer your high details into a new retopoed mesh.

If pixologic upgrades the calculation to more subd-levels, this method would be really 100 % perfect. But so far, the lowest 2 or 3 subd-levels will always miss (when you used a Level 6 or 7 mesh). So, 80 % perfection is not soooo bad, isn’t it ?:laughing:

I was able to reconstruct the lower sub-D’s from my mesh that I
tested this process on (not the multiple sub-tool process, but just the
fine detail transfer process) in order to get back down to the retopo
mesh I made. Originally, I thought I was going to have to
use Z2 for the reconstruct, but I tried it in Z3 and it worked (on another
mesh, my ‘make-1-mesh’ result wasn’t able to be reconstructed in Z3, but
Z2 did it without issue).

Now my problem is swapping out the new better topo mesh’s UVs.
I’ve tried exporting out the level-1 Z3 .obj (with GUV, AUV, or Planar)
into either UVLayout or XSI (with UVLayout plugin), but I either end up
crashing Z3, or the UVs get ‘fractured’ and end up linking to other points
in the UV-space that are discontinuous. So when it works, it’s useless for
displacement generation, as the resultant map is jacked-up due to the
discontinuous UVs. :frowning:

(on a side note, XSI 6.02 only saves out lower case .obj and Z3 saves
all caps .OBJ, so I can’t directly overwrite the Z3 .OBJ on export…sigh)

I’m not sure what the crashing is all about, but it was by far the most
prevalent result. Anyone have a bomb-proof solution for the process of
swapping out for new UVs created outside of Z3?
(the wiki tutorial on
the transfer of textures is very thin on info for outside package UV swapping)
I’ve spent about 6 hours between trying to retopo, and trying to get usable
UVs re-imported… :confused:

WailingMonkey

Rasta, you are getting me all excited! I’m trying it right now, but I must be doing something wrong. Here’s what I did:

[wrong.jpg](javascript:zb_insimg(‘63999’,‘wrong.jpg’,1,0))

A. I made a high poly version of the two pieces in one object, and a low poly version (not shown).

B. I made a retopo of the low poly version with a transition from head to neck. The adaptive skin preview gives a nice merged neck area.

C. I pressed make adaptive skin.

D. The step that doesn’t work out:
I selected my high poly version of two pieces in one model. (the one shown in A.)
I select a ZSphere
Under tool:rigging:select I select the same high poly model.
Under tool:topology:select I select the adaptive skin model shown in C.

E. I get the same model as in A, with an neck area that can’t be merged!

I suspect the fault to be in step D… Can you spot what I do wrong Rasta? If this would work I’d be ever so grateful…

Apart from this: I never knew Morph brush could help in all this: how does it work exactely?

ignored post
deleted post
sorry for post here

@ WailingMonkey:
Of course it is possible to reimport new UV’s that you created whether inside ZB or outside with another app. Go to Plakkies Topo & FlowLab-Thread and read my post for that issue from 1 or 2 days ago. Another member asked there the same.

Now to Plakkies problem:

Plakkie, for a clean result you have to sculpt the both parts (Head and Torso in picture A.) already when they are 2 separate parts in that way that there is a smooth transition between the two models on their borders. You have too big and sharp angles there, so you will always get those unwanted wrinkles, no matter what you try.
Please look again on the pictures and the text above, I described this in step 1):

The border where they connect should be sculpted as good as possible to already match the later outline in this area …
But you can also use the smooth-brush there and reshape this area in the final retopoed-version.
Go down the 4 new subd-levels and work through each level to get a clean and wrinkle-free area.
To preserve finest details like skin-pores and skin-wrinkles there, you can also first store a morph-target in the highest of the 4 levels, then use the Project-morph-feature:

The Wiki says:

Project Morph: This option allows the user to relax their mesh and remove polygon stretching created by using the Pinch Brush or lots of of the Tweak Brush.

To use Project Morph do the following:


  1. Set your geometry level to the highest level. For this example, let’s say level 5.
  2. >
  3. Store a morph target by pressing Tool: Morph Target: StoreMT.
  4. >
  5. Go down 2 levels of resolution to level 3 and delete all higher levels of resolution by pressing Tool: Geometry: Delete Higher. Don’t worry, your hi-rez geometry is still there because we stored a morph target.
  6. >
  7. Smooth out the area you want to ‘relax’ with the Smooth Brush.
  8. >
  9. Divide two more times to return your model to resolution level 5.
  10. >
  11. Set the Tool: Morph Target: Project Morph slider to 100. This will project the morph target with the stetched polygons into your current smooth mesh. The result is a ‘relaxed’ mesh.
  12. >

Concerning a quick entrance into using the morph-brush download the yesterday actualized version of this tutorial and take a look in the Appendix-section.:wink:

If you don’t get around with that, I can offer you that you send me the two model-parts and I try my best.:wink:
But I am sure you will get this fixed by yourself.:smiley:
No pain, no gain…:cool:

Aaahh, one more thing, Plakkie:

Your picture D. is not as it should look when you followed my workflow.
There is an major fault and I suppose this is your problem right now.

When you rig up the high-poly-mesh with the zsphere and load the low-poly-mesh in the topology-selection, you should see exactly the same low-res-topology than in your picture B.

The resolution of the yellow topo-mesh in your picture D. is much to high, and I assume you selected the wrong mesh in the topology-selection-dialogue.

It looks for me that you selected in both dialogues, rigging and topology, the same mesh, the High-poly !

Then your wrong result is clear, because the high-poly-mesh contains polys and points that go inside the the structure because although both parts are inserted in one model, they are still totally separated structures with different topologies !

Then you get as result exactly the same model that you put previously in the process, a duplicate of your original high-poly-model, containing two separate meshes that only stick together, but are still departed.

A right setup should look like this:

Bild5.jpg

Thanks for the response, Rastaman. I’ve read your post you’ve indicated
and have not altered the mesh’s point count. What’s ‘fuzzy’ is that Z3
exports with flipped normals. So I have tried both ‘as-is’ re-UVing and
re-UVing after I’ve flipped to proper normals within XSI. Still crash. I’ve
tried ‘Disable UV’ before re-import, and leaving the same Z3 UV’s as
they were on export. Still crash. I’ve also tried exporting from Z3 with
no UVs and re-importing with my new set. No joy. I’m going to try to
remove my highest sub-d (it’s at a little over 4mil) and see if it’s just
a memory problem…

My other concern is the naming extension difference.
As I mentioned, XSI saves only ‘.obj’ and Z3 saves ‘.OBJ’, so I can’t
truly overwrite the file (XSI will save the same named file : filename.OBJ
as filename.OBJ.obj), so I have to export and re-name it via Explorer
and I wonder if this is causing the crash…

This crashing tends to be quite disconcerting and not really helpful in
establishing what’s going wrong…it’d be far nicer if the operation was
canceled with a warning indicating why it was canceled…but that’s
probably wishing for too much. :cry:

WailingMonkey

Hmmm…, very strange.:confused:

I reimport UV’s frequently within the polypainting workflow (a tutorial about this is still in work :wink: ) and have no problems. But theses UV-Sets are generated within ZBrush, not with another app.
If this fails also in your case, there is definetly something wrong within your ZB-Settings.

OMG!!! Rasta, I think I took the right model for the topo information, I can’t be certain, but I did it again just now, and now it works!!!

[right.jpg](javascript:zb_insimg(‘64005’,‘right.jpg’,1,0))

Rasta, you are a life-saver! Thanks so much for thinking along and presenting a quite easy solution. Means a lot to me to be able to continue this project knowing I can join the head and body later on without a problem.

There are two minor glitches in mouth area, but I’m confident I can solve that with a better topo.
One thing: I only got 2 subdiv levels out of it. Not much of a problem for me, but shouldn’t I get 4?

Again, many thanks!!! :+1: :+1: :+1:
Plakkie

Glad that it works now.:smiley:

Concerning the subd-levels:

Maybe it’s a matter of ones specific hardware capability how many levels Zbrush can calculate, but on my system I can get 4 subd-levels equal to the Subdiv-slider in the Topology-Tab.:confused:
Check this slider, the default value is 2, so maybe you forgot to increase it ?
(Tool -> Topology -> Subdiv-slider)

Rastaman, Thank you so much for this guide.

Thanks for all the tutorials!! I really appreciate it!

Me too. Thanks! :slight_smile:

havent really gotten it too work though somebody maybe can help? I get this issue when i use projection why does this happen?

First, reduce the value of the adaptive skin -> density-slider.

This is the most common fault that this value is set too high.
Try a level of 2, then 3 or 4. This should solve your problem. :+1:

Second, the projection-strength might be to high.
lower the value in that case below 1 and try again.

So, a common hint for all who get wired results when previewing the projected topo-mesh in adaptive skin preview:

Begin your attempt with a low Density-value in the Tool -> Adaptive Skin -> Density setting.
Try a first time with a level of 2.
If it looks right, increase this value step by step (3 then 4) and always press ‘a’ to preview your results.
From some density-level on (depending on the polygon-count of your retopoed low-poly-mesh), ZB3’s algorhythms will fail to produce a clean result.
So that will be your individual adaptive-skin-density-limit you cannot overcome.

The tutorial is updated with that hints.:wink:

Important change in the new tutorial-version:

A big credit to nRatio for giving me an essential hint about a fault I made in the previous versions of this tutorial.

As you already might have noticed above, I changed the advice for the Rigging -> subdiv-Level-setting from 4 to 1.

The Topology -> subdiv-slider must be set to 1, then you will get the same subd-level-amount as what is set in the Adaptive-skin -> Density-slider-value, but only if there was no previous adaptive-skin-preview etc. with any higher setting of the subdiv-slider !

If there was, you have to exit the setup and rebuild it totally new.

So the very first thing you should do after loading both meshes in the rigging- and topology-slots is to set the topology -> subdiv-slider from 2 down to 1.

A short note concerning Version 3.1:

The technique still works, but under 3.1 you will no more see your retopoed low-poly-cage in the final setup for transfering the details.
Though the process should still work, you will not be able to change something of your low-cage topology in this final step.

A huge drawback, unfortunately not the only one we have to live with 3.1 within the topo-features.:cry:

My descriped Topo-problem with 3.1 is solved thanks to --E–.

After having pressed ‘Edit Topolgy’ and then performed Ctrl + Shift + LMB-Click (unmask all) , the low-poly-retopo-mesh is visible and editable again.

I forgot to perform my own advice that I gave in my tutorials. :o

Seems I’m getting old. :rolleyes:

But the other point is that this masking-problem is now current in 3.1 where 3.0 had this problem only a few times.

So it would be nice if Pixologic could fix this with the next patch.