Sweet, I wil try it out soon  thanks!

Thank you~
Thanks men
Hey! Steve great tutorials many thanks! one question is it possible to render out depth pass quick time movie? will appreciate it if you can tell us how if so…!
Thank you
Great Tutorial! Bookmarked!
Thanks, Hemin (and everyone else!) for the kind remarks. As for rendering out a depth pass as a quicktime movie, it is possible, but you have to use an old 3D trick to get it done.

Thanks a million for your effort!! it worked beautifully five stars all the way buddy…

2 Steve Warner
Hi there, Steve…
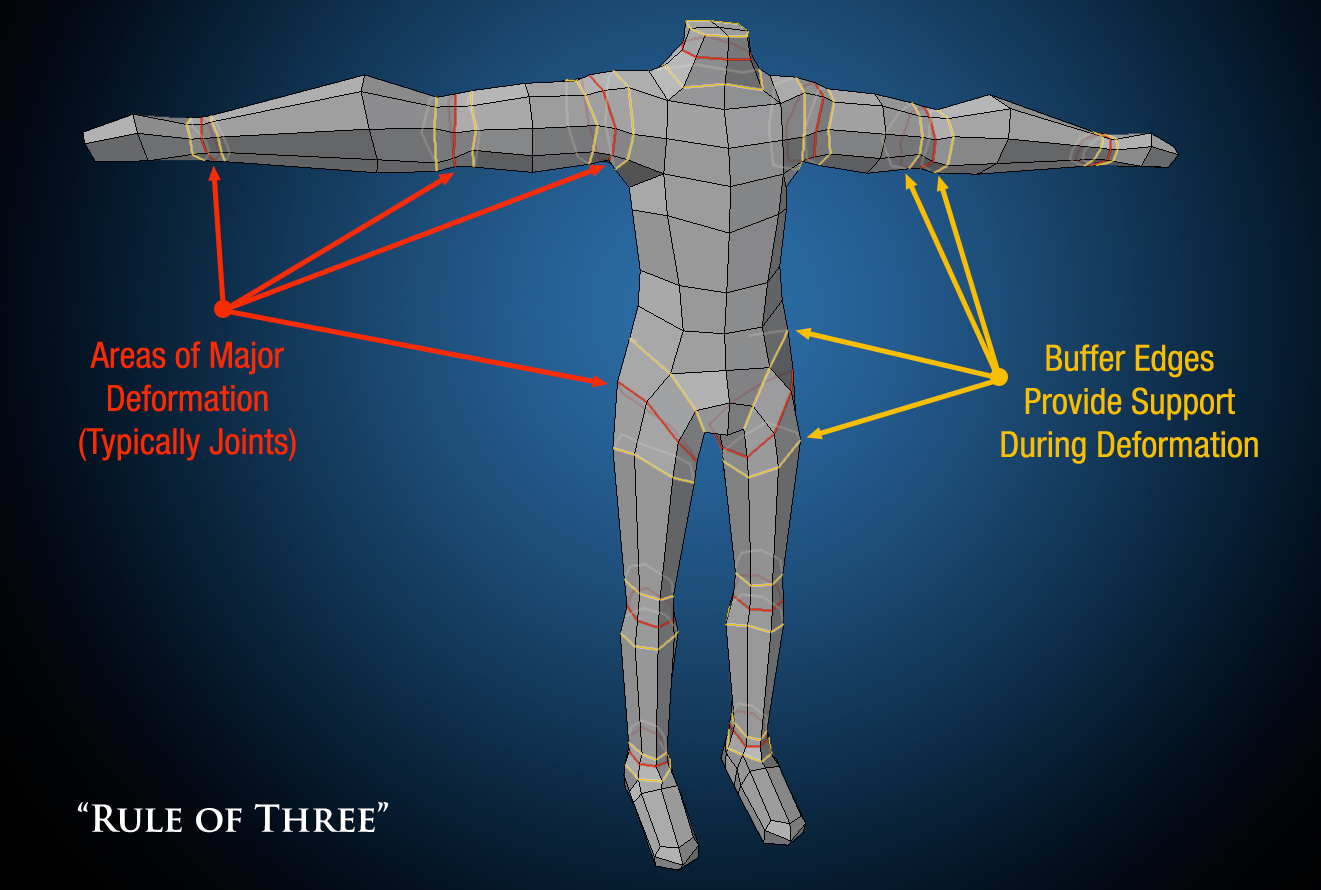
In your tutorial you was talking about the rule calling the “Rule of Three”. Please can you tell what do you mean saying “Rule of Three”? Can’t find anything that can explain this rule to me Oo Thanks.
The “Rule of Three” is a guide for low-poly modeling. It describes how to place edges around joints to ensure proper deformation. It’s especially important for new modelers to understand, as they tend to place a single edge at the point of deformation which yields poor results when animated.
In most cases, objects coming from ZBrush (especially those built with ZSpheres) will observe the “rule of three” as ZBrush meshes favor even poly distribution over polygon economy.
Here’s a simple image to help illustrate the concept.
thanks a lot!!! very helpfull tips!!!
This is so usefull for me
Thanks
thanks for all, great tutorials
excellent training videos, many thanks
steve g
This is exactly why I love Zbrush. Magicians revealing their magic tricks. There’s no place like Zbrush planet. 
hi, there! Thanks for your works, it’s very useful!
But I have some problems that I’m sure I did what you do in the Multipass video, some passes could not coincide together(in the same frame the rendering from the same angle is different).
Do you have any idea about this?
Thanks!
hi, there! Thanks for your works, it’s very helpful!
But I have some problems that I’m sure I did what you do in the Multipass video, some passes could not coincide together(in the same frame the rendering from the same angle is different).
Do you have any idea about this?
Thanks!
Sorry for clicking twice;)
Hey man thanks for the vids but I have a question. I tried doing the shadow pass light you described and no matter what I did I can’t get any shadows to show up on my model after I use the Flat/White fill you say to use. I have 4R2 so i don’t know if anything changed since 4.0 and your video, but when I render the image (BPR) it takes just as long as it would if it had shadows but none are showing up on my screen…accept when I go to the BPR Render Pass menu and look at the render icons…there is one that shows shadows…but how does that relate to what you are telling me to do? Yours are showing up right on the screen! Not to mention it is taking for ever to render and I only have the one default light set up.I don’t know how that could be an issue since I can render it BPR with my original textures and get nice shadows to show up on screen. Can you give me some pointers please?
Hi Steve,
Thanks for your tuts for this! I’m also having difficulty with creating a shadow Pass and AO Pass. Similar to the post before mine. When I use BPR set to Best, I only get a white silhouette of my ZTool. On page five of your tutorial, step 14 you mention using the MGray. I downloaded your file and it seems to work fine, so I’m confident I’m doing something wrong.