OMG! HE IS LIIIIIIVE!!! Congratulations!
this is amazing and the most real cg eye I have ever seen
I have to disagree about this workflow. In our experience the only reliable and accurate way is to keep the original mesh that you’ve imported into Zbrush and use that for the displacement extraction.
This is because at the first subdivision operation, Zbrush will also modify the base mesh and significantly reduce its volume and smooth out the shapes and forms. If you try to displace this mesh to get back to the sculpted result, the base mesh vertices would have to travel longer and usually will not align with their desired final position properly.
If you use the level 1 mesh from Zbrush, it is in particular impossible to retan sharp edges and pointy tips. Countless numbers of swords, fangs and spears have been ruined in our previous projects when we’ve tried to use this method. If you export your sculpted mesh and compare it with the displaced lowres mesh, there’ll be a lot of difference. Even with completely freeform organic characters; but as soon as you try harder edges, the results will get even worse.
If you use the Cage option, it doesn’t help enough, the results are not really better, just different.
On the other hand, storing the original base mesh as a morph target - or reimporting it for the map extraction - will always get 99% close to the sculpted mesh in our experience.
If you decide that the sculpted mesh has changed too much compared to the morph target, it’s still not advised to use the level 1 mesh.
Instead, you should import the base mesh into a clean scene, divide it once and go back and export the level 1 mesh. Then export the level 1 mesh of the sculpted version (with proportion changes) and use it as a blend shape. Now wrap the original base mesh to this blendshaped level 1 mesh so that you can transfer the results of the proportional changes, while keeping the original point order.
I know it sounds a bit complicated at first, try to understand the underlying principles and then it’ll make sense…
As for the character, I think it is by now beyond the point where anyone could mistake it to be a real living person’s photograph. Congratulations!
Amazing work Luc. Extremely inspiring.
Congrats man 
Wow, your work has improved greatly as of recent! I still remember your original Arnold Schwarzenegger renders back from like 2005 and even then they were amazing. But now this is like a whole new level of awesomeness! I would say your work reminds me of, or is in the same class, as the likes of Jacques Defontaine, Max Wahyudi, etc.
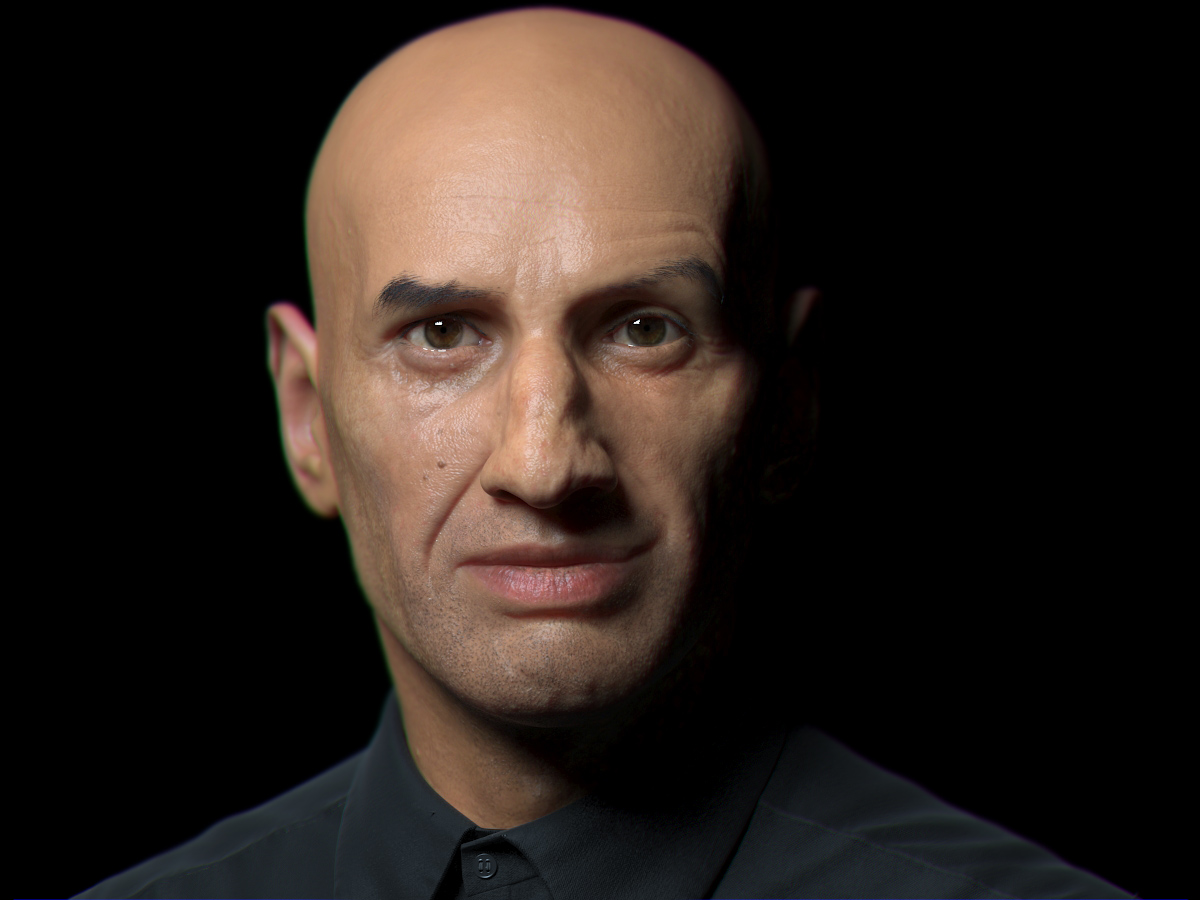
A couple things stand out to me as being really well done: The eyes. Not just cornea itself, but the surrounding skin area. There’s some very nice subtleties going on w/ the SSS and the right amount of spec to make it believable. The tear duct area and the lashes are also very convincing.
Also, the lips look very well done! It looks to me like you’ve applied just the proper amount of translucency to make it look believable.
Only crit is that I think the eyebrows look very artificial. Perhaps a little thin. They appear to lack depth, like they’re painted on, even though you said you’re using Hair Farm, correct?
Couple of questions, hope you don’t mind What version of VRay are you using in conjunction w/ Max? Last version I used (1.47, I believe) seemed to PALE in comparison w/ Mental Ray’s SSS capabilities. What changes make it stand out over Mental Ray, at least for you? And how many painted maps are you using to achieve this look? Lastly, were you in any way inspired by Marc Mordelet’s (aka visionmaster2 on CGTalk) VRay skin shader from a couple of years ago? Any insight would be greatly appreciated!
GJ!
Hi all thank’s for all you’r kind comment, it motivated me to continue!
I’m working on the hairs now, I need to make them hyper real, not an easy thing to do! lol
MisterE : Thank you for you kind comments  As fo the eyebrows, I know, the problem is that I have converted to poly and rendered them in vray, but renders AA suck at rendering thin lines of polygons … so I will render them in hairfarm later or maybe in hair and fur since vray now support it . But all the rest of the hairs will be rendered with hairfarm wich is much better and I will comp them for the still.
So I use vray 1.5 sp4 for 3dsmax 2010 and that new vray have the sss2 shader , wich is much better then the vraymtl for doing sss. You can’t get realistic skin with a vraymtl, impossible! I tried so many time… impossible, so don’t wash your time on this one, use the sss2.
what make me choose vray sss over mr sss is that the front scatter is much better in vray and it do not dissolve the diffuse like mr does and the displacement details remains there also. An other thing, Vray GI is better then mr and is more physically accurate. the sss2 is also more accurtate so it help to get better result.
On the other side, vray has a little trouble when the sss is too mcuh strong, it tend to became greenish, lack of control over the sss layers and especially on the back scatter and reflection, but, in any case, I got much better result with vray then I did with mr so.
And no, it has nothing to do with Marc Mordelet’s sin shader experiments.
For the maps, it’s pretty baisc now, I still have to tweak the diffuse, I just have a diffuse map and bump map , in the spec it’s a noise for now, I will had a spec map later.
and thank’s to pixologic for Zbrush , I was able to do skin pore details even at only 2.6 millions poly’s so it’s cool! Zbrush is very well optimised for doing super detailing stuff, much more then Mudbox compared to the same amount of poly and the workflow for doing that is better also.
LY : thank you! and I totally agree with you about your workflow for the displamcent maps.
guillom: Hé merci! ouais ben c’est la façon dont ils sont modéliser qui aide ils sont physically correct si on veut, le shader ca aide aussi mais le modeling vraiment car ca fait reagir le shader correctement, la texture aussi aide beaucoup, et la reflection,refraction…bref tout, meme le liquide etc , c’est un tout et faut balancer tout ca pour que ca fit. j’avais fait une version avec de l’alpha qui aurais probablemnt pu donner encore mieux mais bon, le sss2 ne support pas l’alpha donc… j’ai oublier cet approche.
Sycron: No I did not even use hd sculpting. I had only 2.6 millions polys, with more poly I would have need able to sculpt also some really fine wrinkles and add more details, but I must wait to have an other pc lol.
Hey no update for now, I begun the cloth but too early stage to show something, gonna takes some days to get the hairs stuff done, lot’s of work in that… he have a weird haircut and many fluffy hairs :lol: .
Wow!So realistic,I try use fast skin of mr many time too,but vray’s sss2 is more real.
Could you tell me how large Ram,Cpu you use and use vray render this 1024x1024 size need how much time?
Hello,
My company likes your work and wants to get in touch with you about rates, availability and skillset for some contract work. Please email me at designer_jobssg@yahoo.com.
Looking forward to hearing from you,
Vivian Milani
Wow, that’s unbelievably awesome…Another top row coming up…
Duuuude!Perfect! Skin, eyes, everything.
Hi all!
Just a quick update, I just remove the hairs from the texture but I still need to adds the details.
And I did the cloth, will add some little hair on it later and some little dust on it.
so, the eyebrows will be rendered in a separate pass in hairfarm, so I will not have that aa jagged border. Need to add more details to the diffuse, since I did not work it, I had took a couple of days of brake, but I get to this this week, will try a test of hair soon, to see if it can be as realistic as the rest, if I cannot get the as I want, I think I will make him a hat, and maybe a magician versio Will see how the hairs turns out.
No way!!, that is a picture isn’it?!!.. sooo a w e s o m e!!! a perfect skin on it woooow.small_orange_diamond
hey Big guns, nice to see you here!
anyway
TOP ROW!!!small_orange_diamondsmall_orange_diamond
Great Work Big Guns, the blink in the eyes is too white …otherless TOPROW!
Probably the most realistic human I’ve seen. This is called photo realism. Avatar level. Congratulations!
you are waaay better than avatar! Congrats! TOP ROW mate!
Pretty darn amazing. Hats off to you.
Wow! Amazing work… very realistic! small_orange_diamondsmall_orange_diamondsmall_orange_diamondsmall_orange_diamond
I’m just waiting, only five stars for now.